Honda CR-V: Automatic Transmission
Honda CR-V (2006–2011) Service Manual / Transaxle / Automatic Transmission
Special Tools
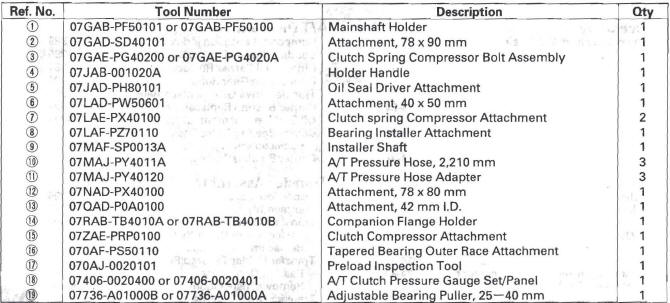
07HAE-PL50101 may also be used to substitute one of 07LAE-PX40100.
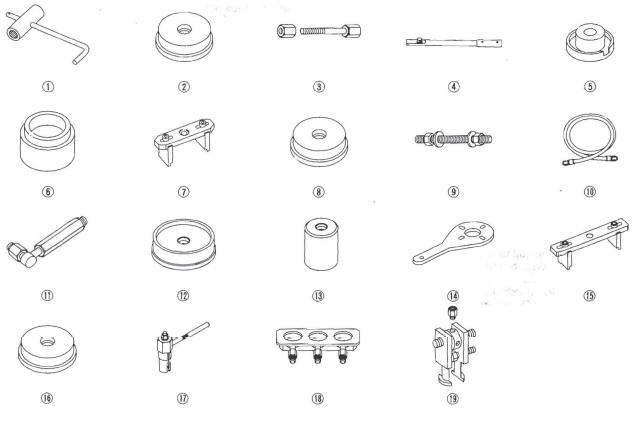
- Mainshaft Holder
- Attachment, 78 x 90 mm
- Clutch Spring Compressor Bolt Assembly
- Holder Handle
- Oil Seal Driver Attachment
- Attachment, 40 x 50 mm
- Clutch spring Compressor Attachment
- Bearing Installer Attachment
- Installer Shaft
- A/T Pressure Hose, 2,210 mm
- A/T Pressure Hose Adapter
- Attachment, 78 x 80 mm
- Attachment, 42 mm I.D.
- Companion Flange Holder
- Clutch Compressor Attachment
- Tapered Bearing Outer Race Attachment
- Preload Inspection Tool
- A/T Clutch Pressure Gauge Set/Panel
- Adjustable Bearing Puller, 25-40 mm
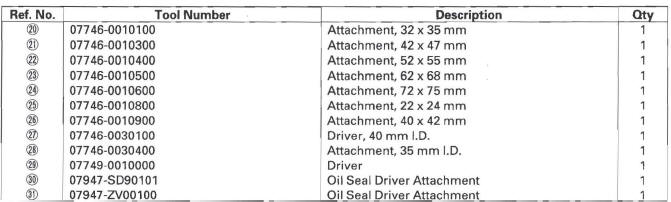
07736-A01000B or 07736-A01000A must be used with commercially available 3/8 "-16 slide hammer.
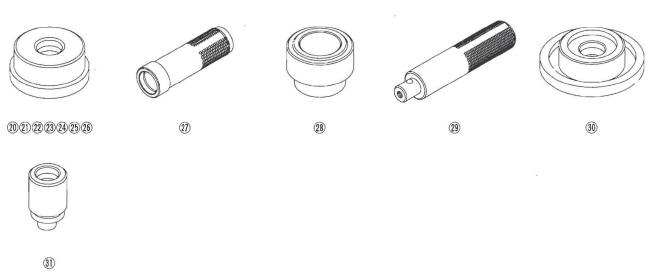
- Attachment, 32 x 35 mm
- Attachment, 42 x 47 mm
- Attachment, 52 x 55 mm
- Attachment, 62 x 68 mm
- Attachment, 72 x 75 mm
- Attachment, 22 x 24 mm
- Attachment, 40 x 42 mm
- Driver, 40 mm 1.0.
- Attachment, 35 mm 1.0.
- Driver
- Oil Seal Driver Attachment
- Oil Seal Driver Attachment
- General Troubleshooting Information
- System Description
- DTC Troubleshooting
- Road Test
- Pressure Test
- Shift Solenoid Valve
- A/T Clutch Pressure Control Solenoid Valve
- ATF Temperature Sensor
- ATF Level Check
- ATF Replacement
- Transfer Assembly Inspection/Removal/Installation
- Transmission Removal/Installation
- ATF Cooler
- Shift Lever
- Shift Cable
- A/T Gear Position Indicator
- A/T Interlock System
- Transmission End Cover
- Transmission Housing
- Valve Body
- Torque Converter Housing
- Shafts and Clutches
- A/T Differential
- Transfer Assembly Inspection/Disassembly/Reassembly
READ NEXT:
 General Troubleshooting Information
How to Check for DTCs with the Honda
Diagnostic System (HDS)
When the powertrain control module (PCM) senses an
abnormality in the input or output system, the D
indicator (A) in the gauge control modu
General Operation
The automatic transmission is a combination of a 3-element torque converter
and triple-shaft electronically controlled
unit which provides 5 speeds forward and 1 reverse. The entire unit is
position
SEE MORE:
Tire Pressure Monitoring System (TPMS) - Required Federal Explanation
Each tire, including the spare (if
provided), should be checked
monthly when cold and inflated to
the inflation pressure recommended
by the vehicle manufacturer on the
vehicle placard or tire inflation
pressure label.
(If your vehicle has tires of a
different size than the size indica
MICU Input Test
NOTE:
The MICU turns on the headlights (high beams) in a dim mode for the
daytime running lights under the following
conditions:
The ignition switch is ON (II)
The headlight switch is OFF
The parking brake is released (parking brake switch OFF)
If the vehicle is equipped with an opti
© 2016-2026 Copyright www.hcrv.net
