Honda CR-V: Road Test
1. Warm up the engine to normal operating temperature (the radiator fan comes on).
2. Apply the parking brake, and block both rear wheels. Start the engine, then shift to the D position while pressing the brake pedal. Press the accelerator pedal, and release it suddenly. The engine should not stall.
3. Repeat step 2 in all shift lever positions.
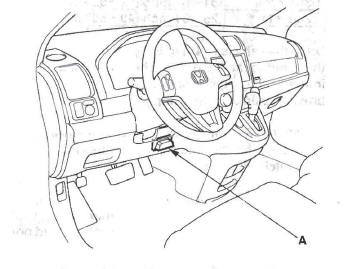
4. Connect the HDS to the DLC (A), and go to the A/T data list. If the HDS does not communicate with the PCM, troubleshoot the DLC circuit.
5. Prepare the HDS to take a HIGH SPEED SNAPSHOT (refer to the HDS user's guide for more details if needed):
- Select the High Speed icon.
- Select these parameters:
- VSS veh speed
- Output Shaft (Countershaft) Speed
- Input Shaft (Mainshaft) Speed (rpm)
- RPM engine speed
- Relative TP Sensor
- APP Sensor A
- ATF Temp sensor
- Battery voltage
- Shift control
- Brake Switch
- Set the Trigger Type to Parameter.
- Adjust the Parameter setting to APP Sensor A above 1.75 V.
- Set the recording time to 60 seconds.
- Set the trigger point to -30 seconds.
6. Find a suitable level road. When you are ready to do the test, press OK on the HDS.
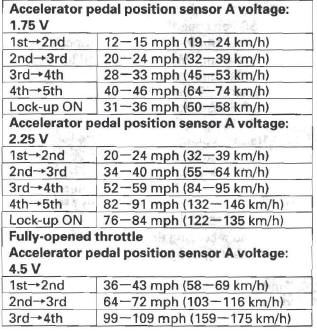
7. Monitor the HDS and accelerate quickly until the APP Sensor A reads 1.75 V. Maintain a steady throttle until the transmission shifts to 5th gear, then slow the vehicle and come to a stop.
8. Save the snapshot if the entire event was recorded or increase the recording time setting as necessary and repeat step 7.
9. Adjust the parameter setting to 2.25 V. Test-drive the vehicle again. While monitoring the HDS, accelerate quickly until the APP Sensor A reads 2.25 V. Maintain a steady throttle until the transmission shifts to 5th gear (or reasonable speed), then slow the vehicle and come to a stop.
10. Save the snapshot if the entire event was recorded or increase the recording time setting as necessary and repeat step 9.
11. Accelerate quickly until the accelerator pedal is to the floor. Maintain a steady pedal until the transmission shifts to 3rd gear, then slow to a stop, and save the snapshot.
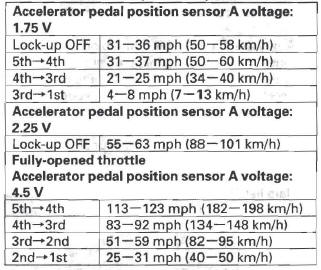
12. Review each snapshot individually, and compare the Shift Command, the APP Sensor A voltage, and the Vehicle Speed to the table below.
Upshift: D Position
Downshift: D Position (reference)
13. Drive the vehicle. in 4th or 5th gear in the D position, then shift to the 2 position. The vehicle should immediately begin to slow down from engine braking, then slow to a stop. 14. Shift to the R position, briefly accelerate from a stop at full throttle, and check for abnormal noise and clutch slippage.
15. Park the vehicle on a slope (about 16 degrees), apply the parking brake, and shift into the P position. Release the brake; the vehicle should not move.
NOTE: Always use the brake to hold the vehicle, when stopped on an incline in gear. Depending on the grade of the incline, the vehicle could roll backwards if the brake is released.
Stall Speed Test
1. Make sure the transmission fluid is filled to the proper level.
2. Apply the parking brake, and block all four wheels.
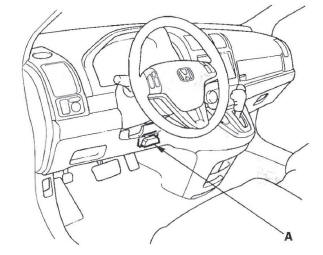
3. Connect the HDS to the DLC (A), and go to the A/T data list. If the HDS does not communicate with the PCM, troubleshoot the DLC circuit.
4. Make sure the A/C switch OFF.
5. Start the engine, and warm it up to normal operating temperature (the radiator fan comes on).
After the engine is warmed up, shift to the D position.
6. Firmly press and hold the brake pedal, and then firmly press the accelerator pedal for 6 to 8 seconds, and note engine speed. Do not move the shift lever while raising engine speed.
7. Allow 2 minutes for cooling, then repeat the test in the 2,1, and R positions.
NOTE:
- Do not test stall speed for more than 10 seconds at a time.
- Stall speed tests should be used for diagnostic purposes only.
- Stall speed should be the same in the D, 2,1, and R positions.
- Do not test stall speed with the A/T pressure gauges installed.
Stall Speed rpm:
Specification: 2,445 rpm
Service Limit: 2,295-2,595 rpm
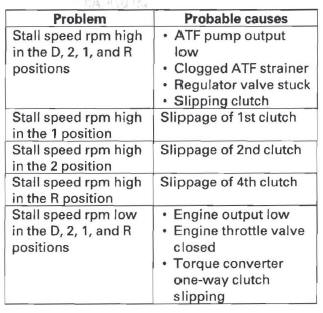
8. If the stall speeds are out of the service limit, the possible problems and probable causes are listed in the table.
READ NEXT:
 Pressure Test
Special Tools Required
A/T clutch pressure gauge set
07406-0020400 or 07406-0020401
A/T pressure hose, 2,210 mm 07MAJ-PY4011A
A/T pressure hose adapter 07MAJ-PY40120
1. Make sure the transmissio
Shift Solenoid Valve
Shift Solenoid Valve Test
1. Connect the HDS to the DLC (A).
2. Choose Shift Solenoid A, B, C, D, and E in the
Miscellaneous Test Menu on the HDS.
NOTE: If the HDS does not communicate with the
PCM,
A/T Clutch Pressure Control Solenoid Valve
A/T Clutch Pressure Control Solenoid Valve A Test
1. Connect the HDS to the DLC (A).
2. Choose Clutch Pressure Control (Linear) Solenoid A
in the Miscellaneous Test Menu on the HDS.
NOTE: If the HDS
SEE MORE:
DTC Troubleshooting
DTC indicator 1: An Open in the Air Mix
Control Motor Circuit
1. Start the engine.
2. Turn on the A/C, then set the temperature control
dial to Max Hot.
3. Turn the ignition switch OFF and then ON (II).
4. Do the self-diagnostic with the HVAC control unit.
5. Check for DTCs.
Is DTC 1 indicated?
To Select a Station
You can use any of five methods to
find radio stations on the selected
band: tune, seek, scan, the preset
buttons, and auto select.
TUNE - Use the SEEK button to
tune to a desired frequency. Press
the
button to tune to a higher
frequency, and the button to
tune to a lower frequency
