Honda CR-V: DTC P2122: APP Sensor A (Throttle Position Sensor D) Circuit Low Voltage
NOTE: Before you troubleshoot, record all freeze data and any on-board snapshot, and review the general troubleshooting information.
1. Turn the ignition switch ON (Ill.
2. Check APP SENSOR A in the DATA LIST with the HDS.
Is there about 0.2 V or less? YES-Go to step 3.
NO-Intermittent failure, the system is OK at this time. Check for poor connections or loose terminals at APP sensor A and the PCM.
3. Turn the ignition switch OFF.
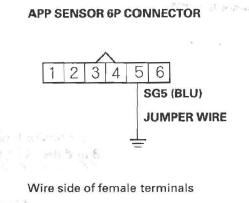
4. Disconnect the APP sensor 6P connector.
5. Turn the ignition switch ON (II).
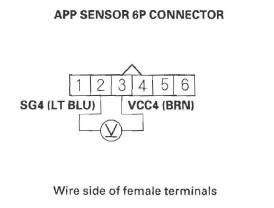
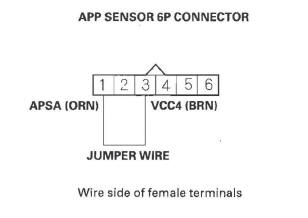
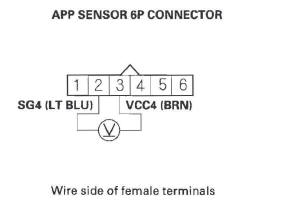
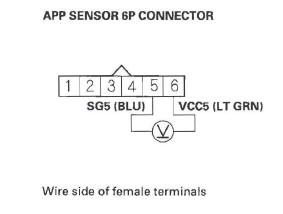
6. Measure voltage between APP sensor 6P connector terminals No.2 and No. 3.
Is there about 5 V? YES-Go to step 7.
NO-Go to step 17.
7. Turn the ignition switch OFF.
8. Jump the SCS line with the HDS.
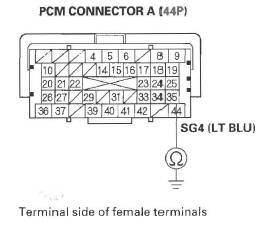
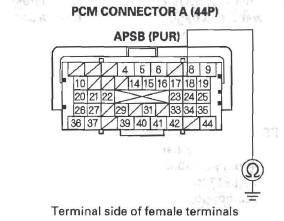
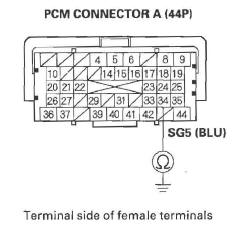
9. Disconnect PCM connector A (44P).
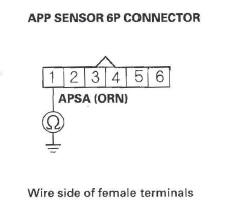
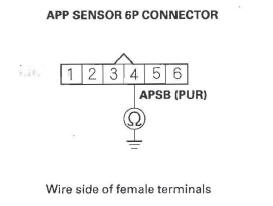
10. Check for continuity between APP sensor 6P connector terminal No.1 and body ground.
Is there continuity? YES-Repair short in the wire between the PCM (A17) and APP sensor A, then go to step 24.
NO-Go to step 11.
11. Connect APP sensor 6P connector terminal No.1 to body ground with a jumper wire.
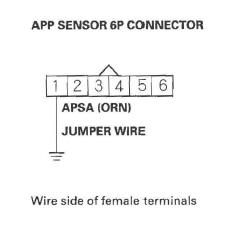
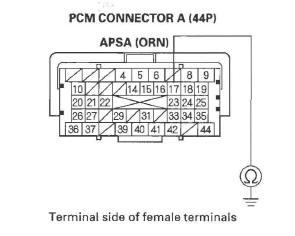
12. Check for continuity between PCM connector terminal A17 and body ground.
Is there continuity? YES-Go to step 13.
NO-Repair open in the wire between the PCM (A 17) and APP sensor A, then go to step 24.
13. Reconnect PCM connector A (44P).
14. Connect APP sensor 6P connector terminals No.1 and No. 3 with a jumper wire.
15. Turn the ignition switch ON (II).
16. Check APP SENSOR A in the DATA LIST with the HDS.
Is there about 0.2 V or less?
YES-Go to step 29.
NO-Go to step 22.
17. Turn the ignition switch OFF.
18. Jump the SCS line with the HDS.
19. Disconnect PCM connector A (44P).
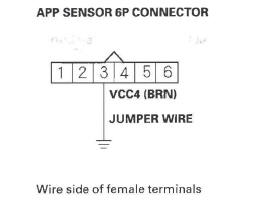
20. Connect APP sensor 6P connector terminal No. 3 to body ground with a jumper wire.
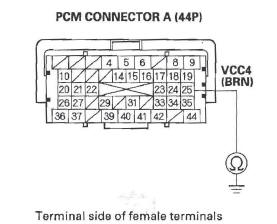
21. Check for continuity between PCM connector terminal A25 and body ground.
Is there continuity? YES-Go to step 29.
NO-Repair open in the wire between the PCM (A25) and APP sensor A, then go to step 24.
22. Turn the ignition switch OFF.
23. Replace the accelerator pedal module.
24. Reconnect all connectors.
25. Turn the ignition switch ON (II).
26. Reset the PCM with the HDS.
27. Do the PCM idle learn procedure.
28. Check for Temporary DTCs or DTCs with the HDS.
Is DTC P2122 indicated? YES-Check for poor connections or loose terminals at APP sensor A and the PCM, then go to step 1.
NO-Troubleshooting is complete. If any other Temporary DTCs or DTCs are indicated, go to the indicated DTC's troubleshooting.
29. Reconnect all connectors.
30. Update the PCM if it does not have the latest software, or substitute a known-good PCM.
31. Check for Temporary DTCs or DTCs with the HDS.
Is DTC P2122 indicated? YES-Check for poor connections or loose terminals at APP sensor A and the PCM. If the PCM was updated, substitute a known-good PCM, then recheck. If the PCM was substituted, go to step 1.
NO-If the PCM was updated, troubleshooting is complete. If the PCM was substituted, replace the original PCM. If any other Temporary DTCs or DTCs are indicated, go to the indicated DTC's troubleshooting.
DTC P2123: APP Sensor A (Throttle Position Sensor D) Circuit High Voltage
NOTE: Before you troubleshoot, record all freeze data and any on-board snapshot, and review the general troubleshooting information.
1. Turn the ignition switch ON (II).
2. Check APP SENSOR A in the DATA LIST with the HDS.
Is there about 4.9 V or more? YES-Go to step 3.
NO-Intermittent failure, the system is OK at this time. Check for poor connections or loose terminals at APP sensor A and the PCM.
3. Turn the ignition switch OFF.
4. Disconnect the APP sensor 6P connector.
5. Turn the ignition switch ON (II).
6. Measure voltage between APP sensor 6P connector terminals No. 2 and No.3.
Is there about 5 V? YES-Go to step 12.
NO-Go to step 7.
7. Turn the ignition switch OFF.
8. Jump the SCS line with the HDS.
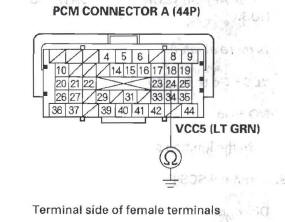
9. Disconnect PCM connector A (44P).
10. Connect APP sensor 6P connector terminal No.2 to body ground with a jumper wire.
11. Check for continuity between PCM connector terminal A35 and body ground.
Is there continuity? YES-Go to step 19.
NO-Repair open in the wire between the PCM (A35) and APP sensor A, then go to step 14.
12. Turn the ignition switch OFF.
13. Replace the accelerator pedal module.
14. Reconnect all connectors.
15. Turn the ignition switch ON (II).
16. Reset the PCM with the HDS.
17. Do the PCM idle learn procedure.
18. Check for Temporary DTCs or DTCs with the HDS.
Is DTC P2123 indicated? YES-Check for poor connections or loose terminals at APP sensor A and the PCM, then go to step 1.
NO-Troubleshooting is complete. If any other Temporary DTCs or DTCs are indicated, go to the indicated DTC's troubleshooting.
19. Reconnect all connectors.
20. Update the PCM if it does not have the latest software, or substitute a known-good PCM.
21. Check for Temporary DTCs or DTCs with the HDS.
Is DTC P2123 indicated? YES-Check for poor connections or loose terminals at APP sensor A and the PCM. If the PCM was updated, substitute a known-good PCM, then recheck. If the PCM was substituted, go to step 1.
NO-If the PCM was updated, troubleshooting is complete. If the PCM was substituted, replace the original PCM. If any other Temporary DTCs or DTCs are indicated, go to the indicated DTC's troubleshooting.
DTC P2127: APP Sensor B (Throttle Position Sensor E) Circuit Low Voltage
NOTE: Before you troubleshoot, record all freeze data and any on-board snapshot, and review the general troubleshooting information.
1. Turn the ignition switch ON (II).
2. Check APP SENSOR B in the DATA LIST with the HDS.
Is there about 0.2 V or less? YES-Go to step 3.
NO-Intermittent failure, the system is OK at this time. Check for poor connections or loose terminals at APP sensor B and the PCM.
3. Turn the ignition switch OFF.
4. Disconnect the APP sensor 6P connector.
5. Turn the ignition switch ON (II).
6. Measure voltage between APP sensor 6P connector terminals No.5 and No.6.
Is there about 5 V? YES-Go to step 7.
NO-Go to step 17.
7. Turn the ignition switch OFF.
8. Jump the SCS line with the HDS.
9. Disconnect PCM connector A (44P).
10. Check for continuity between APP sensor 6P connector terminal No.4 and body ground.
Is there continuity? YES-Repair short in the wire between the PCM (A 18) and APP sensor B, then go to step 24.
NO-Go to step 11.
11. Connect APP sensor 6P connector terminal No.4 to body ground with a jumper wire.

12. Check for continuity between PCM connector terminal A18 and body ground.
Is there continuity? YES-Go to step 13.
NO-Repair open in the wire between the PCM (A18) and APP sensor S, then go to step 24.
13. Reconnect PCM connector A (44P).
14. Connect APP sensor 6P connector terminals No.4 and No.6 with a jumper wire.

15. Turn the ignition switch ON (II).
16. Check APP SENSOR B in the DATA LIST with the HDS.
Is there about 0.2 V or less? YES-Go to step 29.
NO-Go to step 22.
17. Turn the ignition switch OFF.
18. Jump the SCS line with the HDS.
19. Disconnect PCM connector A (44P).
20. Connect APP sensor 6P connector terminal No.6 to body ground with a jumper wire.
21. Check for continuity between PCM connector terminal A24 and body ground.
Is there continuity? YES-Go to step 29.
NO-Repair open in the wire between the PCM (A24) and APP sensor B, then go to step 24.
22. Turn the ignition switch OFF.
23. Replace the accelerator pedal module.
24. Reconnect all connectors.
25. Turn the ignition switch ON (II).
26. Reset the PCM with the HDS.
27. Do the PCM idle learn procedure.
28. Check for Temporary DTCs or DTCs with the HDS.
Is DTC P2127 indicated? YES-Check for poor connections or loose terminals at APP sensor B and the PCM, then go to step 1.
NO-Troubleshooting is complete. If any other Temporary DTCs or DTCs are indicated, go to the indicated DTC's troubleshooting.
29. Reconnect all connectors.
30. Update the PCM if it does not have the latest software, or substitute a known-good PCM.
31. Check for Temporary DTCs or DTCs with the HDS.
Is DTC P2127 indicated? YES-Check for poor connections or loose terminals at APP sensor B and the PCM. If the PCM was updated, substitute a known-good PCM, then recheck. If the PCM was substituted, go to step 1.
NO-If the PCM was updated, troubleshooting is complete. If the PCM was substituted, replace the original PCM. If any other Temporary DTCs or DTCs are indicated, go to the indicated DTC's troubleshooting.
DTC P2128: APP Sensor B (Throttle Position Sensor E) Circuit High Voltage
NOTE: Before you troubleshoot, record all freeze data and any on-board snapshot, and review the general troubleshooting information.
1. Turn the ignition switch ON (II).
2. Check APP SENSOR B in the DATA LIST with the HDS.
Is there about 4.0 V or more? YES-Go to step 3.
NO-Intermittent failure, the system is OK at this time. Check for poor connections or loose terminals at APP sensor B and the PCM.
3. Turn the ignition switch OFF.
4. Disconnect the APP sensor 6P connector.
5. Turn the ignition switch ON (II).
6. Measure voltage between APP sensor 6P connector terminals No. 5 and No.6.
Is there about 5 V? YES-Go to step 12.
NO-Go to step 7.
7. Turn the ignition switch OFF.
8. Jump the SCS line with the HDS.
9. Disconnect PCM connector A (44P).
10. Connect APP sensor 6P connector terminal No.5 to body ground with a jumper wire.
11. Check for continuity between PCM connector terminal A34 and body ground.
Is there continuity? YES-Go to step 19.
NO-Repair open in the wire between the PCM (A34) and APP sensor B, then go to step 14.
12. Turn the ignition switch OFF.
13. Replace the accelerator pedal module.
14. Reconnect all connectors.
15. Turn the ignition switch ON (II).
16. Reset the PCM with the HDS.
17. Do the PCM idle learn procedure.
18. Check for Temporary DTCs or DTCs with the HDS.
Is DTC P2128 indicated? YES-Check for poor connections or loose terminals at APP sensor B and the PCM, then go to step 1.
NO-Troubleshooting is complete. If any other Temporary DTCs or DTCs are indicated, go to the indicated DTC's troubleshooting.
19. Reconnect all connectors.
20. Update the PCM if it does not have the latest software, or substitute a known-good PCM.
21. Check for Temporary DTCs or DTCs with the HDS.
Is DTC P2128 indicated? YES-Check for poor connections or loose terminals at APP sensor B and the PCM. If the PCM was updated, substitute a known-good PCM, then recheck. If the PCM was substituted, go to step 1.
NO-If the PCM was updated, troubleshooting is complete. If the PCM was substituted, replace the original PCM. Is fany other Temporary DTCs or DTCs are indicated, go to the indicated DTC's troubleshooting.
READ NEXT:
 DTC P2135: TP Sensor A/B Voltage Incorrect
Correlation
DTC P2135: TP Sensor A/B Voltage Incorrect
Correlation
CAUTION
Do not insert your fingers into the installed throttle
body when you turn the ignition switch ON (II) or
while the ignition switch is ON (II). If you do, you
will seriously injure your fingers
APP Sensor Signal Inspection
NOTE:
This procedure checks the APP sensor in its fully
closed position. In any other position, the APP sensor
stores DTCs which are covered in other
troubleshooting procedures.
Check for Tempor
VTEC/VTC
Component Location Index
ROCKER ARM OIL CONTROL VALVE
Removal/Installation
ROCKER ARM OIL PRESSURE SWITCH
Removal/Installation
CAMSHAFT POSITION (CMP)
SEE MORE:
System Description
MICU Control Functions Index
The MICU (built into the under-dash fuse/relay box) is one of the B-CAN
components. The MICU controls many
systems related to the body controller area network, and also works as a gateway
to diagnose the other B-CAN circuits
with the HDS.
Refer to each system circuit d
Multiplex Integrated Control System
Component Location Index
GAUGE CONTROL MODULE
Input Test
Replacement
IMMOBILIZER-KEYLESS CONTROL UNIT
(Built in receiver)
MICU (Built into the under-dash fuse/relay box)
Input Test
Replacement
General Troubleshooting Information
Troubleshooting CAN Circuit Related Problems
NOT
