Honda CR-V: Transfer Assembly Inspection/Removal/Installation
Transfer Assembly Inspection
1. Shift the transmission into the N position.
2. Raise the vehicle on a lift, and make sure it is supported securely.
3. Make a reference mark (A) across the propeller shaft (B) and the transfer companion flange (C).
4. Separate the propeller shaft from the transfer assembly.
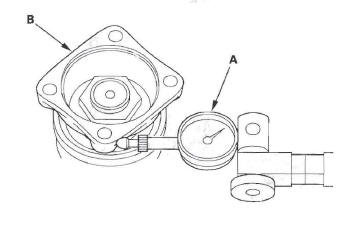
5. Set a dial indicator (A) on the transfer companion flange (B), and measure the transfer gear backlash.
Standard: 0.06-0.16 mm (0.002-0.006 in.)
6. If the measurement is out of standard, remove the transfer assembly, and adjust the transfer gear backlash.
7. Check for fluid leaks between the mating faces of the transfer assembly and transmission.
8. If there is leak, remove the transfer assembly, and replace the O-ring. Also check for fluid leaks between the mating surfaces of the transfer housing and transfer cover. If there is a leak, remove the transfer cover, and replace the O-ring.
9. Check for leaks between the transfer companion flange and transfer oil seal.
10. If there is a leak, remove the transfer assembly from the transmission, and replace the transfer oil seal and O-ring on the transfer output shaft (hypoid gear). If oil seal and O-ring replacement is required, you will need to check and adjust the transfer gear tooth contact, transfer gear backlash, the tapered roller bearing starting torque, and the total starting torque (see page 14-409). Do not replace the oil seal with the transfer assembly on the transmission.
Transfer Assembly Removal
1. Shift the transmission into the N position.
2. Raise the vehicle on a lift, and make sure it is supported securely.
3. Remove the drain plug (A), and drain the automatic transmission fluid (ATF).
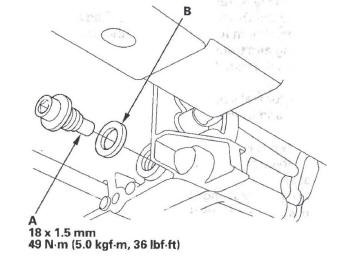
4. Reinstall the drain plug with a new sealing washer (B).
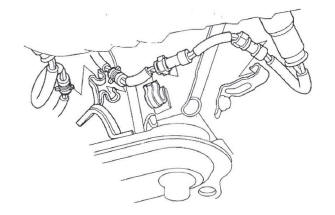
5. Disconnect the A/F sensor connector and the secondary heated oxygen sensor connector.
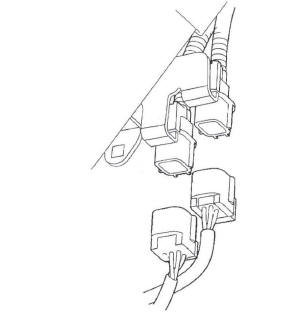
6. Remove the sensor harnesses from the harness clamps.
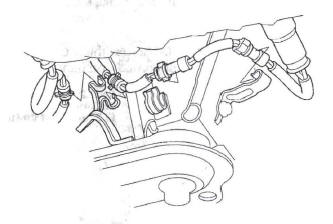
7. Remove the three-way catalytic converter.
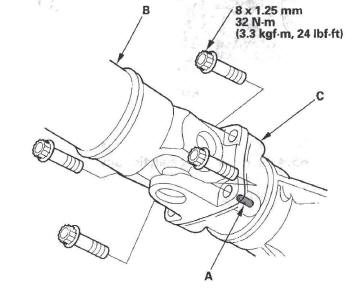
8. Make a reference mark (A) across the propeller shaft (B) and the transfer companion flange (C).
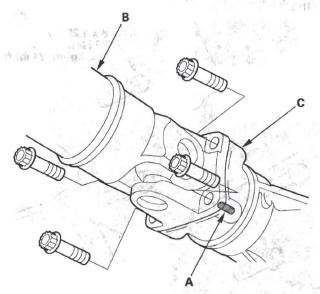
9. Separate the propeller shaft from the transfer companion flange.
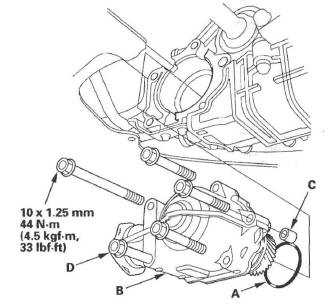
10. Remove the transfer assembly mounting bolts (A) (4), and pullout the bolt (B) to the limit of travel.
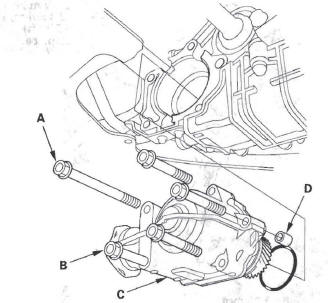
11. Remove the transfer assembly (C) and dowel pin (D) from the transmission.
Transfer Assembly Installation
1. Clean the areas where the transfer assembly contacts the transmission with solvent, and dry with compressed air. Then apply transmission fluid to the contact area.
2. Install the new O-ring (A) on the transfer assembly (B).
3. Install the dowel pin (C) in the transfer housing.
4. Install the one bolt (D) part-way in the rear lower of the transfer housing, and install the transfer assembly on the transmission.
5. Install the propeller shaft (A) to the transfer companion flange (B) by aligning the reference mark (C).
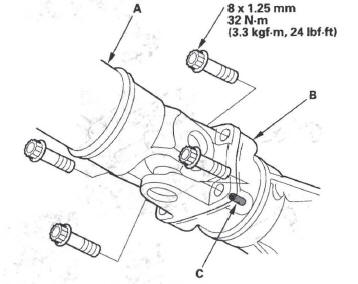
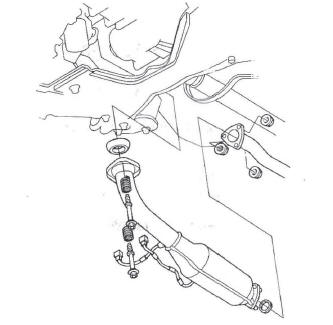
6. Install the three-way catalytic converter (A) with the bolts, the new self-locking nuts, and new gaskets (B) (C).

7. Connect the A/F sensor connector and the secondary heated oxygen sensor connector.

8. Install the sensor harnesses in the harness clamps.
9. Refill the transmission with ATF (see step 5).
READ NEXT:
 Transmission Removal/Installation
Transmission Removal
Special Tools Required
Engine hanger adapter VSB02C000015
CR-V engine hanger adapter VSB02C000032
Front subframe adapter VSB02C000016
Engine support hanger, A and Reds AAR-T-
ATF Cooler
ATF Cooler Cleaning
Special Tools Required
ATF cooler cleaner GHTTTCF6H
Magnetic nonbypass spin-on filter GTHGNBP2
These special tools are available through the Honda
Tool and Equipment Program
Shift Lever
Shift Lever Removal
1. Remove the following parts:
Heater control panel
Dashboard center panel
Center lower covers
2. Shift the shift lever into the R position.
3. Remove the nut securing the s
SEE MORE:
Overview of Contents
Contents
A convenient reference to the
sections in this manual.
Your Vehicle at a Glance
A quick reference to the main
controls in your vehicle.
Driver and Passenger Safety
Important information about the
proper use and care of your vehicle’s
seat belts, an overview of the
supplemen
Engine Removal
Universal eyelet 07AAK-SNAA120
Engine hanger adapter VSB02C000015 *
Front subframe adapter VSB02C000016 *
CR-V engine hanger adapter VSB02C000032 *
Engine support hanger, A and Reds AAR-T-12566 *
* : Available through American Honda Tool and
Equipment Program, 1 -888-424-6857
NOTE:
Use fend
