Honda CR-V: Transmission Removal/Installation
Transmission Removal
Special Tools Required
- Engine hanger adapter VSB02C000015
- CR-V engine hanger adapter VSB02C000032
- Front subframe adapter VSB02C000016
- Engine support hanger, A and Reds AAR-T-12566
These special tools are available through the Honda Tool and Equipment Program 1-888-424-6857.
NOTE:
- Use fender covers to avoid damaging painted surfaces.
- Special tool engine hanger must be used with the side engine mount installed.
1. Make sure you have the audio system or the navigation system (if equipped) anti-theft code, and write down the audio presets.
2. Remove the front bulkhead cover.
3. Make sure the ignition switch is OFF. Disconnect the negative cable from the battery, then disconnect the positive cable.
4. Remove the battery hold-down bracket, and remove the battery cover, battery, and battery tray.
5. Remove the intake air duct and air cleaner housing.
6. Remove the battery base.
7. Raise the vehicle on a lift, and make sure it is securely supported.
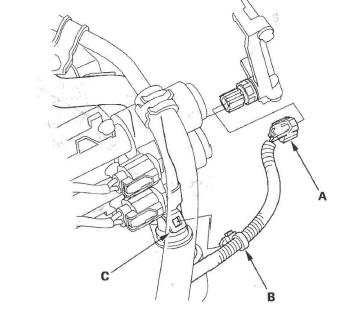
8. Remove the splash shield.
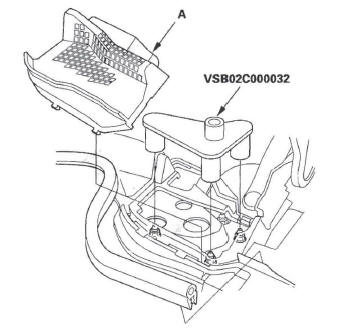
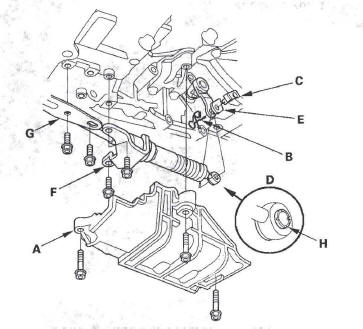
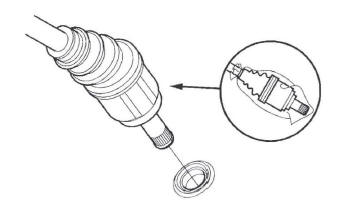
9. Remove the drain plug (A), and drain the transmission fluid (ATF).
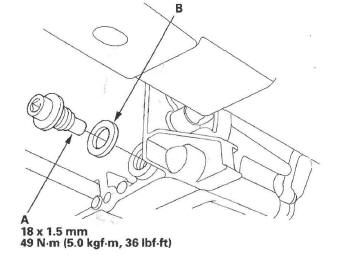
10. Reinstall the drain plug with a new sealing washer (B).
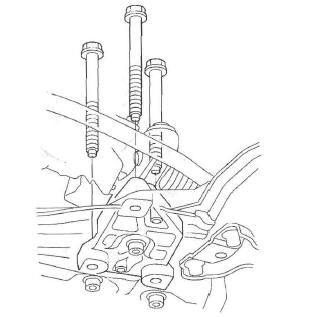
11. Fix the hood in the vertical position.
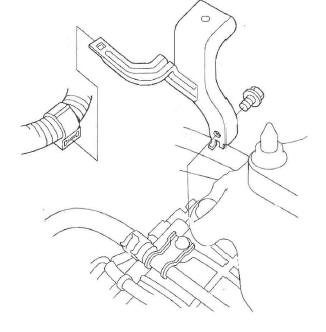
12. Remove the harness clamp from the clamp bracket, and remove the air cleaner housing bracket.
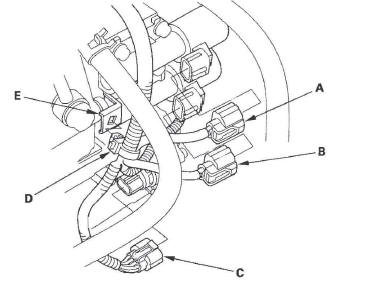
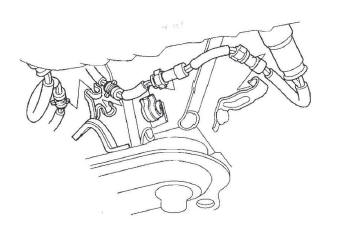
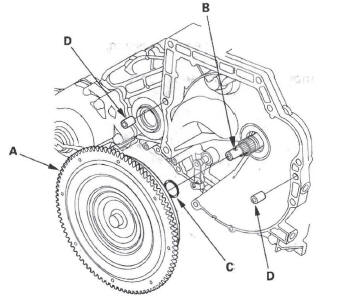
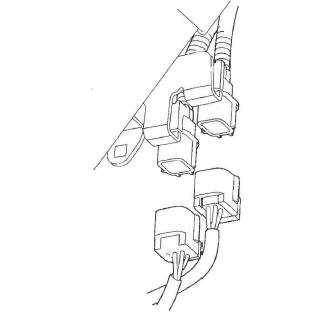
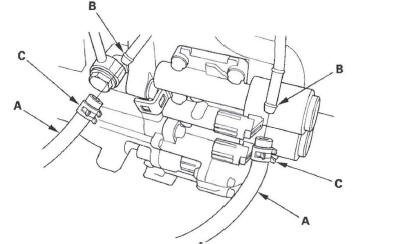
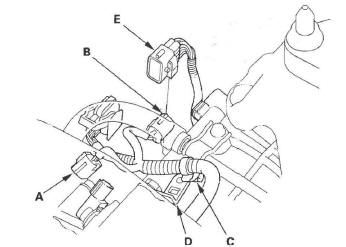
13. Disconnect the A/T clutch pressure control solenoid valve A connector (A) and 2nd clutch transmission fluid pressure switch connector (B), and remove the harness clamps (C) from the clamp brackets (D).
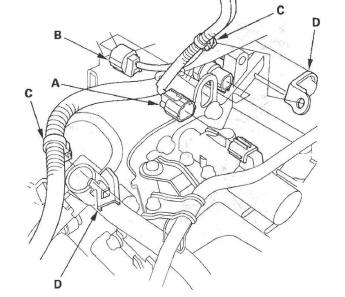
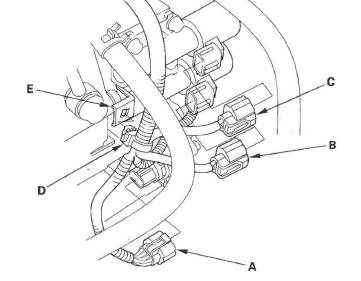
14. Disconnect the transmission range switch connector (A), and remove the connector from its bracket.
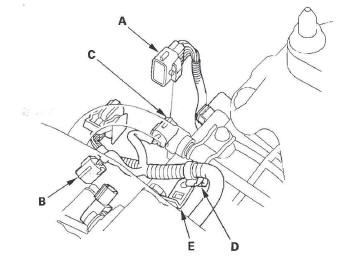
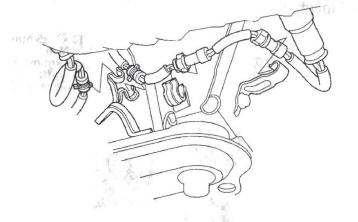
15. Disconnect the output shaft (countershaft) speed sensor connector (B) and input shaft (mainshaft) speed sensor connector (C), and remove the harness clamp (D) from the clamp bracket (E).
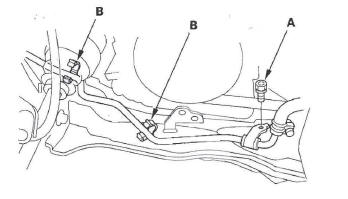
16. Disconnect the 3rd clutch transmission fluid pressure switch connector (A), and remove the harness clamp (B) from its bracket (C).
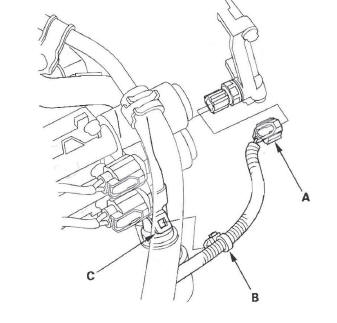
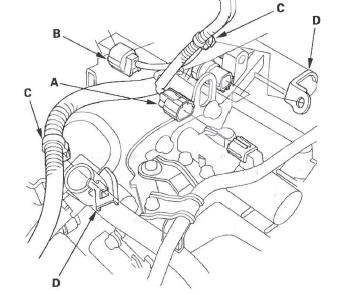
17. Disconnect the A/T clutch pressure control solenoid valve B connector (A), A/T clutch pressure control solenoid valve e connector (B), and shift solenoid harness connector (C), then remove the harness clamp (D) from the clamp bracket (E).
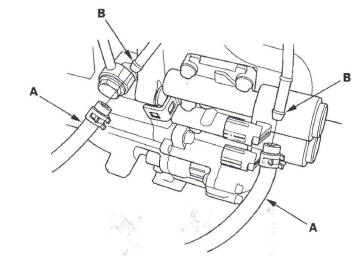
18. Disconnect the ATF cooler hoses (A) from the ATF lines (B). Turn the end of the ATF cooler hoses up to prevent ATF from flowing out, then plug the hoses and lines.
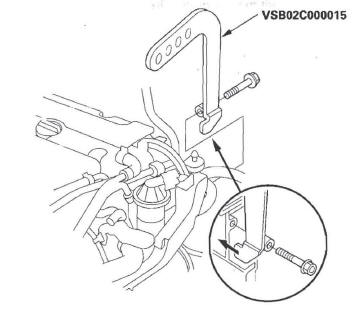
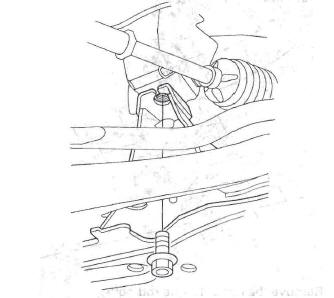
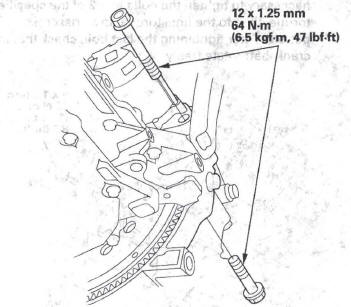
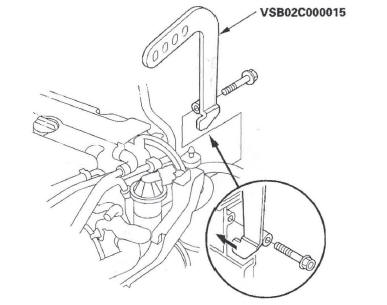
19. Attach the engine hanger adapater (VSB02C000015) to the threaded hole in the cylinder head.
20. Remove both lids (A) for the front damper flange nuts from the cowl cover. Position the engine hanger adapters (VSB02C000032) over the damper flange nuts.
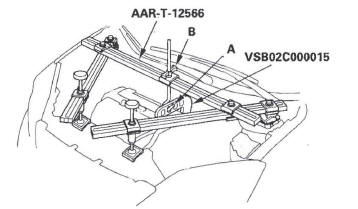
21. Carefully position the engine support hanger (AAR-T-12566) on the vehicle, and attach the hook (A) to the engine hanger adapter (VSB02C000015).
Tighten the wing nut (B) by hand, and lift and support the engine.
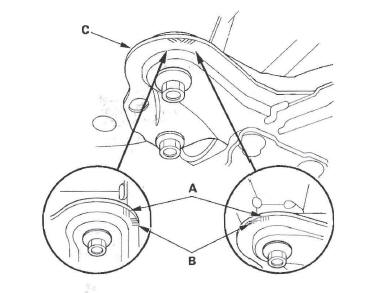
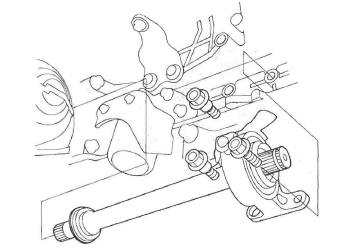
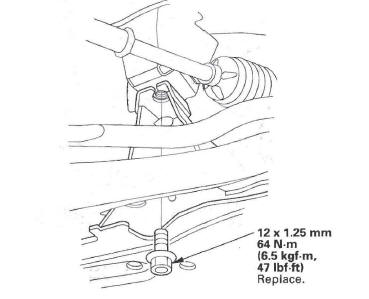
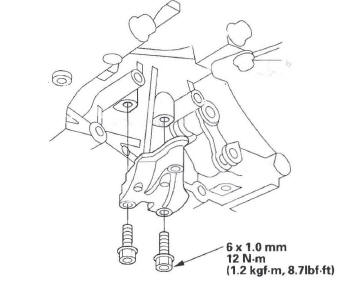
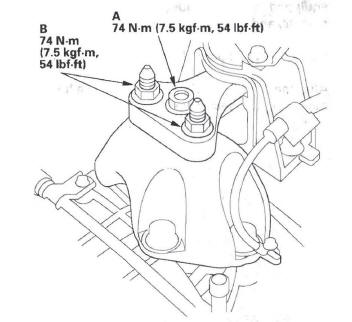
22. Insert a 6 mm Allen wrench (A) in the top of the ball joint pin (B), and remove the nut (C), then separate the stabilizer link (D) from the stabilizer (E). Repeat this for the other stabilizer link.
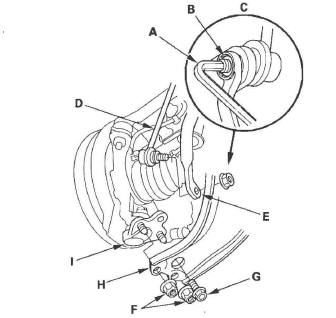
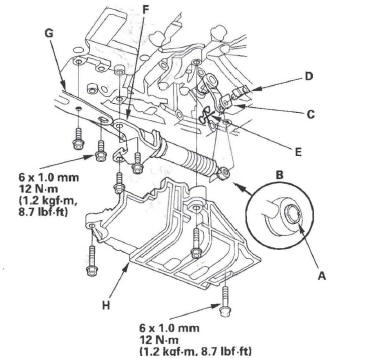
23. Remove the nuts (F) and bolt (G) securing the lower arm (H) and ball joint (I), and separate the lower arms from the ball joints.
24. Disconnect the A/F sensor connector and the secondary heated oxygen sensor connector.
25. Remove the sensor harnesses from the harness clamps.
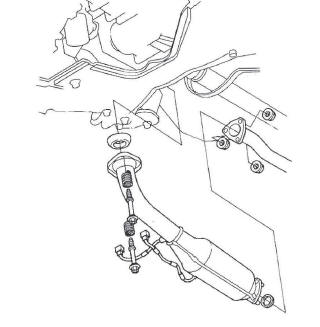
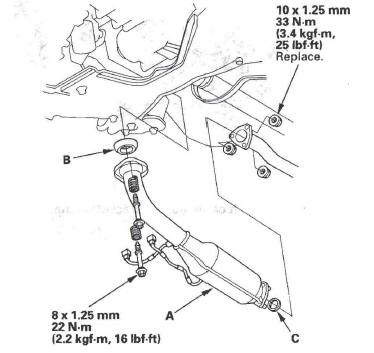
26. Remove the three-way catalytic converter.
27. For 4WD model: Make a reference mark (A) across the propeller shaft (B) and the transfer companion flange (C). Separate the propeller shaft from the transfer companion flange.
28. Remove the steering gearbox bracket mounting bolts.
29. Remove the steering gearbox bracket mounting bolts.
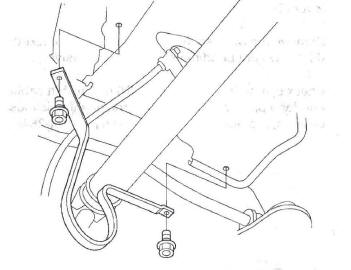
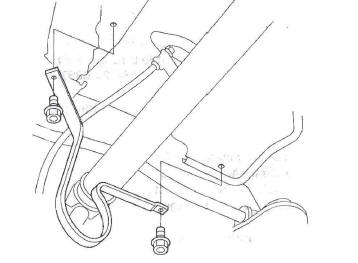
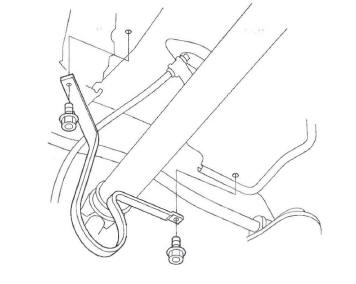
30. Remove the bolt (A) securing the power steering fluid line clamp.
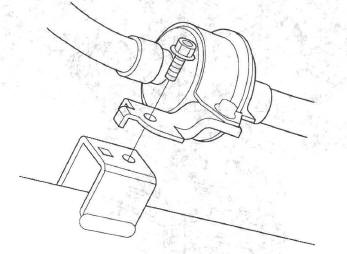
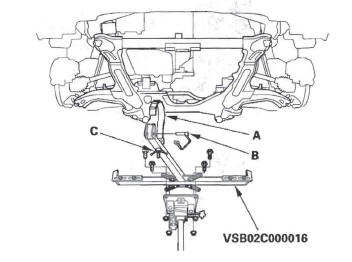
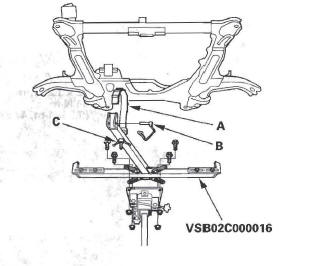
31. Remove the power steering fluid line from the line clamps (B).
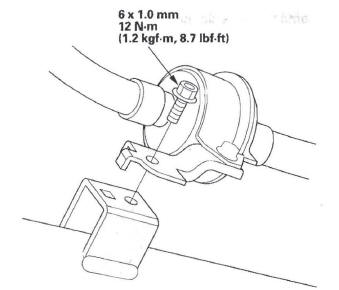
32. Remove the bolt securing the ATF filter on the front subframe.
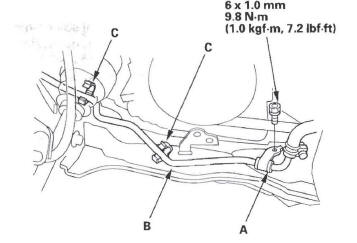
33. Remove the lower torque rod bolts.
34. Remove the shift cable cover (A).
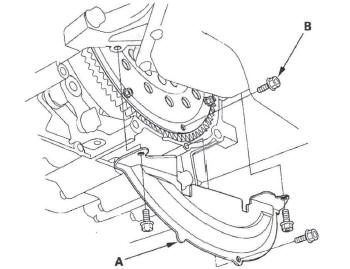
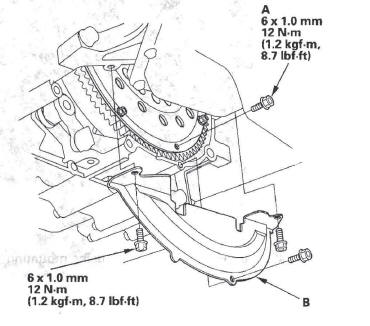
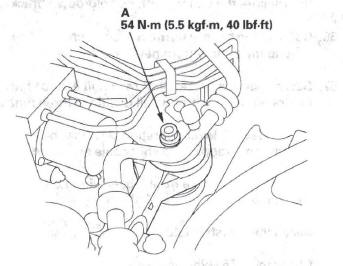
35. Remove the spring clip (B) and control pin (C), and separate the shift cable end (D) from the control lever (E).
36. Remove the bolts securing the shift cable brackets (F) (G). Do not bend the shift cable excessively.
37. Check synthetic resin bushing (H) in the shift cable end for a proper fit and wear. If the bushing is loose or worn, replace the shift cable.
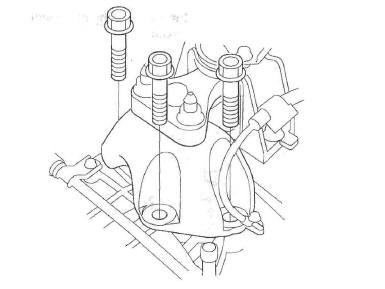
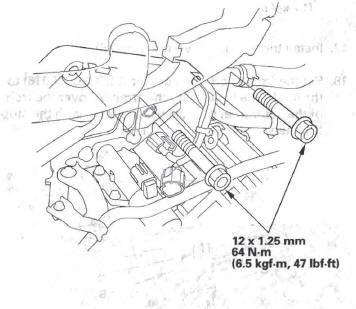
38. Remove the shift cable holder bracket from the transmission.
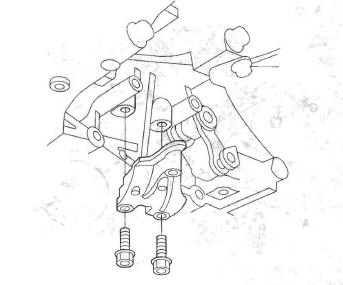
39. For 4WD model: Remove the propeller shaft protector.
40. Remove both mid-bracket bolts.
41. Make reference marks (A) on the body across the marks (B) on the edge of the front subframe (C).
42. Attach the front subframe adapter (VSB02C000016) to the subframe by looping the strap (A) over the front of the subframe, then secure the strap with the stop (B), then tighten the wing nut (C).
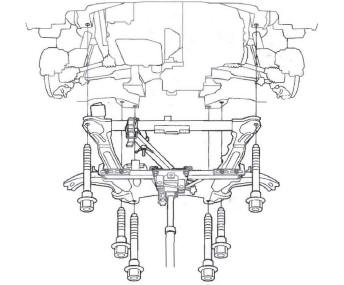
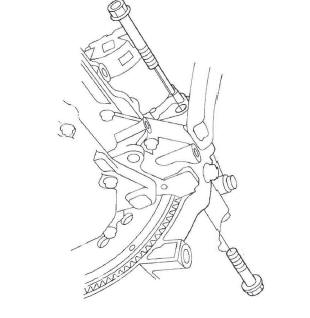
43. Raise the jack and line up the slots in the arms with the bolt holes on the corner of the jack base, then tighten the bolts.
44. Remove the six bolts securing the front subframe, and lower the subframe.
45. Hang the steering gearbox to the body with a strap.
46. Remove the torque converter cover (A), and remove the drive plate bolts (B) (8) while rotating the crankshaft pulley.
47. Remove the driveshafts from the differential and intermediate shaft. Coat all precision machined surfaces with clean engine oil, then put plastic bags over drives haft ends.
48. Remove the intermediate shaft. Coat all precision machined surfaces with clean engine oil, then put plastic bags over intermediate shaft ends.
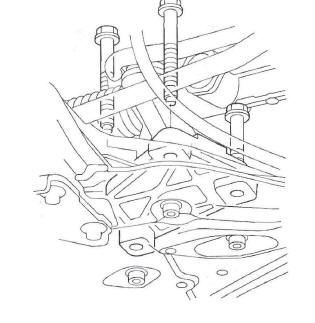
49. Remove the upper transmission housing mounting bolts.

50. Remove the transmission mount bracket bolts.
51. Remove the front transmission housing mounting bolts.
52. Lower the transmission by loosening the wing nut on the engine support hanger, and tilt the engine just enough for the transmission to clear the side frame.
53. Place a jack under the transmission.
54. Remove the rear transmission housing mounting bolts.
![]()
55. Slide the transmission away from the engine to remove it from the vehicle.
56. Remove the torque converter and dowel pins.
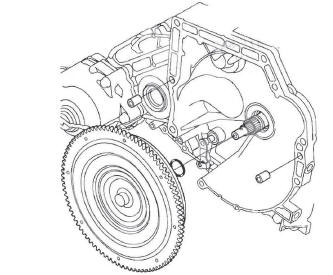
57. Inspect the drive plate, and replace it if it's damaged.
58. For 4WD model: Install the propeller shaft protector.
59. If you will be installing an overhauled or remanufactured transmission, clean the ATF cooler.
Transmission Installation
Special Tools Required
- Engine hanger adapter VSB02C000015
- CR-V engine hanger adapter VSB02C000032
- Engine support hanger, A and Reds AAR-T-12566
- Front subframe adapter VSB02C000016
These special tools are available through the Honda Tool and Equipment Program 1-888-424-6857.
NOTE: Use fender covers to avoid damaging painted surfaces.
1. If you did not clean the ATF cooler when you removed the transmission and you are installing an overhauled or remanufactured transmission, clean the ATF cooler.
2. For 4WD model: Remove the propeller shaft protector.
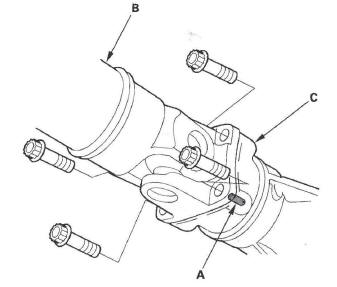
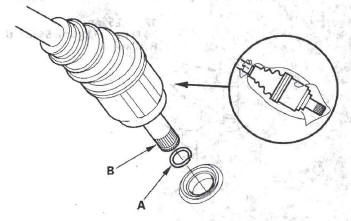
3. Install the torque converter (A) on the mainshaft (B) with the new O-ring (C).
4. Install the 14 x 20 mm dowel pins (D) in the torque converter housing.
5. Place the transmission on the jack, and raise the transmission to the engine level, then fit the transmission to the engine.
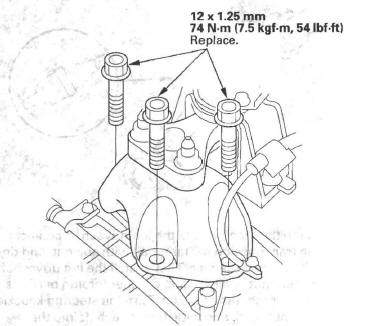
6. Install the rear transmission housing mounting bolts.

7. Install the front transmission housing mounting bolts.
8. Install the upper transmission housing mounting bolts.
9. Secure the transmission mount bracket on the transmission housing with the new mounting bolts.
10. Install the new set ring (A) on the intermediate shaft (B).

11. Clean the areas where the intermediate shaft contacts the transmission (differential) with solvent, and dry with compressed air. Apply ATF to the intermediate shaft splines (C), then install the intermediate shaft, be sure not to allow dust or other foreign particles to enter the transmission.
12. Install the new set ring (A) on the left driveshaft (B).
13. Clean the areas where the left driveshaft contacts the transmission (differential) with solvent, and dry with compressed air. Then install the left drives haft, be sure not to allow dust or other foreign particles to enter the transmission. Turn the steering knuckle fully outward, and slide the driveshaft into the differential until you feel its set ring fully engage the side gear.
14. Apply right driveshaft inboard-joint splines with the recommended grease.
15. Slide the right driveshaft over the intermediate shaft splines until you feel the driveshaft fully engage the intermediate shaft set ring.
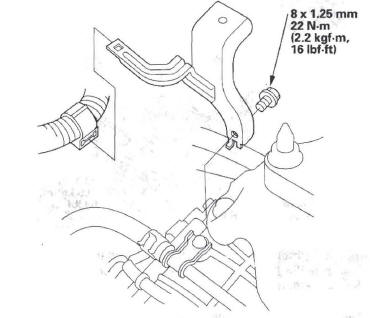
16. Attach the torque converter to the drive plate with eight bolts (A). Rotate the crankshaft pulley as necessary to tighten the bolts to 1/2 of the specified torque, then to the final torque, in a crisscross pattern. After tightening the last bolt, check that the crankshaft rotate freely.
17. Install the torque converter cover (B).
18. Set the front subframe adapter (VS802C000016) to the subframe by looping the strap (A) over the front of the subframe, then secure the strap with the stop (B). then tighten the wing nut (C).
19. Loosely install the new subframe mounting bolts.
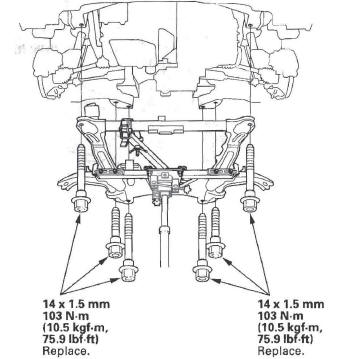
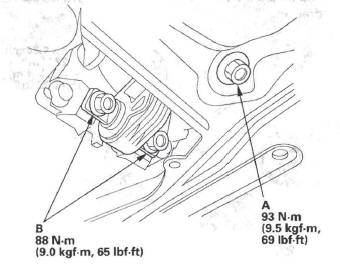
20. Align all reference marks (A) on the front subframe (B) with the marks you made on the body, then tighten the mounting bolts on the subframe to the specified torque.
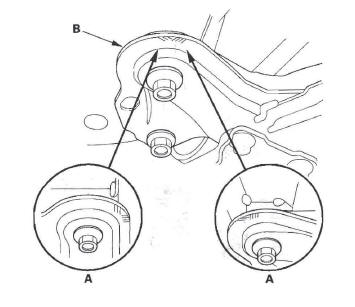
21. Install the new mid-bracket bolts.
22. Secure the lower torque rod with the new bolts.
23. For 4WD model: Install the propeller shaft protector.

24. For 4WD model: Install the propeller shaft (A) to the transfer companion flange (B) by aligning the reference mark (C).

25. Loosely install the steering gearbox bracket mounting bolts.
26. Loosely install the steering gearbox bracket mounting bolts.
27. Tighten the steering gearbox bracket mounting bolts to the specified torque.
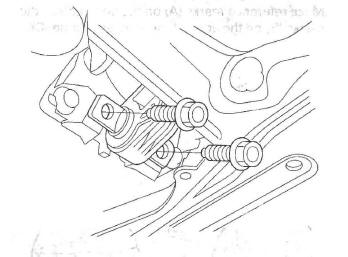
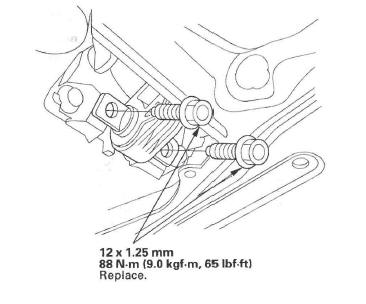
28. Install both lower arms (A) to both ball joints (B), and loosely install the new mounting nuts and bolts.
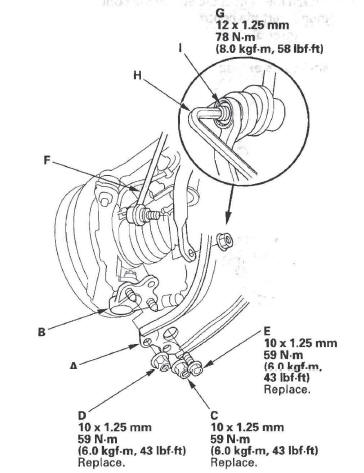
29. Tighten the nuts and bolts to 59 N*m (6.0 kgf*m, 43 Ibf*ft) in the following order: the nut on the front (C), the nut on the rear (D), then the bolt (E).
30. Install the stabilizer links (F) to the stabilizer, and install the nuts (G). Insert a 6 mm Allen wrench (H) in the ball joint pin (I), and tighten the nuts.
31. Install the three-way catalytic converter (A) with the bolts, the new self-locking nuts, and new gaskets (B) (C).
32. Connect the A/F sensor connector and the secondary heated oxygen sensor connector.
33. Install the sensor harnesses in the harness clamps.
34. Install the shift cable holder bracket on the transmission.
35. Apply molybdenum grease to the bore hole of the synthetic resin bushing (A) in the shift cable end (B).
Attach the shift cable end to the control lever (C), then insert the control pin (D) into the control lever hole through the shift cable end, and secure the control pin with the spring clip (E). Do not bend the shift cable excessively.
36. Secure the shift cable brackets (F) (G) with the bolts.
37. Install the shift cable cover (H).
38. Secure the ATF filter with the bolt on the front subframe.
39. Secure the power steering fluid line clamp (A) with the bolt.
40. Secure the power steering fluid line (B) with the clamps (C).
41. Remove the engine support hanger and engine hanger adapters.
42. Remove the engine hanger adapter (VSB02C000015) from the cylinder head.
43. Connect the ATF cooler hoses (A) to the ATF cooler lines (B), and secure the hoses with the clips (C).
44. Connect the shift solenoid harness connector (A), A/T clutch pressure control solenoid valve C connector (B), and A/T clutch pressure control solenoid valve B connector (C), and install the harness clamp (D) on the clamp bracket (E).
45. Connect the 3rd clutch transmission fluid pressure switch connector (A), and install the harness clamp (B) on its clamp bracket (C).
46. Connect the output shaft (countershaft) speed sensor connector (A) and input shaft (mainshaft) speed sensor connector (B), and install the harness clamp (C) on its clamp bracket (D).
47. Install the transmission range switch connector (E) on the connector bracket, and connect the connector.
48. Connect the A/T clutch pressure control solenoid valve A connector (A) and 2nd clutch transmission fluid pressure switch connector (B), and install the harness clamps (C) on the clamp brackets (D).
49. Install the air cleaner housing mounting bracket, and install the harness clamp on the harness clamp bracket.
50. Refill the transmission with ATF (see step 5).
51. Install the battery base.
52. Install the air cleaner housing and intake air duct.
53. Install the bulkhead cover.
54. Install both lids on the cowl cover.
55. Install the battery tray, battery, and battery cover, then secure the battery with its hold-down bracket.
56. Connect the battery terminals, and apply grease around the battery terminals.
57. Set the parking brake. Start the engine, and shift the transmission through all positions three times.
58. Check the shift lever operation, A/T gear position indicator operation, and shift cable adjustment.
59. Check and adjust the front wheel alignment.
60. Install the splash shield.
61. Check the ATF level.
62. Enter the audio system or the navigation system (if equipped) anti-theft code, then enter the audio presets, and set the clock.
63. Do the road test procedure.
64. After the road test, raise the vehicle on a lift, and make sure it is securely supported.
65. Loosen the upper torque rod bolt (A).
66. Loosen the transmission mount base bracket bolt (A) and nuts (B).
67. Loosen the lower torque rod bolts (A, B).
68. Retighten the lower torque rod bolts (B) to the specified torque, then retighten the bolt (A) to the specified torque.
69. Tighten the transmission mount base bracket bolt and nuts to the specified torque.
70. Tighten the upper torque rod bolt to the specified torque.
Drive Plate Removal and Installation
1. Remove the transmission assembly.
2. Remove the drive plate (A) and washer (B) from the engine crankshaft.
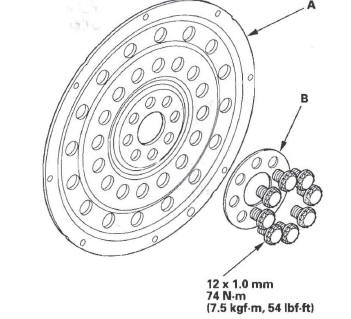
3. Install the drive plate and washer on the engine crankshaft, and tighten the eight bolts in a crisscross pattern in two or more steps.
4. Install the transmission assembly.
READ NEXT:
 ATF Cooler
ATF Cooler Cleaning
Special Tools Required
ATF cooler cleaner GHTTTCF6H
Magnetic nonbypass spin-on filter GTHGNBP2
These special tools are available through the Honda
Tool and Equipment Program
Shift Lever
Shift Lever Removal
1. Remove the following parts:
Heater control panel
Dashboard center panel
Center lower covers
2. Shift the shift lever into the R position.
3. Remove the nut securing the s
Shift Cable
Shift Cable Replacement
1. Lift the vehicle up on a lift or apply the parking
brake, block rear wheels, and raise the *front of the
vehicle. Make sure it is securely supported.
2. Remove the followin
SEE MORE:
Idle Control System
Component Location Index
POWER STEERING PRESSURE (PSP) SWITCH
Signal Circuit Troubleshooting
A/C COMPRESSOR
CLUTCH RELAY
(RELAY SOCKET A)
Signal Circuit Troubleshooting
POWERTRAIN CONTROL
MODULE (PCM)
General Troubleshooting Information
Replacement
A/C
DTC 22-3x ("x" can be 0 thru 9 or A thru F):
Short to Another Wire or Decreased
Resistance in Front Passenger's Seat Belt
Tensioner
Special Tools Required
SRS inflator simulator 07SAZ-TB4011A
SRS simulator lead K 070AZ-SNAA200
NOTE: Before doing this troubleshooting procedure,
review SRS Precautions and Procedures.
1. Erase the DTC memory.
2. Turn the ignition switch ON (II), and check that the
SRS indicator comes on for ab
