Honda CR-V: Shift Lever
Shift Lever Removal
1. Remove the following parts:
- Heater control panel
- Dashboard center panel
- Center lower covers
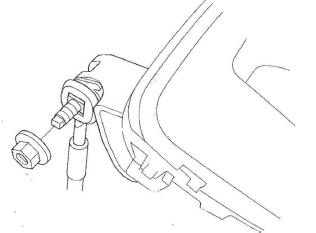
2. Shift the shift lever into the R position.
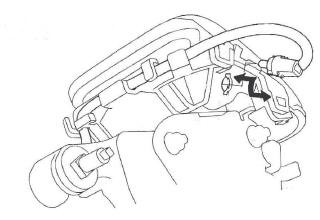
3. Remove the nut securing the shift cable end.
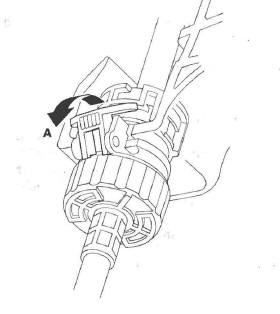
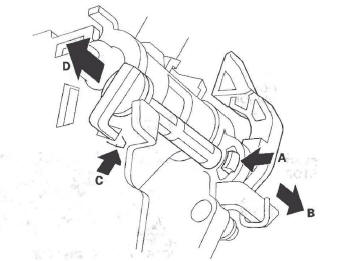
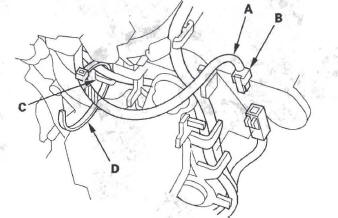
4. Unlock the retainer (A).
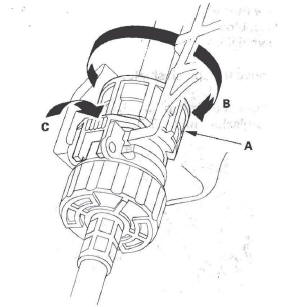
5. Rotate the socket holder retainer (A) counterclockwise (B) until it stops, and push the retainer lock (C) into the socket holder retainer to lock the retainer.
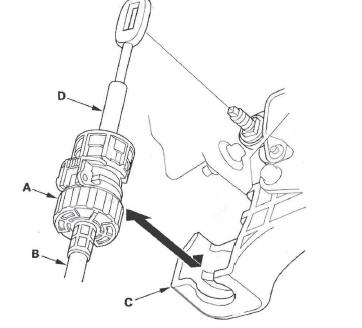
6. Lower the socket holder (A), then slide it to remove the shift cable (B) from the shift cable bracket (C).
Do not remove the shift cable by pulling the shift cable guide (D).
7. Cover around the opening of the dashboard with tape to prevent damage to the dashboard.
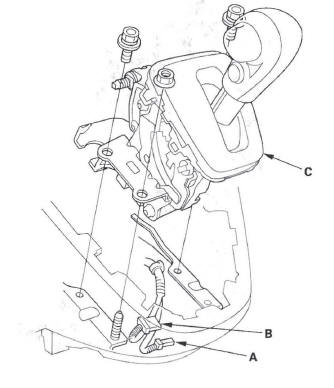
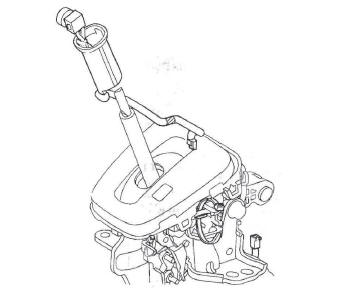
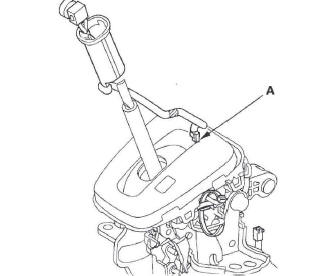
8. Remove the shift lever mounting bolt and nuts.
9. Disconnect the shift lock solenoid connector (A) and D3 switch/park pin switch/A/T gear position indicator panel light connector (B), and remove the shift lever assembly (C).
Shift Lever Installation
1. Cover around the opening of the dashboard with tape to prevent damage to the dashboard.
2. Install the shift lever assembly (A) in the dashboard.
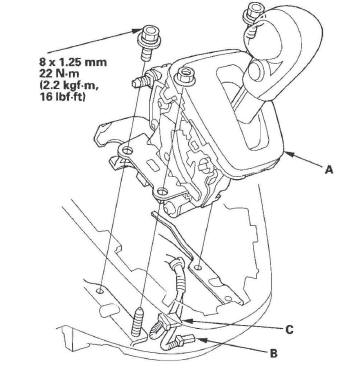
3. Connect the shift lock solenoid connector (B) and D3 switch/park pin switch/A/T gear position indicator panel light connector (C).
4. Install the shift cable on the shift lever, and adjust the shift cable (see step 7).
Shift Lever Disassembly/Reassembly
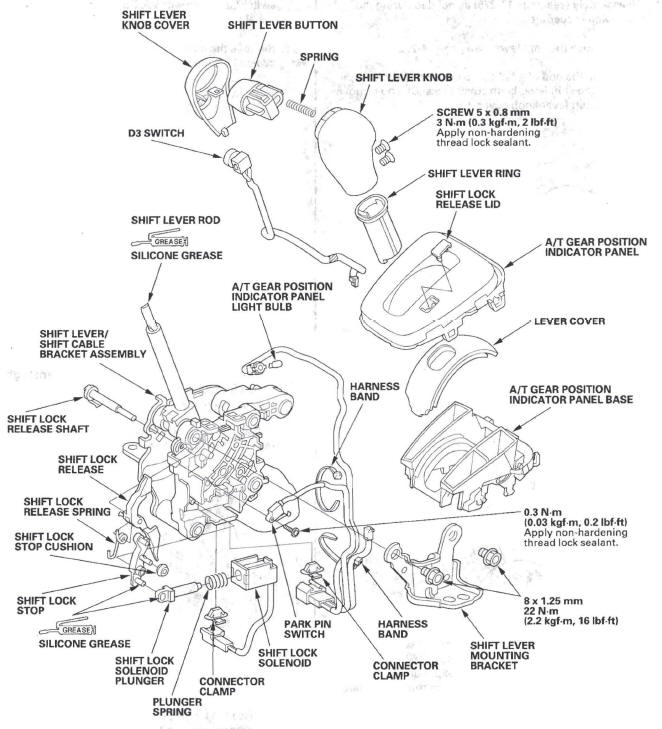
Shift Lever/Shift Cable Bracket Assembly Replacement
NOTE: Refer to the Shift Lever Disassembly and Reassembly (see page 14-275) as needed during the following procedures.
1. Remove the shift lever.
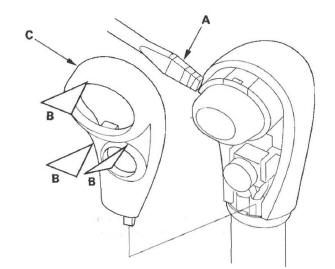
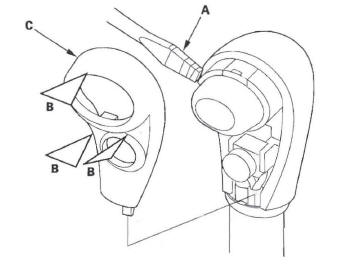
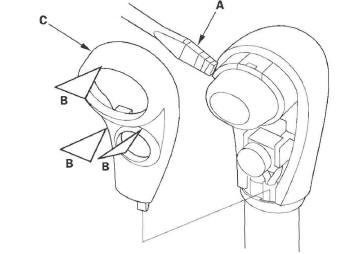
2. Wrap the end of a flat-tip screwdriver (A) with tape, pry the shift lever knob cover locks (B), and remove the shift lever knob cover (C).
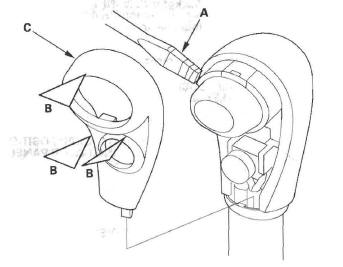
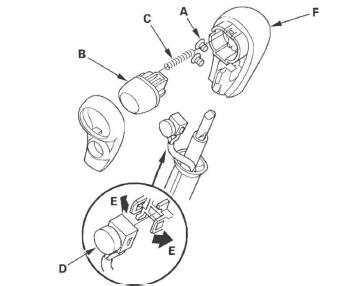
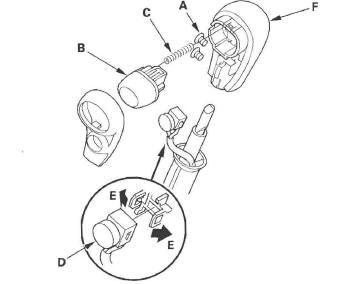
3. Remove the screws (A), shift lever button (B), and spring (C).
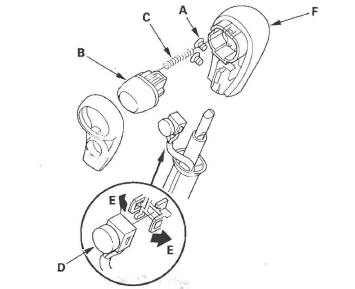
4. Remove the D3 switch (D) by expanding its locks (E) from the shift lever knob, and remove the shift lever knob (F).
5. Remove the shift lock solenoid connector and D3 switch/park pin switch/A/T gear position indicator panel light connector from the shift lever.
6. Remove the harness bands, and disconnect the D3 switch 2P connector.
7. Remove the D3 switch harness and shift lever ring.
8. Remove the A/T gear position indicator panel light socket from the indicator panel, and remove the indicator panel.
9. Release the lock (A) of the shift lock release, and remove the shift lock release and release spring (B).
10. Release the lock (C) of the shift lock release shaft, and remove the shaft (D).
11. Remove the shift lever mounting bracket, and remove the park pin switch.
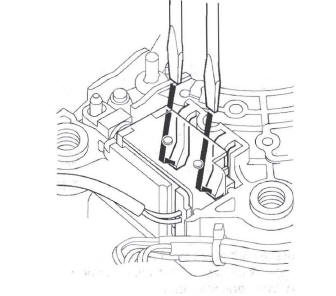
12. Release the lock tabs retaining the shift lock solenoid using thin blade screwdrivers.
13. Insert a 6 mm pin (A) into the guide hole (B), and push the shift lock solenoid (C) out.
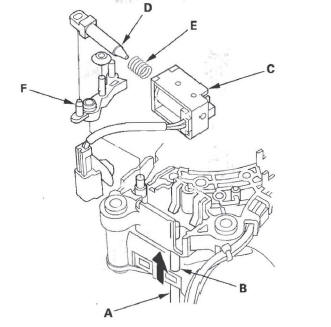
14. Remove the shift lock solenoid plunger (D), plunger spring (E), and shift lock stop and stop cushion (F).
15. Replace the shift lever/shift cable bracket assembly.
16. Install the shift lock stop and stop cushion.
17. Apply silicone grease to joint of the shift lock solenoid plunger and shift lock stop, if necessary.
18. Install the shift lock solenoid plunger and plunger spring in the shift lock solenoid.
19. Install the shift lock solenoid by aligning the joint of the shift lock solenoid plunger with the tip of the shift lock stop, then push the shift lock solenoid into the shift lever securely.
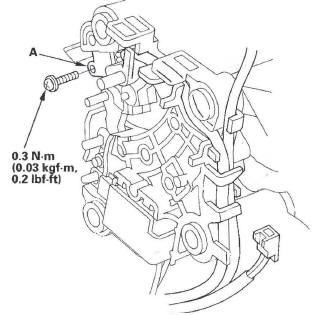
20. Apply non-hardening thread lock sealant to the screw threads. Install the park pin switch (A), and secure the switch with the screw.
21. Install the shift lever mounting bracket.
22. Install the A/T gear position indicator panel, shift lever ring, and D3 switch harness.
23. Route the D3 switch harness (A), connect the D3 switch 2P connector (B), and install the connector in the holder.
24. Tie the harnesses of the D3 switch and park pin switch at the guide (C) with the band (D).
25. Install the A/T gear position indicator panel light socket in the indicator panel.
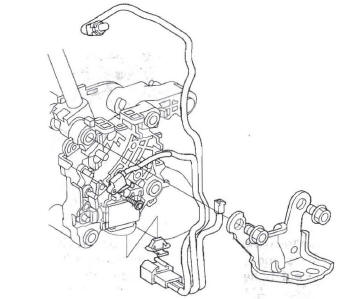
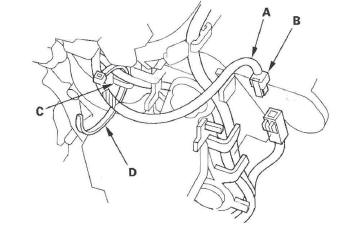
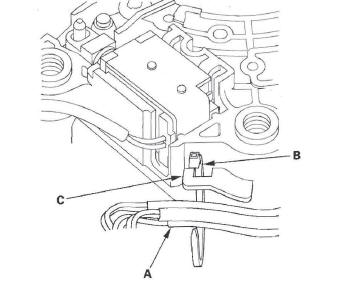
26. Route the park pin switch harness, D3 switch harness, and indicator panel light harness. Take a slack out of the harnesses, and secure the harnesses (A) with the band (B) at the guide (C).
27. Install the shift lock solenoid connector and D3 switch/park pin switch/A/T gear position indicator panel light connector on the shift lever.
28. Install the shift lock release spring (A) in the shift lock release (B).
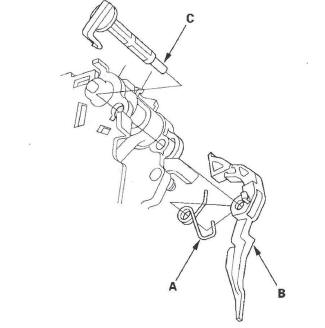
29. Install the shift lock release shaft (C) in the shift lever, and install the shift lock release and release spring on the release shaft end.
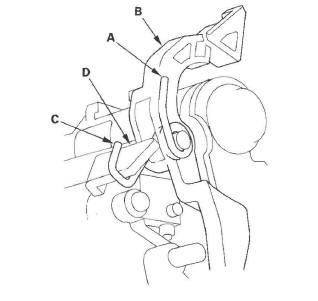
30. Make sure that the release spring end (A) is installed in the shift lock release (B), and the hooked end (C) is hitched on the catch (D).
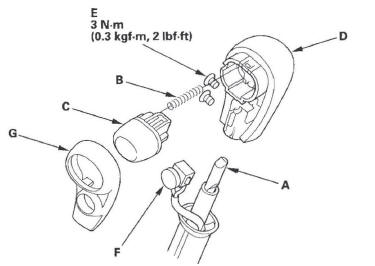
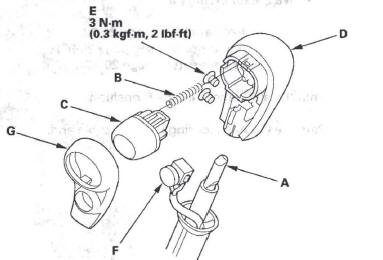
31. Apply silicone grease to the top of the shift lever rod (A), to the shift lever button spring (B), and to the area of the shift lever button (C) connected with the shift lever rod.
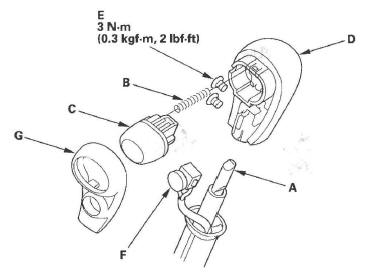
32. Install the shift lever button spring and button in the shift lever knob (D), and install the shift lever knob over the shift lever.
33. Apply non-hardening thread lock sealant to the screw threads, and secure the shift lever knob with the screws (E).
34. Install the D3 switch (F) and shift lever knob cover (G) on the shift lever knob.
35. Install the shift lever.
Shift Lever Knob Replacement
NOTE: Refer to the Shift Lever Disassembly and Reassembly as needed during the following procedures.
1. Remove the shift lever.
2. Wrap the end of a flat-tip screwdriver (A) with tape, pry the shift lever knob cover locks (B), and remove the shift lever knob cover (C)
3. Remove the screws (A), shift lever button (B), and spring (C).
4. Remove the D3 switch (D) by expanding its locks (E) from the shift lever knob, and remove the shift lever knob (F).
5. Apply silicone grease to the top of the shift lever rod (A), to the shift lever button spring (B), and to the area of the shift lever button (C) connected with the shift lever rod.
6. Install the shift lever button spring and button in the shift lever knob (D), and install the shift lever knob over the shift lever.
7. Apply non-hardening thread lock sealant to the screw threads, and secure the shift lever knob with the screws (E).
8. Install the D3 switch (F) and shift lever knob cover (G) on the shift lever knob.
9. Install the shift lever.
Shift Lever Knob Cover Replacement
1. Wrap the end of a flat-tip screwdriver (A) with tape, pry the shift lever knob cover locks (B), and remove the shift lever knob cover (C).
2. Replace the shift lever knob cover, and install the new cover on the shift lever knob.
Shift Lever Ring Replacement
NOTE: Refer to the Shift Lever Disassembly and Reassembly as needed during the following procedures.
1. Remove the shift lever.
2. Wrap the end of a flat-tip screwdriver (A) with tape, pry the shift lever knob cover locks (B), and remove the shift lever knob cover (C).
3. Remove the screws (A), shift lever button (B), and spring (C).
4. Remove the D3 switch (D) by expanding its locks (E) from the shift lever knob, and remove the shift lever knob (F).
5. Remove the harness band, and disconnect the D3 switch 2P connector (A).
6. Remove the D3 switch and shift lever ring.
7. Replace the shift lever ring, and install the D3 switch harness through the shift lever ring.

8. Install the shift lever ring over the shift lever.
9. Route the D3 switch harness (A), connect the D3 switch 2P connector (B), and install the connector in the holder.
10. Tie the harnesses of the D3 switch and park pin switch at the guide (C) with the band (D).
11. Apply silicone grease to the top of the shift lever rod (A), to the shift lever button spring (B), and to the area of the shift lever button (C) connected with the shift lever rod.
12. Install the shift lever button spring and button in the shift lever knob (D), and install the shift lever knob over the shift lever.
13. Apply non-hardening thread lock sealant to the screw threads, and secure the shift lever knob with the screws (E).
14. Install the D3 switch (F) and shift lever knob cover (G) on the shift lever knob.
15. Install the shift lever.
READ NEXT:
 Shift Cable
Shift Cable Replacement
1. Lift the vehicle up on a lift or apply the parking
brake, block rear wheels, and raise the *front of the
vehicle. Make sure it is securely supported.
2. Remove the followin
A/T Gear Position Indicator
Component Location Index
A/T GEAR POSITION INDICATOR
F-CAN Communication Circuit Troubleshooting
Gauge Control Module Self-diagnostic Function Indicator Drive Circuit
Check
Communication Line
A/T Interlock System
Component Location Index
DATA LINK CONNECTOR (DLC) SHIFT LOCK SOLENOID
Shift Lock System Circuit
Troubleshooting
Test
Replacement
PARK PIN SWITCH
Key Interlock System Circuit
Troubleshooting
SEE MORE:
A/C Compressor
Replacement
NOTE: Do not install an A/C compressor into a system
unless you are completely sure that the system is free
of contamination. Installing the A/C compressor into a
contaminated system can result in premature A/C
compressor failure.
1. If the A/C compressor is marginally operable, run
the engine at i
DTC P0752: Shift Solenoid Valve A Stuck ON
NOTE: Before you troubleshoot, record all freeze data and any on-board
snapshot, and review General Troubleshooting Information.
1. Warm up the engine to normal operating
temperature (the radiator fan comes on).
2. Make sure that the transmission is filled to the
proper level, and check for fluid
