Honda CR-V: Drive Belt Inspection
1. Inspect the belt for cracks and damage. If the belt is cracked or damaged, replace it.
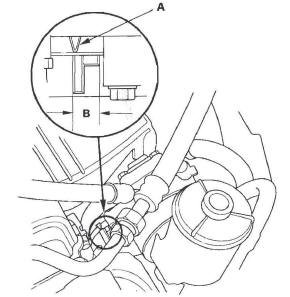
2. Check that the auto-tensioner indicator (A) is within the standard range (B) as shown. If it is out of the standard range, replace the drive belt.
Drive Belt Removal/Installation
Special Tools Required
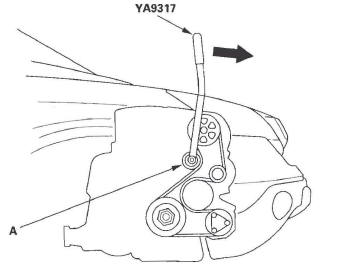
Belt tension release tool Snap-on YA9317 or equivalent, commercially available
1. Move the auto-tensioner (A) with the belt tension release tool to relieve tension from the drive belt, then remove the drive belt.
2. Install the new belt in the reverse order of removal.
Drive Belt Auto-tensioner Inspection
Special Tools Required
Belt tension release tool Snap-on YA9317 or equivalent, commercially available
1. Turn the ignition switch ON (II), and make sure to turn the A/C switch OFF. Turn the ignition switch OFF.
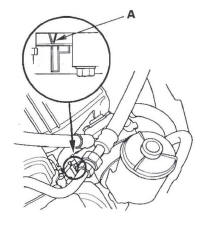
2. Check the position of the auto-tensioner indicator's pointer (A). Start the engine then check the position again with the engine idling. If the position of the indicator moves or fluctuates very much, replace the auto-tensioner.
3. Check for abnormal noise from the tensioner pulley.
If you hear abnormal noise, replace the tensioner pulley.
4. Remove the drive belt.
5. Move the auto-tensioner within its limit with the belt tension release tool in the direction shown.
Check that the tensioner moves smoothly and without any abnormal noise. If the tensioner does not move smoothly or you hear abnormal noise, replace the auto-tensioner.

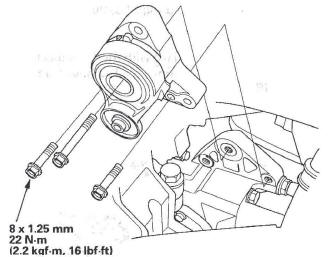
6. Remove the auto-tensioner.
7. Clamp the auto-tensioner (A) by using two 8 mm bolts (B) and a vise (C) as shown. Do not clamp the auto-tensioner itself.
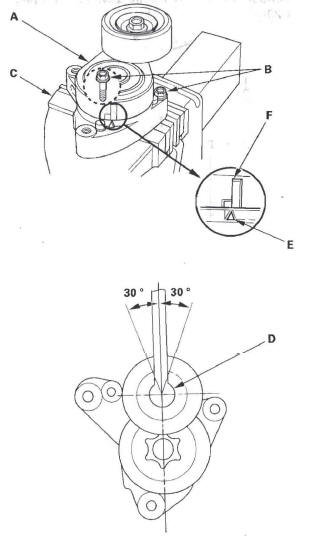
8. Set the torque wrench (D) on the pulley bolt, and align it as shown.
9. Align the indicator (El on the tensioner base with center mark (F) on the tensioner arm by using the torque wrench, and measure the torque. If the torque value is out of specification, replace the auto-tensioner.
NOTE: If the indicator exceeds the center mark, recheck the torque.
Auto-tensioner Spring Torque: 32.5-39.7 N*m (3.31-4.05 kgf*m, 23.9-29.3 Ibf*ft)
Drive Belt Auto-tensioner Removal/Installation
1. Remove the drive belt.
2. Remove the power steering (P/S) fluid reservoir from the holder.
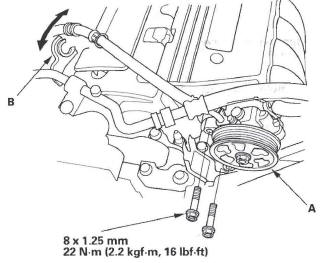
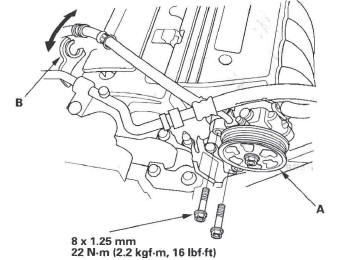
3. Remove the P/S pump (A) without disconnecting the P/S hoses, then remove the P/S hose from the clamp (B).
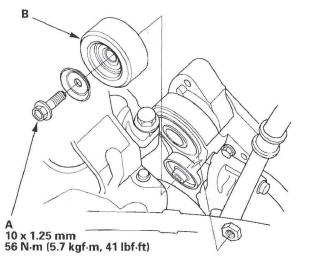
4. Remove the tensioner pulley bolt (A), then remove the tensioner pulley (B).
5. Remove the auto-tensioner.
6. Install the auto-tensioner in the reverse order of removal.
Tensioner Pulley Replacement
1. Remove the drive belt.
2. Remove the power steering (P/S) fluid reservoir from the holder.
3. Remove the P/S pump (A) without disconnecting the P/S hoses, then remove the P/S hose from the clamp (B).
4. Remove the tensioner pulley bolt (A), then remove the tensioner pulley (B).
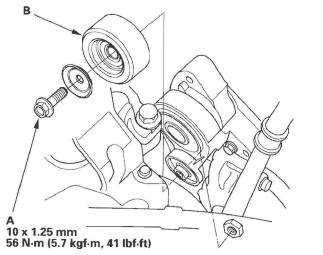
5. Install the tensioner pulley in the reverse order of removal.
READ NEXT:
 Alternator Removal and
Installation
Alternator Removal and
Installation
Removal
1. Make sure you have the anti-theft code for the
audio system and the navigation system (if
equipped), then write down the XM radio presets.
2. Disconnect the negative cable from the battery
Cruise Control
Component Location Index
CRUISE MAIN INDICATOR
CRUISE CONTROL INDICATOR
CRUISE CONTROL
COMBINATION SWITCH
BRAKE PEDAL POSITION SWITCH
POWERTRAIN CONTROL MODULE (PCM)
TRANSMISSION RANGE
SEE MORE:
Engine Oil Life Display
To see the current engine oil life,
turn the ignition switch to the ON
(II) position, then press and release
the select/reset knob repeatedly
until the engine oil life indicator
appears.
The remaining engine oil life is
shown on the display according to
this table:
If the remai
To Select a File from Folder and File Lists
You can also select a folder or file by
using the VOL/SELECT knob. Push
the VOL/SELECT knob to switch
the display to the folder or file list,
then turn the VOL/SELECT knob to
select a folder or file. Press the
VOL/SELECT knob to set your
selection.
Pressing the
button goes back
to
