Honda CR-V: Charging System
Honda CR-V (2006–2011) Service Manual / Engine Electrical / Charging System
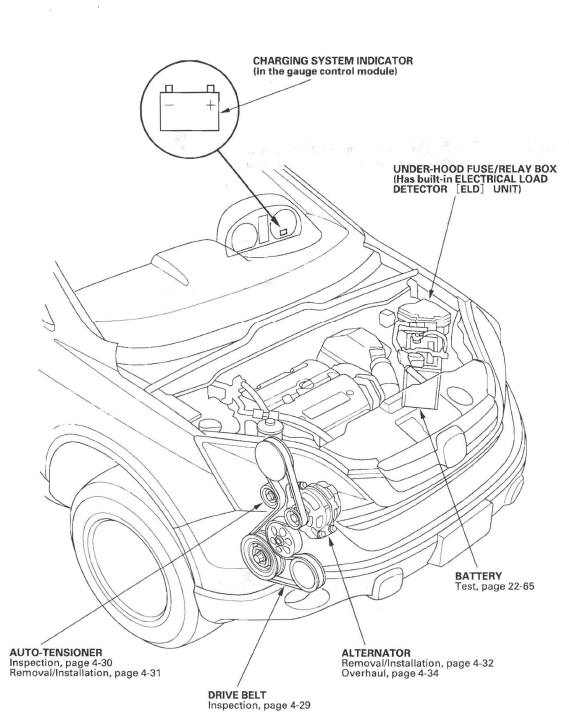
Component Location Index
-
CHARGING SYSTEM INDICATOR (In the gauge control module)
-
UNDER-HOOD FUSE/RELAY BOX (Has built-in ELECTRICAL LOAD DETECTOR [ELD] UNIT)
-
BATTERY
-
ALTERNATOR
-
DRIVE BELT
-
AUTO-TENSIONER
Symptom Troubleshooting Index
Charging system indicator does not come on with the ignition switch ON (II)
- Troubleshoot the charging system indicator circuit.
Charging system indicator stays on
- Check for PGM-FI DTCs
- Troubleshoot the charging system indicator circuit
- Check for a broken drive belt
- Check the drive belt auto-tensioner
Battery discharged
- Check for excessive parasitic electrical current draw
- Check for a broken drive belt
- Check the drive belt auto-tensioner
- Troubleshoot the alternator and regulator circuit
- Check for a poor connection at the battery terminal
- Test the battery
Battery overcharged
- Troubleshoot the alternator and regulator circuit
- Test the battery
Circuit Diagram
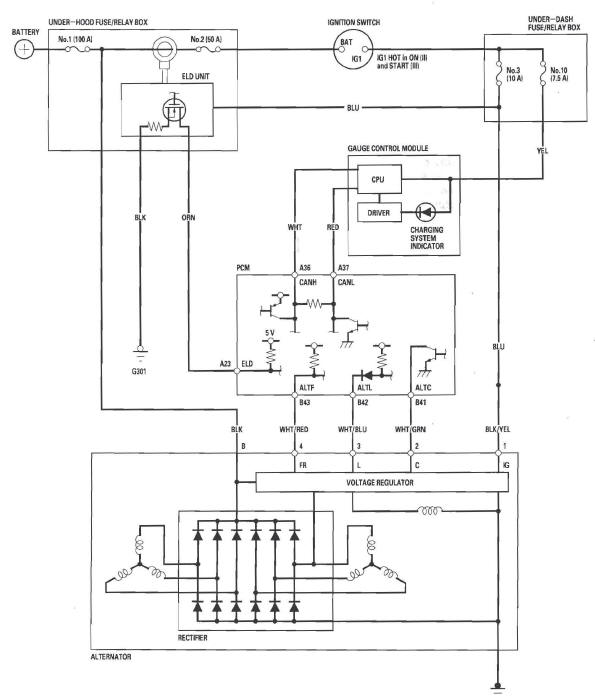
- Charging System Indicator Circuit Troubleshooting
- Alternator and Regulator Circuit Troubleshooting
- Drive Belt Inspection
- Alternator Removal and Installation
READ NEXT:
 Charging System Indicator
Circuit Troubleshooting
Charging System Indicator
Circuit Troubleshooting
1. Turn the ignition switch ON (II).
Does the charging system indicator come on?
YES-Go to step 2.
NO-Go to step 14.
2. Start the engine. Hold the engine speed at
2,000 rpm for 1 minute.
Does the c
Alternator and Regulator
Circuit Troubleshooting
1. Make sure the battery connections are good and
the battery is sufficiently charged.
2. Connect a VAT-40 (or equivalent tester), and turn
the selector switch to position 1 (starting).
3. Start the
Drive Belt Inspection
1. Inspect the belt for cracks and damage. If the belt is
cracked or damaged, replace it.
2. Check that the auto-tensioner indicator (A) is within
the standard range (B) as shown. If it is out of the
SEE MORE:
System Description
MICU Control Functions Index
The MICU (built into the under-dash fuse/relay box) is one of the B-CAN
components. The MICU controls many
systems related to the body controller area network, and also works as a gateway
to diagnose the other B-CAN circuits
with the HDS.
Refer to each system circuit d
Using a Booster Seat
A child who has outgrown a forwardfacing
child seat should ride in a
back seat and use a booster seat
until the lap/shoulder belt fits them
properly without the booster.
Some states, Canadian provinces and
territories also require children to
use a booster seat until they reach a
© 2016-2026 Copyright www.hcrv.net
