Honda CR-V: Shift Cable
Shift Cable Replacement
1. Lift the vehicle up on a lift or apply the parking brake, block rear wheels, and raise the *front of the vehicle. Make sure it is securely supported.
2. Remove the following parts:
- Heater control panel
- Dashboard center panel
- Center lower covers
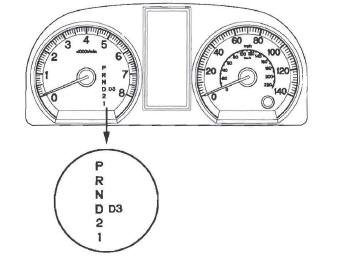
3. Shift the shift lever into the R position.
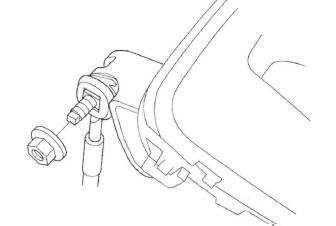
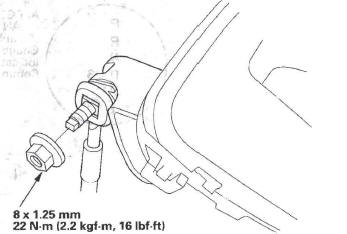
4. Remove the nut securing the shift cable end.
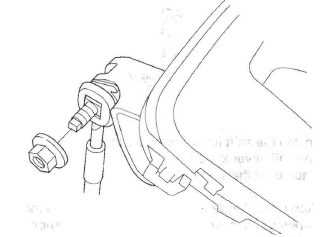
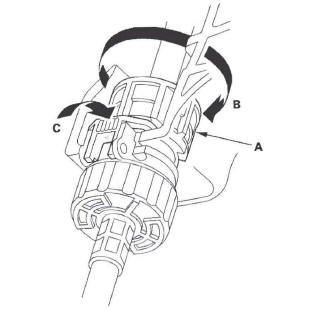
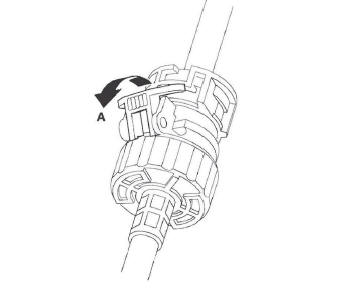
5. Unlock the retainer (A).
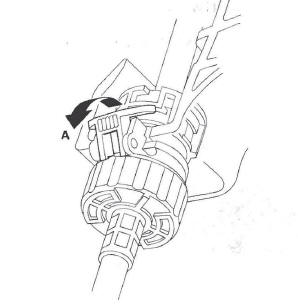
6. Rotate the socket holder retainer (A) counterclockwise (B) until it stops, and push in the retainer (C) to lock it.
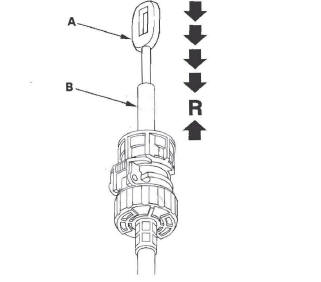
7. Lower the socket holder (A), then slide it to remove the shift cable (B) from the shift cable bracket (C).

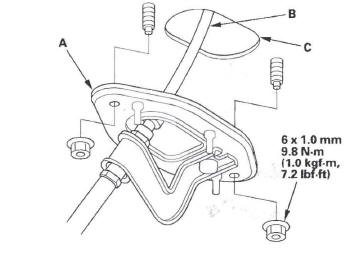
8. Remove the shift cable cover (A).
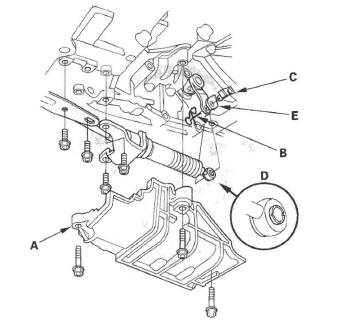
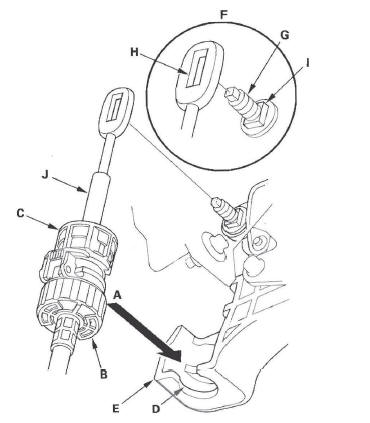
9. Remove the spring clip (B) and control pin (C), and separate the shift cable end (D) from the control lever (E). Remove the bolts securing the shift cable brackets.
10. Remove the nuts securing the shift cable grommet (A).
11. Remove the shift cable grommet, and pull out the shift cable (B).
12. Insert the new shift cable through the grommet hole (C), and install the grommet in its hole. Do not bend the shift cable excessively.
13. Secure the shift cable grommet with the nuts.
14. Apply molybdenum grease to the bore hole of the synthetic resin bushing (A) in the shift cable end (B), and attach the shift cable end to the control lever (C), then insert the control pin (D) into the control lever hole through the shift cable end, and secure the control pin with the spring clip (E). Do not bend the shift cable excessively.
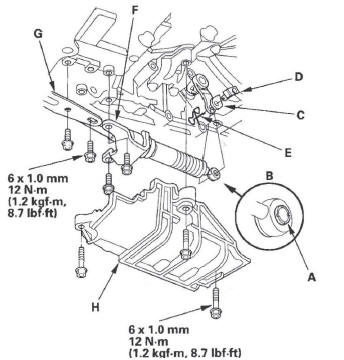
15. Secure the shift cable brackets (F) (G) with the bolts.
16. Install the shift cable cover (H).
17. Install the shift cable on the shift lever, and adjust the shift cable (see step 7).
Shift Cable Adjustment
1. Remove the following parts:
- Heater control panel
- Dashboard center panel
- Center lower covers
2. Shift the shift lever into the R position.
3. Remove the nut securing the shift cable end.
4. Unlock the retainer (A).
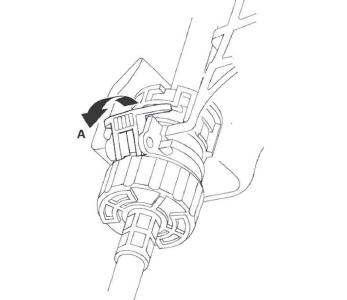
5. Rotate the socket holder retainer (A) counterclockwise (B) until it stops, and push in the retainer (C) to lock it.
6. Lower the socket holder (A), then slide it to remove the shift cable (B) from the shift cable bracket (C).
Do not remove the shift cable by pulling the shift cable guide (D).

7. Push the shift cable (A) until it stops, then release it.
Pull the shift cable back one step so that the shift position is in R. Do not hold the shift cable guide (B) to adjust the shift cable.
8. Turn the ignition switch ON (II), and verify that the R position indicator comes on.
9. Turn the ignition switch OFF.
10. Place the shift lever in the R position, then insert a 6.0 mm (0.24 in.) pin (A) into the positioning hole (B) on the shift lever, through the positioning hole on the shift lever, and into the positioning hole on the bracket. Use only a 6.0 mm pin with no burrs.
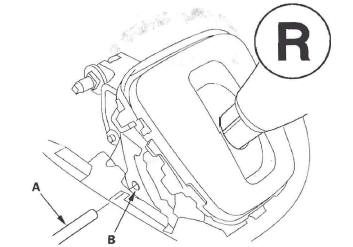
11. Verify that the shift lever is secured in the R position.
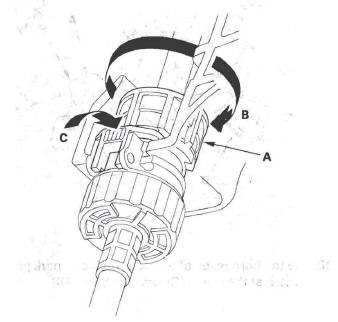
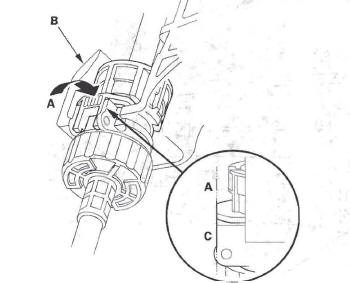
12. Unlock the retainer (A).
13. Rotate the socket holder retainer (A) counterclockwise (B) until it stops to create clearance (C) between the socket holder (D) and holder retainer, and push in the retainer (E) to lock it.

14. Align the clearance (A) between the socket holder (B) and the socket holder retainer (C) with the opening (D) in the shift cable bracket (E), then slide the holder into the bracket with installing the shift cable end (F) over the mounting stud (G) by aligning its square hole (H) with the square fitting (I) at the bottom of the stud. Do not install the shift cable by holding the shift cable guide (J).
NOTE: When the socket holder is installed in the shift cable bracket, the retainer lock is unhinged and releases the holder retainer lock, then the holder retainer returns under spring force to secure the shift cable.
15. Push the retainer lock (A) fully to lock the socket holder retainer (B), and make sure that the retainer lock fits into the hinged-joint (C). If the retainer lock does not fit with the edge of the hinged-joint, rotate the holder retainer counterclockwise while pushing the retainer lock until it locks.
16. Verify that the shift cable end is properly installed on the mounting stud.
Improperly installed:
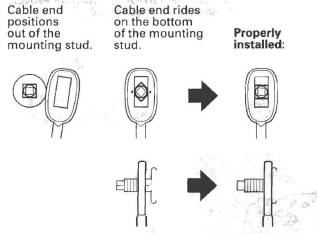
17. If the cable end is out of position on the mounting stud, remove the shift cable from the bracket, and reinstall the shift cable. Do not install the shift cable end on the mounting stud while the shift cable is on the bracket. If the cable end rides on the bottom of the mounting stud, rotate the stud and align the square fitting with the hole.
18. Install and tighten the nut on the shift cable end.
19. Remove the 6.0 mm (0.24 in.) pin that was installed to hold the shift lever.
20. Turn the ignition switch ON (II). Move the shift lever to each position, and verify that the A/T gear position indicator follows the transmission range switch.
21. Shift to the P position, and check that the shift lock works properly. Push the shift lock release, and verify that the shift lever releases, and also check that the shift lever locks when it is shifted back to the P position.
22. Install the following parts:
- Center lower covers
- Dashboard center panel
- Heater control panel
READ NEXT:
 A/T Gear Position Indicator
Component Location Index
A/T GEAR POSITION INDICATOR
F-CAN Communication Circuit Troubleshooting
Gauge Control Module Self-diagnostic Function Indicator Drive Circuit
Check
Communication Line
A/T Interlock System
Component Location Index
DATA LINK CONNECTOR (DLC) SHIFT LOCK SOLENOID
Shift Lock System Circuit
Troubleshooting
Test
Replacement
PARK PIN SWITCH
Key Interlock System Circuit
Troubleshooting
Transmission End Cover
End Cover Removal
Special Tools Required
Mainshaft holder 07GAB-PF50101 or 07GAB-PF50100
NOTE: The illustration shows the 4WD transmission; the 2WD is similar.
1. Remove the cooler inlet line bolt (D)
SEE MORE:
Brake System
Brake System Inspection and Test
Inspect the brake system components listed. Repair or replace any parts that
are leaking or damaged.
Component Inspections
Brake System Test
Brake pedal sinks/fades when braking
1. Set the parking brake, and start the engine, then turn off the A/C switch.
Allow th
General Troubleshooting Information
System Indicator
This system has four indicators:
ABS indicator (A)
Brake system indicator (B)
VSA indicator (C)
VSA activation indicator (D)
When the system detects a problem, it will turn the
appropriate indicators on. Depending on the failure, the
VSA modulator-control unit determines whic
