Honda CR-V: A/T Gear Position Indicator
Component Location Index
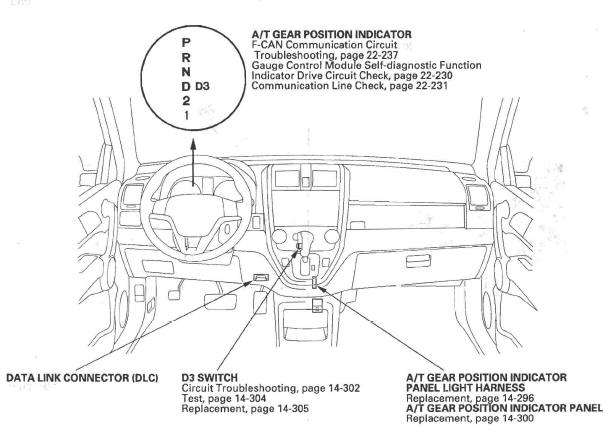
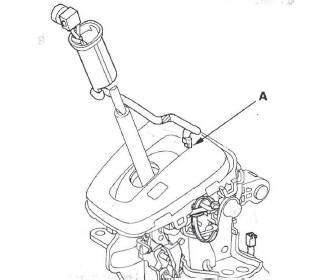
- A/T GEAR POSITION INDICATOR
F-CAN Communication Circuit Troubleshooting
Gauge Control Module Self-diagnostic Function Indicator Drive Circuit Check
Communication Line Check - A/T GEAR POSITION INDICATOR PANEL LIGHT HARNESS
Replacement
A/T GEAR POSITION INDICATOR PANEL
Replacement - D3 SWITCH
Circuit Troubleshooting
Test
Replacement - DATA LINK CONNECTOR (DLC)
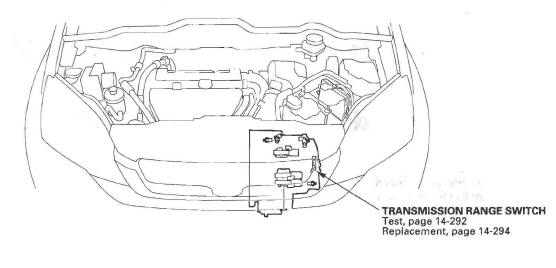
- TRANSMISSION RANGE SWITCH
Test
Replacement
Circuit Diagram
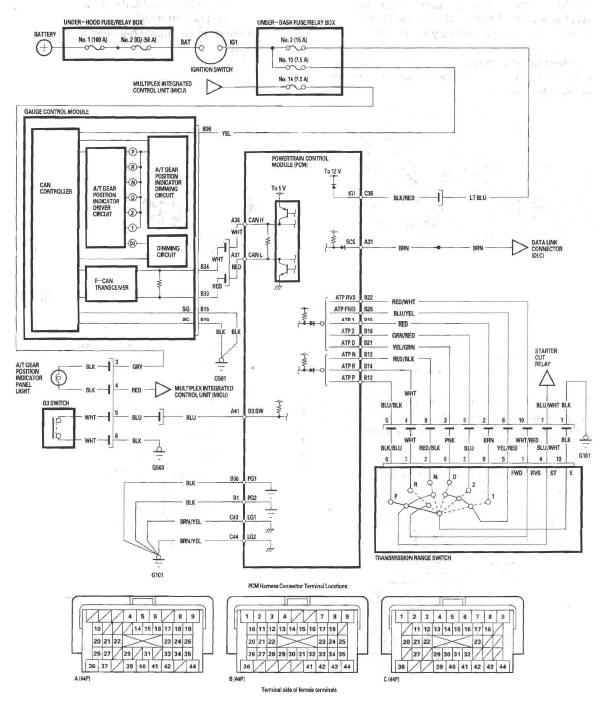
Transmission Range Switch
Transmission Range Switch Test
1. Raise the vehicle on a lift, or apply the parking brake, block rear wheels, and raise the front of the vehicle. Make sure it is securely supported.
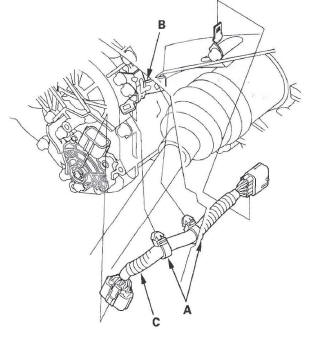
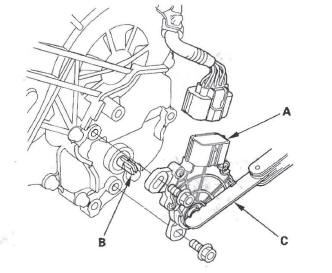
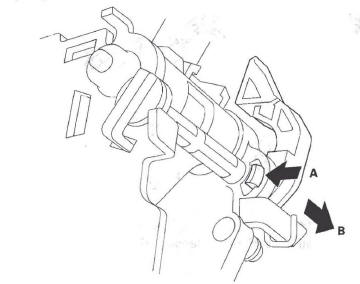
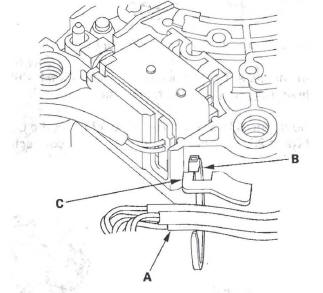
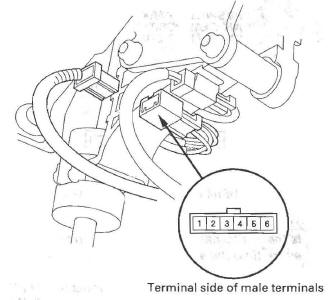
2. Disconnect the transmission range switch harness connector (A), and remove the connector from the connector bracket.
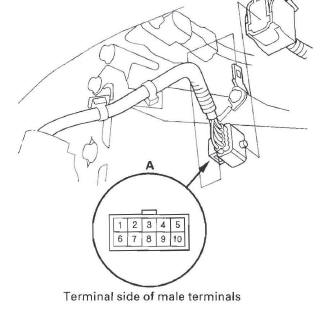
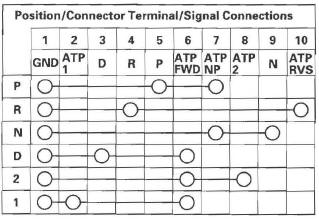
3. Check for continuity between terminals at the harness connector. There should be continuity between the terminals in the following table for each switch position.
Transmission Range Switch Harness Connector
4. If the test results are OK, the transmission range switch test is complete.
If there is no continuity between any terminals, go to step 5.
5. Remove the transmission range switch cover.
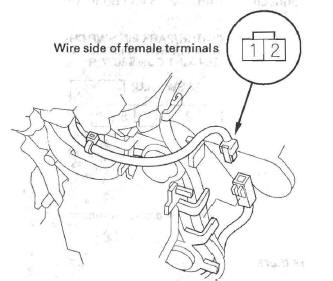
6. Disconnect the transmission range switch connector.
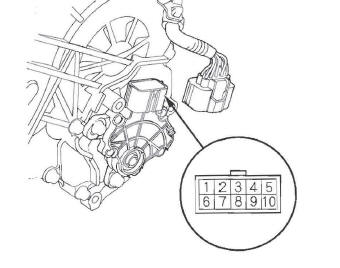
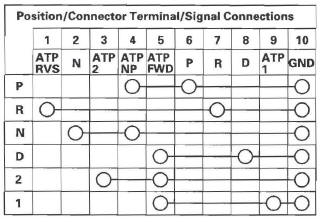
7. Check for continuity between terminals at the switch connector. There should be continuity between the terminals in the following table for each switch position.
Transmission Range Switch Connector
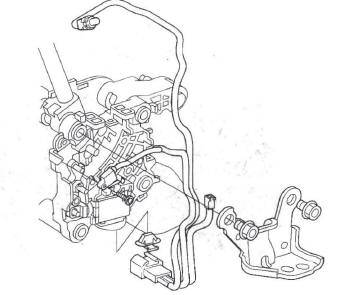
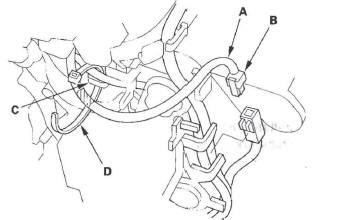
8. If the transmission range switch continuity check is OK, remove the harness clamps (A) from the clamp bracket (B), and replace the faulty transmission range switch harness (C).
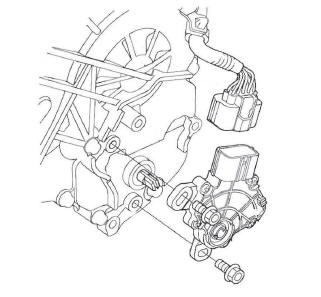
9. If there is no continuity between any terminals, remove the transmission range switch, and check the end of the selector control shaft (A).
Selector Control Shaft Specification
Width (B): 6.1-6.2 mm (0.240-0.244 in.)
End Gap (C): 1.8-2.0 mm (0.07-0.08 in.)

10. If the measurement of the selector control shaft end is within the specification, replace the transmission range switch. If the measurement is out of the specification, repair the selector control shaft end, and recheck the transmission range switch continuity.
Transmission Range Switch Replacement
1. Raise the vehicle on a lift, or apply the parking brake, block rear wheels, and raise the front of the vehicle. Make sure it is securely supported.
2. Shift the N position.
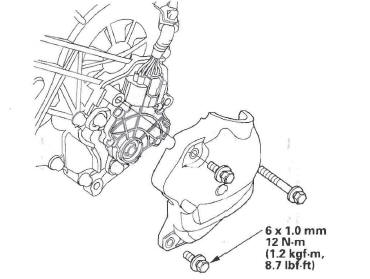
3. Remove the transmission range switch cover.
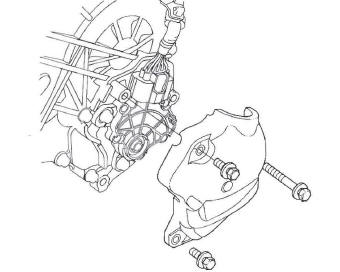
4. Remove the transmission range switch.
5. Make sure the control shaft is in the N position. If necessary, move the shift lever to the N position.
NOTE: Do not use the selector control shaft to adjust the shift position. If the control shaft tips are squeezed together it will cause a faulty signal or position due to play between the selector control shaft and switch.
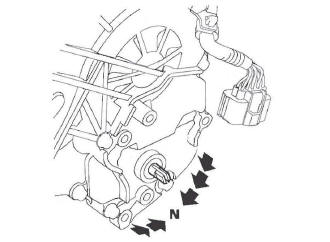
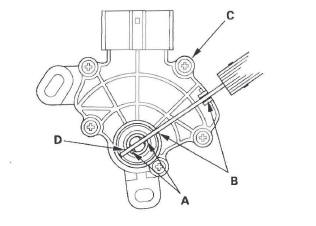
6. Align the cutouts (A) on the rotary-frame with the neutral positioning cutouts (B) on the transmission range switch (C), then put a 2.0 mm (0.08 in.) feeler gauge blade (D) in the cutouts to hold the switch in the N position.
NOTE: Be sure to use a 2.0 mm (0.08 in.) blade or equivalent to hold the switch in the N position.
7. Install the transmission range switch (A) gently on the selector control shaft (B) while holding it in the N position with the 2.0 mm (0.08 in.) blade (C).
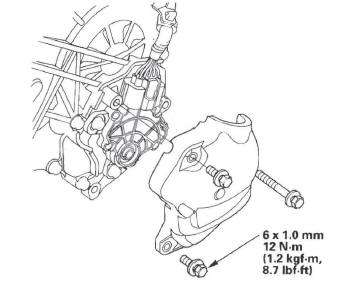
8. Tighten the bolts on the transmission range switch while you continue to hold the N position. Do not move the transmission range switch when tightening the bolts. Remove the feeler gauge.

9. Check the connectors for rust, dirt, or oil, then connect the connector securely.
10. Turn the ignition switch ON (II). Move the shift lever through all positions, and make sure the transmission range switch is synchronized with the A/T gear position indicator.
11. Make sure the engine will start in the P and N positions, and will not start in any other shift lever position.
12. Make sure the back-up lights come on when the shift lever is in the R position.
13. Allow the all four wheels (4WD model) or the front wheels (2WD model) to rotate freely, then start the engine, and check the shift lever operation.
14. Install the transmission range switch cover.
A/T Gear Position Indicator Panel
A/T Gear Position Indicator Panel Light Harness Replacement
NOTE:
- The A/T gear position indicator panel light harness is not available from the park pin switch and D3 switch connector harness; replace the A/T gear position indicator panel light harness, park pin switch, D3 switch connector harness, and the connector as a set.
- Refer to the Shift Lever Disassembly and Reassembly as needed during the following procedures.
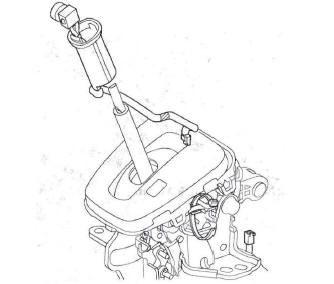
1. Remove the shift lever.
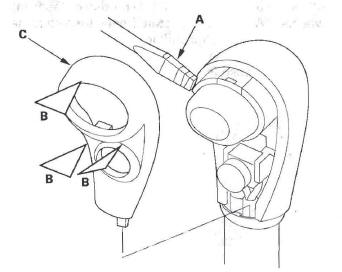
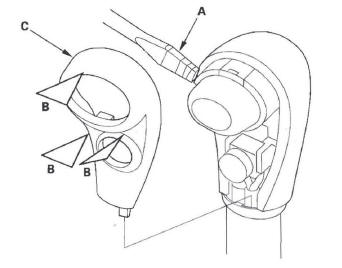
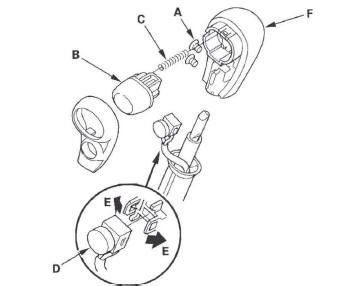
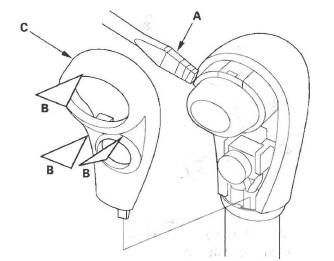
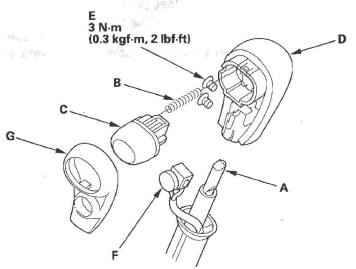
2. Wrap the end of a flat-tip screwdriver (A) with tape, pry the shift lever knob cover locks (B), and remove the shift lever knob cover (C).
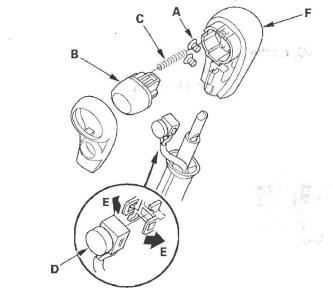
3. Remove the screws (A), shift lever button (B), and spring (C).
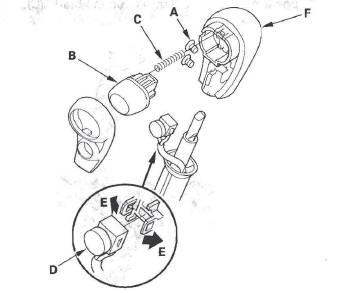
4. Remove the D3 switch (D) by expanding its locks (E) from the shift lever knob, and remove the shift lever knob (F).
5. Remove the shift lock solenoid connector and D3 switch/park pin switch/A/T gear position indicator panel light connector from the shift lever.
6. Remove the harness bands, and disconnect the D3 switch 2P connector.
7. Remove the D3 switch harness and shift lever ring.
8. Remove the A/T gear position indicator panel light socket from the indicator panel, and remove the indicator panel.
9. Release the lock (A) of the shift lock release, and remove the shift lock release and release spring (B).
10. Remove the shift lever mounting bracket, and remove the park pin switch.
11. Remove the A/T gear position indicator panel light harness, park pin switch, D3 switch connector harness, and connector assembly, and replace it.
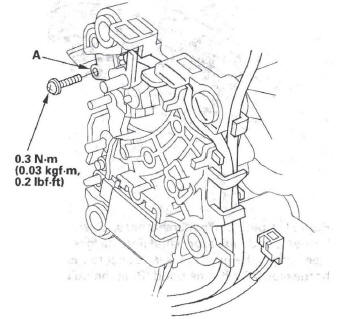
12. Apply non-hardening thread lock sealant to the screw threads. Install the park pin switch (A), and secure the switch with the screw.
13. Install the shift lever mounting bracket.
14. Install the A/T gear position indicator panel, shift lever ring, and D3 switch harness.
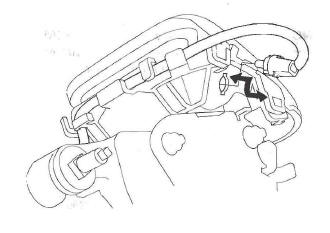
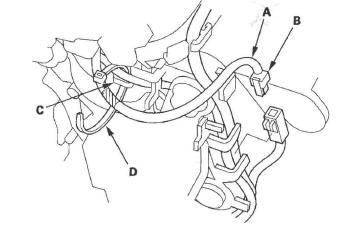
15. Route the D3 switch harness (A), connect the D3 switch 2P connector (B), and install the connector in the holder.
16. Tie the harnesses of the D3 switch and park pin switch at the guide (C) with the band (D).
17. Install the A/T gear position indicator panel light socket in the indicator panel.
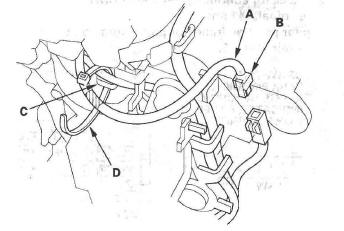
18. Route the park pin switch harness, D3 switch harness, and indicator panel light harness. Take a slack out of the harnesses, and secure the harnesses (A) with the band (B) at the guide (C).
19. Install the shift lock solenoid connector and D3 switch/park pin switch/A/T gear position indicator panel light connector on the shift lever.
20. Install the shift lock release spring (A) in the shift lock release (B).
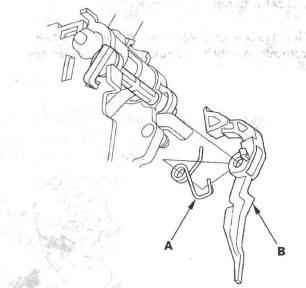
21. Install the shift lock release and release spring on the release shaft end.
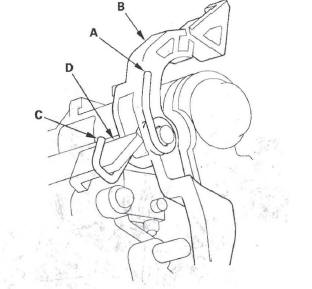
22. Make sure that the release spring end (A) is installed in the shift lock release (B), and the hooked end (C) is hitched on the catch (D).
23. Apply silicone grease to the top of the shift lever rod (A), to the shift lever button spring (B), and to the area of the shift lever button (C) connected with the shift lever rod.
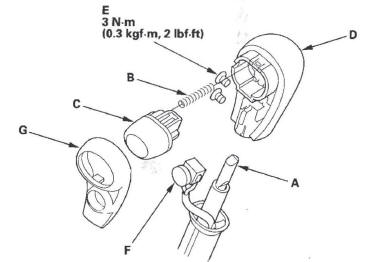
24. Install the shift lever button spring and button in the shift lever knob (D), and install the shift lever knob over the shift lever.
25. Apply non-hardening thread lock sealant to the screw threads, and secure the shift lever knob with the screws (E).
26. Install the 03 switch (F) and shift lever knob cover (G) on the shift lever knob.
27. Install the shift lever.
A/T Gear Position Indicator Panel Assembly Replacement
NOTE: Refer to the Shift Lever Disassembly and Reassembly as needed during the following procedures.
1. Remove the shift lever.
2. Wrap the end of a flat-tip screwdriver (A) with tape, pry the shift lever knob cover locks (B), and remove the shift lever knob cover (C).
3. Remove the screws (A), shift lever button (B), and spring (C).
4. Remove the D3 switch (D) by expanding its locks (E) from the shift lever knob, and remove the shift lever knob (F).
5. Remove the harness band, and disconnect the D3 switch 2P connector (A).
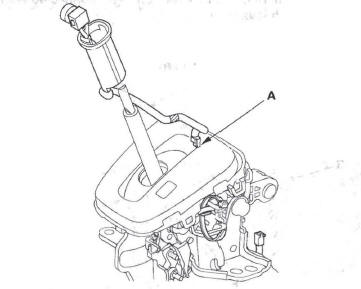
6. Remove the D3 switch harness and shift lever ring.
7. Remove the A/T gear position indicator panel light socket from the indicator panel.
8. Remove the A/T gear position indicator panel, and disassemble the indicator panel (A), panel base (B), and lever cover (C).

9. Replace the indicator panel, panel base, or lever cover, and assemble the A/T gear position indicator panel; install the lever cover in the panel base with the marks (D) point toward the front.
10. Install the A/T gear position indicator panel, and install the shift lever ring and D3 switch harness.
11. Route the D3 switch harness (A), connect the D3 switch 2P connector (B), and install the connector in the holder.
12. Tie the harnesses of the D3 switch and park pin switch at the guide (C) with the band (D).
13. Install the A/T gear position indicator panel light socket in the indicator panel.
14. Apply silicone grease to the top of the shift lever rod (A), to the shift lever button spring (B), and to the area of the shift lever button (C) connected with the shift lever rod.
15. Install the shift lever button spring and button in the shift lever knob (D), and install the shift lever knob over the shift lever.
16. Apply non-hardening thread lock sealant to the screw threads, and secure the shift lever knob with the screws (E).
17. Install the D3 switch (F) and shift lever knob cover (G) on the shift lever knob.
18. Install the shift lever.
D3 Switch
D3 Switch Circuit Troubleshooting
1. Remove the shift lever.
2. Turn the ignition switch ON (II).
3. Measure the voltage between D3 switch/park pin switch/A/T gear position indicator panel light connector terminals No.5 and No.6.
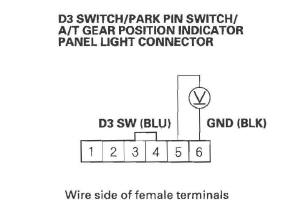
Is there about 5 V? YES-Go to step 10.
NO-Go to step 4.
4. Measure the voltage between D3 switch/park pin switch/A/T gear position indicator panel light connector terminal No.5 and body ground.

Is there about 5 V? YES-Repair open in the wire between D3 switch/ park pin switch/A/T gear position indicator panel light connector terminal No.6 and ground (G503), and repair poor ground (G503).
NO-Go to step 5.
5. Turn the ignition switch OFF.
6. Jump the SCS line with the HDS.
7. Disconnect PCM connector A (44P).
8. Check for continuity between PCM connector terminal A41 and D3 switch/park pin switch/A/T gear position indicator panel light connector terminal No.5.

Is there continuity? YES-Go to step 9.
NO-Repair open in the wire between PCM connector terminal A41 and the D3 switch/park pin switch/A/T gear position indicator panel light connector.
9. Check for continuity between D3 switch/park pin switch/A/T gear position indicator panel light connector terminal No.5 and body ground.
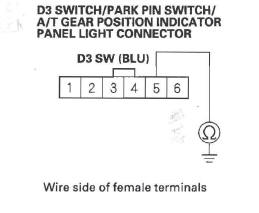
Is there continuity? YES-Repair short in the wire between PCM connector terminal A41 and the D3 switch/park pin switch/A/T gear position indicator panel light connector.
NO-Check for loose or poor connection at PCM connector terminal A41. If the connection is OK, substitute a known-good PCM and recheck. If the symptom goes away with a known-good PCM, replace the original PCM.
10. Check for continuity between D3 switch/park pin switch/A/T gear position indicator panel light connector terminals No.5 and No.6 while pressing the D3 switch several times.
Is there alternating continuity and no continuity every time the switch is pushed? YES-Check for loose or poor connection at PCM connector terminal A41. If the connection is OK, substitute a known-good PCM and recheck. If the symptom goes away with a known-good PCM, replace the original PCM.
NO-Replace the D3 switch.
D3 Switch Test
1. Remove the center lower covers.
2. Disconnect D3 switch/park pin switch/A/T gear position indicator panel light connector.
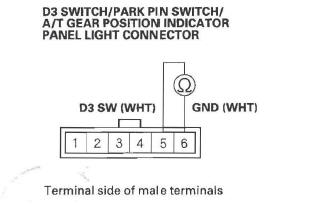
3. Push the D3 switch several times, and check the switch for continuity between D3 switch/park pin switch/A/T gear position indicator panel light connector terminals No.5 and No.6. There should be toggled continuity and no continuity between terminals every time the D3 switch is pushed.
4. D3 switch test is finished if the test result is OK. If the D3 switch works incorrectly at the D3 switch/ park pin switch/A/T gear position indicator panel light connector, test the D3 switch at the D3 switch 2P connector.
5. Remove the shift lever.
6. Remove the D3 switch 2P connector from the connector holder, and disconnect it.
7. Push the D3 switch several times) and check the switch for continuity between D3 switch 2P connector terminals No.1 and No. 2. There should be toggled continuity and no continuity between terminals every time the D3 switch is pushed.
8. Replace the D3 switch if the switch works incorrectly.
9. Replace the D3 switch connector harness, A/T gear position indicator panel light harness, and park pin switch as a set if the switch is OK.
The D3 switch connector harness is not available from the A/T gear position indicator panel light harness and park pin switch.
10. Connect the 2P connector, and install it in the holder.
11. Install the shift lever.
12. Install the center lower covers.
D3 Switch Replacement
NOTE: Refer to the Shift Lever Disassembly and Reassembly as needed during the following procedures.
1. Remove the shift lever.
2. Wrap the end of a flat-tip screwdriver (A) with tape, pry the shift lever knob cover locks (B), and remove the shift lever knob cover (C).
3. Remove the screws (A), shift lever button (B), and spring (C).
4. Remove the D3 switch (D) by expanding its locks (E) from the shift lever knob, and remove the shift lever knob (F).
5. Remove the harness band, and disconnect the D3 switch 2P connector (A).
6. Remove the D3 switch and shift lever ring.
7. Replace the D3 switch, and install the D3 switch harness through the shift lever ring.
8. Install the shift lever ring over the shift lever.
9. Route the D3 switch harness (A), connect the D3 switch 2P connector (B), and install the connector in the holder.
10. Tie the harnesses of the D3 switch and park pin switch at the guide (C) with the band (D).
11. Apply silicone grease to the top of the shift lever rod (A), to the shift lever button spring (B), and to the area of the shift lever button (C) connected with the shift lever rod.
12. Install the shift lever button spring and button in the shift lever knob (D), and install the shift lever knob over the shift lever.
13. Apply non-hardening thread lock sealant to the screw threads, and secure the shift lever knob with the screws (E).
14. Install the D3 switch (F) and shift lever knob cover (G) on the shift lever knob.
15. Install the shift lever.
READ NEXT:
 A/T Interlock System
Component Location Index
DATA LINK CONNECTOR (DLC) SHIFT LOCK SOLENOID
Shift Lock System Circuit
Troubleshooting
Test
Replacement
PARK PIN SWITCH
Key Interlock System Circuit
Troubleshooting
Transmission End Cover
End Cover Removal
Special Tools Required
Mainshaft holder 07GAB-PF50101 or 07GAB-PF50100
NOTE: The illustration shows the 4WD transmission; the 2WD is similar.
1. Remove the cooler inlet line bolt (D)
Transmission Housing
Housing and Shaft Assembly Removal
NOTE: The illustration shows the 4WD transmission; the 2WD does not have the
transfer mechanism.
1. Remove the ATF feed pipe (A) from the idler gear shaft, and the
SEE MORE:
Front and Rear Suspension
Special Tools
Strut Nut Adapter
Universal Eyelet
Hub Dis/Assembly Tool
Attachment, 40 mm
Ball Joint Remover, 32 mm
Ball Joint Remover, 28 mm
Ball Joint Thread Protector, 14 mm
Attachment, 72 x 75 mm
Driver
Attachment, 96 mm
Support Base
Component Location Index
Front Suspension
STAB
Daytime Running Lights
With the headlight switch in the off
or
position,
the high beam
headlights and the high beam
indicator come on with reduced
brightness when you turn the
ignition switch to the ON (II)
position and release the parking
brake. They remain on until you turn
the ignition switch off, e
