Honda CR-V: A/T Interlock System
Component Location Index
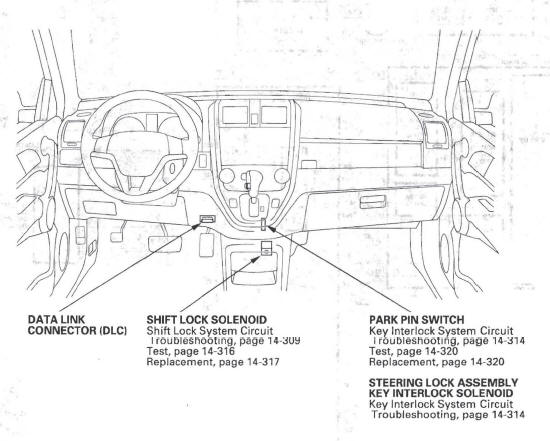
- DATA LINK CONNECTOR (DLC) SHIFT LOCK SOLENOID
Shift Lock System Circuit Troubleshooting
Test
Replacement - PARK PIN SWITCH
Key Interlock System Circuit Troubleshooting
Test
Replacement - STEERING LOCK ASSEMBLY KEY INTERLOCK SOLENOID
Key Interlock System Circuit Troubleshooting
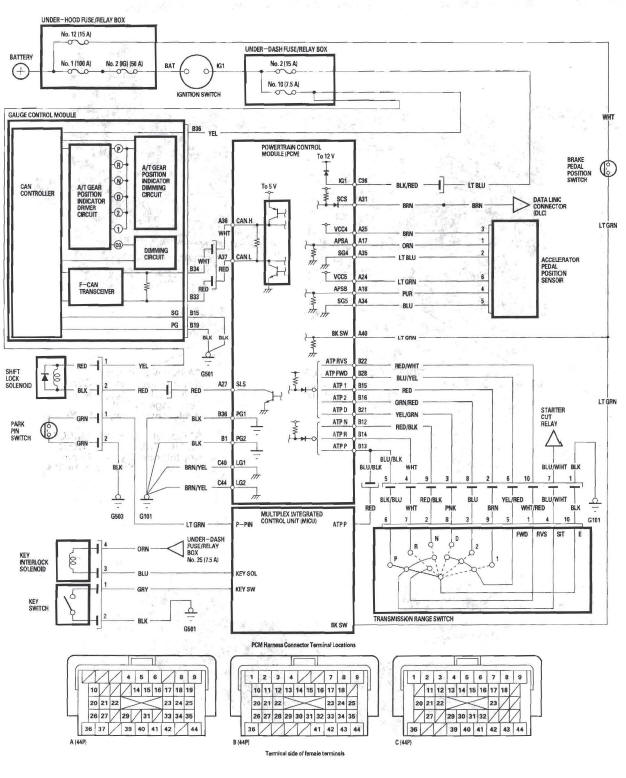
Circuit Diagram
Shift Lock System Circuit Troubleshooting
1. Connect the HDS to the DLC.
2. Select Shift Lock Solenoid Test in the Miscellaneous Test Menu, and check that the shift lock solenoid operates with the HDS.
NOTE: If the HDS does not communicate with the PCM, troubleshoot the DLC circuit.
Does the shift lock solenoid work properly? YES-Go to step 14.
NO-Go to step 3.
3. Remove the center lower covers.
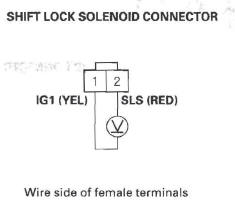
4. Disconnect the shift lock solenoid connector.
5. Turn the ignition switch ON (II).
6. Measure the voltage between shift lock solenoid connector terminal No. 1 and body ground.
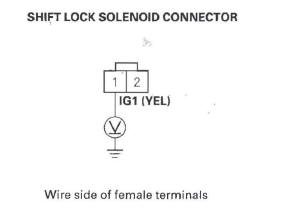
Is there battery Voltage? YES-Go to step 7.
NO-Check for a blown No. 10 (7.5 A) fuse in the under-dash fuse/relay box. If the fuse is OK, repair open or short in the wire between shift lock solenoid connector terminal No.1 and the under-dash fuse/relay box.
7. Shift the shift lever into the P position, and press the brake pedal. Do not press the accelerator.
8. Measure the voltage between shift lock solenoid connector terminals No.1 and No.2 while pressing the brake pedal.
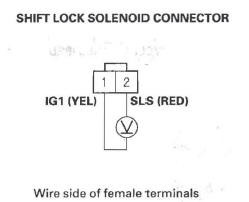
Is there battery voltage? YES-Go to step 9.
NO-Go to step 10.
9. Release the brake pedal, and measure the voltage between connector terminals No.1 and No.2. The shift lever must be in the P position.
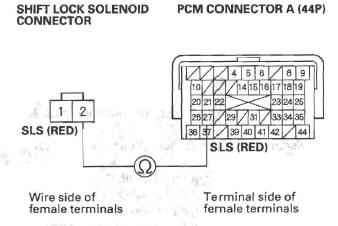
Is there battery voltage? YES-Repair short in the wire between PCM connector terminal A27 and the shift lock solenoid.
NO-Check the shift lock mechanism. If the mechanism is OK, replace the shift lock solenoid.
10. Turn the ignition switch OFF.
11. Jump the SCS line with the HDS.
12. Disconnect PCM connector A (44P).
13. Check for continuity between PCM connector terminal A27 and shift lock solenoid connector terminal No.2.
Is there continuity?
YES-Substitute a known-good PCM and recheck.
NO-Repair open in the wire between PCM connector terminal A27 and the shift lock solenoid.
14. Press the brake pedal.
Are the brake lights ON? YES-Go to step 15.
NO-Repair faulty brake light circuit.
15. Turn the ignition switch OFF.
16. Jump the SCS line with the HDS.
17. Disconnect PCM connector A (44P).
18. Measure the voltage between PCM connector terminal A40 and body ground while pressing the brake pedal and when the brake pedal is released.
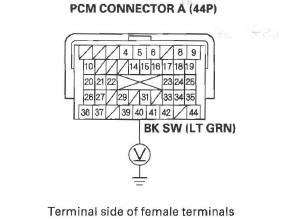
Is there battery voltage while the brake pedal is pressed, and no voltage when the pedal is released? YES-Go to step 20.
NO-Go to step 19.
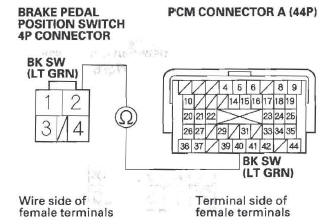
19. Disconnect brake pedal position.switch4P.
connector, and check for continuity between PCM connector terminal A40 and brake pedal position switch 4P connector terminal No.2.
Is there continuity?
YES-Substitute a known-good PCM and recheck.
NO-Repair open in the wire between PCM connector terminal A40 and the brake pedal position switch.
20. Connect PCM connector A (44P).
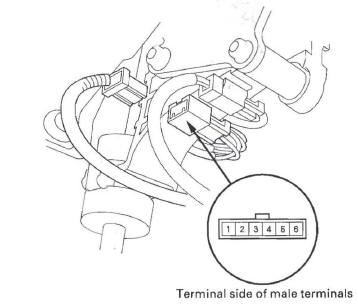
21. Disconnect the transmission range switch connector.
22. Turn the ignition switch ON (II).
23. Measure the voltage between transmission range switch connector terminals No.6 and No. 10.
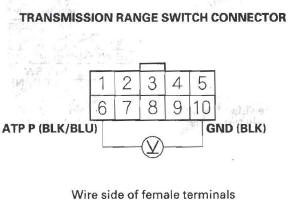
Is there about 5 V? YES-Go to step 28.
NO-Go to step 24.
24. Turn the ignition switch OFF.
25. Disconnect PCM connector B (44P).
26. Check for continuity between PCM connector terminal B13 and body ground.
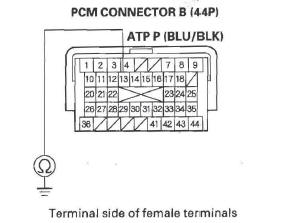
Is there continuity? YES-Repair short in the wire between PCM connector terminal B13 and the transmission range switch connector.
NO-Go to step 27.
27. Check for continuity between PCM connector terminal B13 and transmission range switch connector terminal No.6.

Is there continuity?
YES-Go to step 28.
NO-Repair open in the wire between PCM connector terminal B13 and the transmission range switch connector.
28. Check for continuity between transmission range switch connector terminal No. 10 and body ground.

Is there continuity? YES-Substitute a known-good PCM (see page 14-10) and recheck.
NO-Repair open in the wire between transmission range switch connector terminal No. 10 and ground (G101), or repair poor ground (G101).
29. Test the transmission range switch.
Is the switch OK? YES-Go to step 30.
NO-Replace the transmission range switch.
30. Connect the HDS to the DLC.
31. Check the accelerator pedal position sensor 1 in the data list with the HDS. Do not press the accelerator.
Is the accelerator pedal position sensor 1 opening 11 % and above, or the sensor 1 voltage 0.90 V and above? YES-Check the throttle body.
NO-Substitute a known-good PCM.
Key Interlock System Circuit Troubleshooting
SRS components are located in this area. Review the SRS component locations (see page 24-13) and the precautions and procedures (see page 24-15) before doing repair or service.
1. Turn the ignition switch to ACC (I). The shift lever must be in the P position.
2. Disconnect the ignition key switch (6P) connector.
3. Check if the ignition switch can be turned to the LOCK (0) position.
Can the ignition switch be turned the LOCK (0) position? YES-Go to step 4.
NO-Replace the ignition key switch/steering lock assembly.
4. Turn the ignition switch OFF.
5. Move the shift lever into any position other than P.
6. Check for continuity between the ignition key switch connector terminal No.3 and body ground.
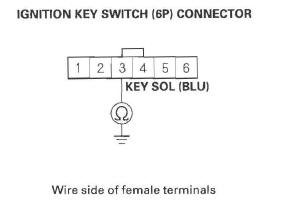
Is there continuity? YES-Repair a short in the wire between the key interlock solenoid and the MICU.
NO-Go to step 7.
7. Remove the shift lever.
8. Check for continuity between D3 switch/park pin switch/A/T gear position indicator panel light connector terminal No.1 and body ground.
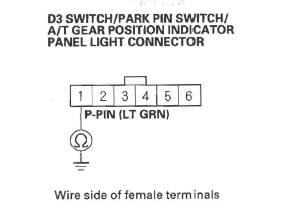
Is there continuity? YES-Repair short in the wire between D3 switch/ park pin switch/A/T gear position indicator panel light connector terminal No. 1 and the MICU.
NO-Go to step 9.
9. Move the shift lever into the P position.
10. Check for continuity between D3 switch/park pin switch/A/T gear position indicator panel light connector terminals No.1 and No. 2. Do not push the shift lever button.
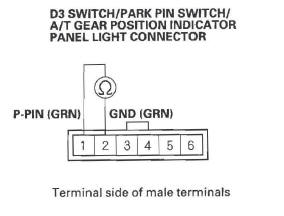
Is there continuity? YES-Replace the park pin switch.
NO-Go to step 11.
11. Disconnect the F (34P) connector from the under-dash fuse/relay box.
12. Turn the ignition switch ON (II).
13. Measure the voltage between under-dash fuse/ relay box F (34P) connector terminal No. 27 and body ground.
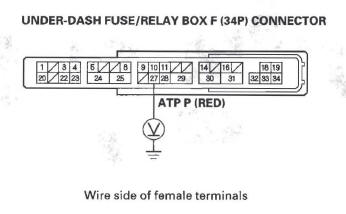
Is there about 5 V when the shift lever is in any position other than the P position, and no voltage when the shift lever is in the P position? YES-Substitute a known-good MICU and recheck.
NO-Repair open or short in the wire between the MICU and the transmission range switch.
Shift Lock Solenoid
Shift Lock Solenoid Test
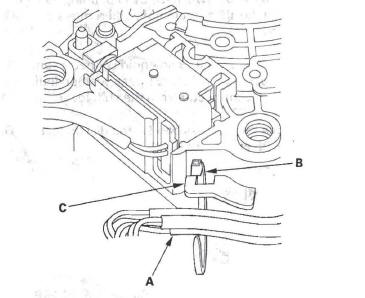
1. Connect the HDS to the DLC (A).
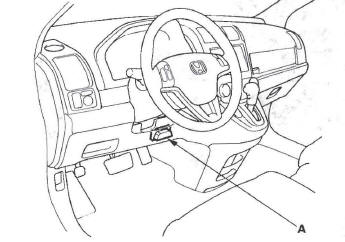
2. Select Shift Lock Solenoid Test in the Miscellaneous Test Menu of the HDS, and check that the shift lock solenoid operates.
NOTE: If the HDS does not communicate with the PCM, troubleshoot the DLC circuit.
3. Check that the shift lever can be moved out of the P position when Shift Lock Solenoid: ON. Move the shift lever back in the P position, and make sure it locks with Shift Lock Solenoid: OFF.
4. Check that the shift lock releases when the shift lock release is pushed, and check that it locks when the shift lock release is released.
5. If the shift lock solenoid does not work properly, perform shift lock system troubleshooting.
Shift Lock Solenoid Replacement
1. Remove the shift lever.
2. Remove the shift lock solenoid connector.
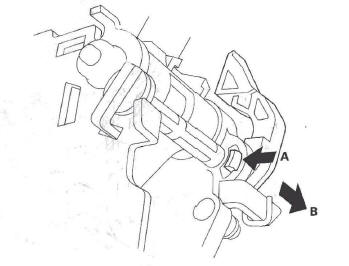
3. Release the lock tabs retaining the shift lock solenoid using thin blade screwdrivers.
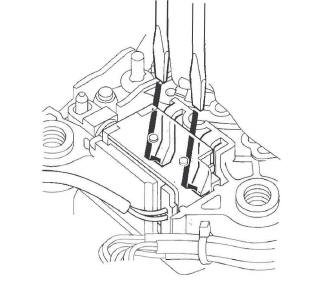
4. Insert a 6 mm pin (A) into the guide hole (B), and push the shift lock solenoid (C) out.
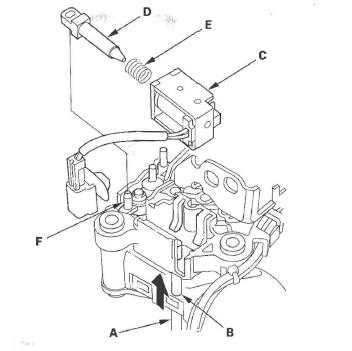
5. Replace the shift lock solenoid, solenoid plunger (D), and plunger spring (E) assembly.
6. Apply silicone grease to the tip (F) of the shift lock stop and solenoid plunger.
7. Install the shift lock solenoid by aligning the joint of the shift lock solenoid plunger with the tip of the shift lock stop, then push the shift lock solenoid into the shift lever securely.
8. Install the shift lock solenoid connector.
9. Install the shift lever.
Shift Lock Stop, Shift Lock Stop Cushion Replacement
1. Remove the shift lock solenoid.
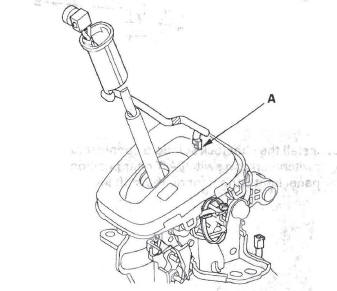
2. Remove the shift lock stop (A) and stop cushion (B), and replace the shift lock stop or stop cushion.

3. Install the shift lock stop cushion on the shift lock stop.
4. Apply silicone grease to the pin (C) on the shift lever bracket base, and install the shift lock stop over the pin.
5. Install the shift lock solenoid.
Shift Lock Release, Release Spring, Release Shaft Replacement
1. Remove the shift lever.
2. Remove the A/T gear position indicator panel from the shift lever.
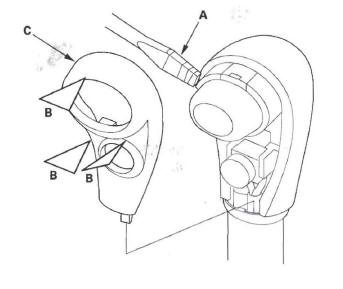
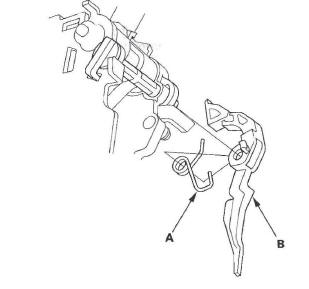
3. Release the lock (A) of the shift lock release, and remove the shift lock release and release spring (B).
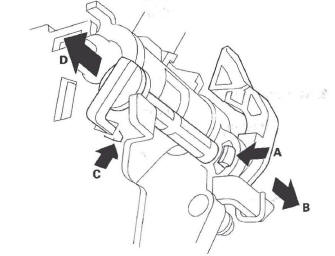
4. Release the lock (C) of the shift lock release shaft, and remove the shaft (D).
5. Replace the shift lock release, release spring, or release shaft.
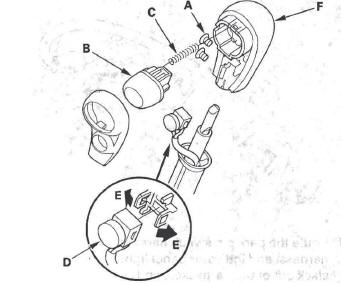
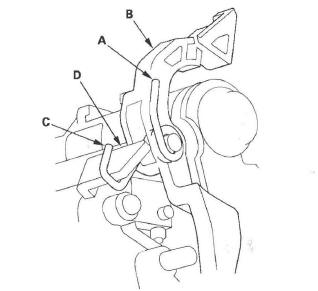
6. Install the shift lock release spring (A) in the shift lock release (B).
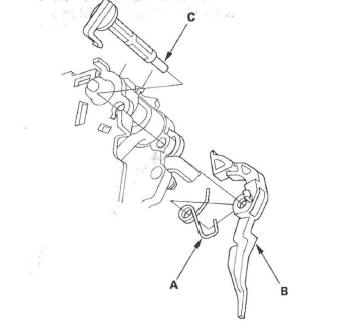
7. Install the shift lock release shaft (C) in the shift lever, and install the shift lock release and release spring on the release shaft end.
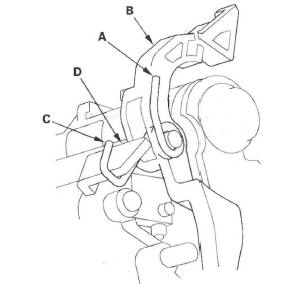
8. Make sure that the release spring end (A) is installed in the shift lock release (B), and the hooked end (C) is on the catch (D).
9. Install the A/T gear position indicator panel on the shift lever.
10. Install the shift lever.
Park Pin Switch
Park Pin Switch Test
1. Remove the center lower covers.
2. Disconnect the D3 switch/park pin switch/A/T gear position indicator panel light connector.
3. Shift the shift lever into the P position, and check for continuity between D3 switch/park pin. switch/ A/T gear position indicator panel light connector terminals No.1 and No. 2.
There should be no continuity.
4. Shift out of the P position, and check for continuity between connector terminals No. 1 and No.2.
There should be continuity.
5. If the park pin switch tests OK, connect the connector and install the center lower covers.
If the park pin switch fails the test, replace the park pin switch.
Park Pin Switch Replacement
NOTE:
- The park pin switch is not available from the D3 switch connector harness and A/T gear position indicator panel light harness; replace the park pin switch, D3 switch connector harness, A/T gear position indicator panel light harness, and the connector as a set.
- Refer to the Shift Lever Disassembly and Reassembly (see page 14-275) as needed during the following procedures.
1. Remove the shift lever.
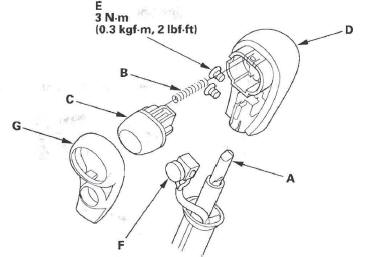
2. Wrap the end of a flat-tip screwdriver (A) with tape, pry the shift lever knob cover locks (B), and remove the shift lever knob cover (C).
3. Remove the screws (A), shift lever button (B), and spring (C).
4. Remove the D3 switch (D) by expanding its locks (E) from the shift lever knob, and remove the shift lever knob (F).
5. Remove the shift lock solenoid connector and D3 switch/park pin switch/A/T gear position indicator panel light connector from the shift lever.
6. Remove the harness bands, and disconnect the D3 switch 2P connector (A).
7. Remove the D3 switch harness and shift lever ring.
8. Remove the A/T gear position indicator panel light socket from the indicator panel, and remove the indicator panel.
9. Release the lock (A) of the shift lock release, and remove the shift lock release and release spring (B).
10. Remove the shift lever mounting bracket, and remove the park pin switch.

11. Remove the A/T gear position indicator panel light harness, park pin switch, D3 switch connector harness, and connector assembly, and replace it.
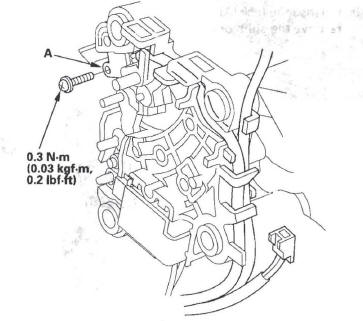
12. Apply non-hardening thread lock sealant to the screw threads. Install the new park pin switch (A), and secure the switch with the screw.
13. Install the shift lever mounting bracket.
14. Install the A/T gear position indicator panel, shift lever ring, and D3 switch harness.
15. Route the D3 switch harness (A), connect the D3 switch 2P connector (B), and install the connector in the holder.
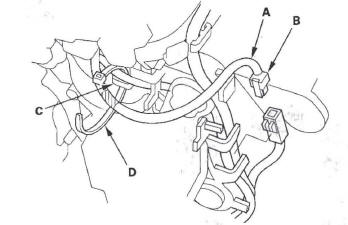
16. Tie the harnesses of the D3 switch and park pin switch at the guide (C) with the band (D).
17. Install the A/T gear position indicator panel light socket in the indicator panel.
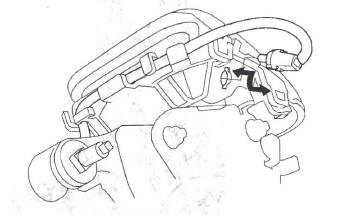
18. Route the park pin switch harness, D3 switch harness, and indicator panel light harness. Take a slack out of the harnesses, and secure the harnesses (A) with the band (B) at the guide (C).
19. Install the shift lock solenoid connector and D3 switch/park pin switch/A/T gear position indicator panel light connector on the shift lever.
20. Install the shift lock release spring (A) in the shift lock release (B).
21. Install the shift lock release and release spring on the release shaft end.
22. Make sure that the release spring end (A) is installed in the shift lock release (B), and the hooked end (C) is on the catch (D).
23. Apply silicone grease to the top of the shift lever rod (A), to the shift lever button spring (B), and to the area of the shift lever button (C) connected with the shift lever rod.
24. Install the shift lever button spring and button in the shift lever knob (D), and install the shift lever knob over the shift lever.
25. Apply non-hardening thread lock sealant to the screw threads, and secure the shift lever knob with the screws (E).
26. Install the D3 switch (F) and shift lever knob cover (G) on the shift lever knob.
27. Install the shift lever.
READ NEXT:
 Transmission End Cover
End Cover Removal
Special Tools Required
Mainshaft holder 07GAB-PF50101 or 07GAB-PF50100
NOTE: The illustration shows the 4WD transmission; the 2WD is similar.
1. Remove the cooler inlet line bolt (D)
Transmission Housing
Housing and Shaft Assembly Removal
NOTE: The illustration shows the 4WD transmission; the 2WD does not have the
transfer mechanism.
1. Remove the ATF feed pipe (A) from the idler gear shaft, and the
Valve Body
Valve Body and ATF Strainer Removal
NOTE: The illustration shows the 4WD transmission; the 2WD is similar.
1. Remove the ATF feed pipes (A) and ATF joint pipes (B).
2. Remove the ATF strainer (C) (t
SEE MORE:
PCV System
Component Location Index
PCV VALVE
PCV Valve Inspection
1. Check the PCV valve (A), hoses (B), and
connections for leaks or restrictions.
2. At idle, make sure there is a clicking sound from the
PCV valve when the hose between the PCV valve
and intake manifold is lightly pinched (A) with you
DTC P0455/P0456: EVAP System Large Leak
Detected/Very Small Leak Detected
DTC P0455: EVAP System Large Leak
Detected
DTC P0456: EVAP System Very Small Leak
Detected
NOTICE
The fuel system is designed to allow specified
maximum vacuum and pressure conditions. Do not
deviate from the vacuum and pressure tests as
indicated in these procedures. Excessive pressure/
vacuum wou
