Honda CR-V: Brake System
Brake System Inspection and Test
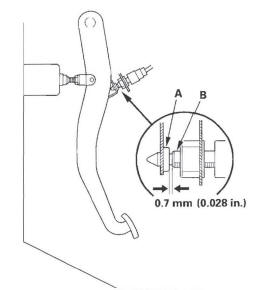
Inspect the brake system components listed. Repair or replace any parts that are leaking or damaged.
Component Inspections
Brake System Test
Brake pedal sinks/fades when braking
1. Set the parking brake, and start the engine, then turn off the A/C switch. Allow the engine to warm up to normal operating temperature (radiator fan comes on twice).
2. Attach a 50 mm (2 in.) piece of masking tape along the bottom of the steering wheel, and draw a horizontal reference mark across it.
3. With the transmission in P or N position, press and hold the brake pedal lightly (about the same pressure needed to keep an A/T-equipped vehicle from creeping), then release the parking brake.
4. While still holding the brake pedal, hook the end of the tape measure behind the brake pedal, then pull the tape up to the steering wheel. Note the measurement between the brake pedal and the reference mark on the steering wheel.
5. Apply steady pressure to the brake pedal for 3 minutes.
6. Watch the tape measure.
- If the measurement increases 10 mm (3/8 in.) or less, the master cylinder is OK.
- If the measurement increases more than 10 mm (3/8 in.), replace the master cylinder.
Symptom Troubleshooting
Rapid brake pad wear, vehicle vibration (after a long drive), or high, hard brake pedal
NOTE: Make sure that the caliper pins are installed correctly.
The upper caliper pin B and lower caliper pin A are different. If the pins are installed in the wrong location, it will cause, vibration, uneven or rapid brake pad wear, and possibly uneven tire wear. For proper caliper pin location.
1. Drive the vehicle until the brakes drag or until the pedal is high and hard. This can take 20 or more brake pedal applications during an extended test-drive.
2. With the engine running, raise the vehicle on a lift, and spin all four wheels by hand.
Is there brake drag at any of the wheels? YES-Go to step 3.
NO-Look for other causes of the pad wear, high pedal, or vehicle vibration.
3. Turn the engine off, pump the brake pedal to deplete the vacuum in the brake booster, and then spin the wheels again to check for brake drag.
Is there brake drag at any of the wheels? YES-Go to step 4.
NO-Replace the brake booster.
4. Without removing the brake lines, unbolt and separate the master cylinder from the booster, then spin the wheels to check for brake drag.
Is there brake drag at any of the wheels? YES-Go to step 5.
NO-Check the brake pedal position switch adjustment and pedal free play.
5. Loosen the hydraulic lines at the master cylinder, then spin the wheels to check for brake drag.
Is there brake drag at any of the wheels? YES-Go to step 6.
NO-Check the master cylinder reservoir and subreservoir tanks for contamination in the brake fluid. If you find contamination, flush the entire brake system of all contaminated fluid. If the brake fluid is OK, replace the master cylinder.
6. Loosen the bleed screws at each caliper, then spin the wheels to check for brake drag.
Is there brake drag at any of the wheels? YES-Check the master cylinder reservoir and subreservoir tanks for contamination in the brake fluid. If you find contamination, flush the entire brake system of all contaminated fluid. If the brake fluid is OK, disassemble and repair the caliper on the wheel(s) with brake drag.
NO-Look for and replace any damaged brake lines.
If all brake lines are OK, replace the VSA modulator-control unit.
Brake Pedal and Brake Pedal Position Switch Adjustment
Pedal Height
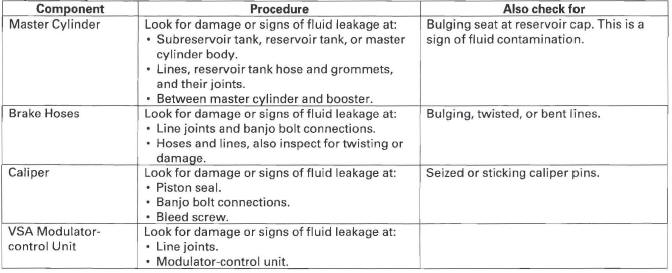
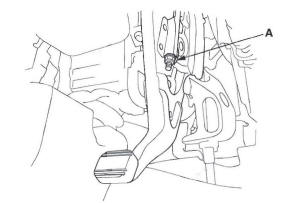
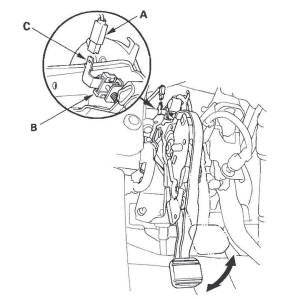
1. Turn the brake pedal position switch (A) counterclockwise, and pull it back until it is no longer touching the brake pedal.
2. Pull back the carpet and find the cutout (B) in the insulator. Lift up the insulator cutout and measure the pedal height (C) at the middle of the left side center of the pedal pad (D) to the floor.
Standard pedal height (with carpet removed): 165 mm (6 1/2 in.)
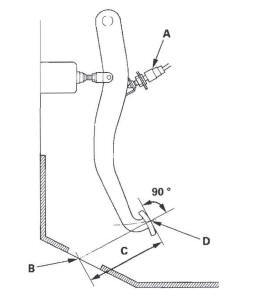
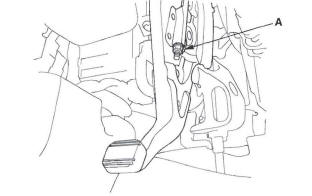
3. Loosen the push rod locknut (A), and screw the push rod (B) in or out with pliers until the standard pedal height from the floor is reached. After adjustment, tighten the locknut firmly. Do not adjust the pedal height with the pushrod pressed.
Brake Pedal Position Switch Clearance
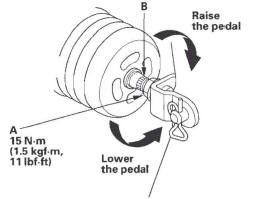
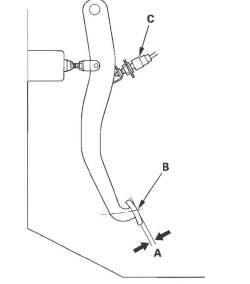
4. Lift up on the brake pedal by hand. Push in the brake pedal position switch until its plunger is fully pressed (threaded end (A) touching the pad (B) on the pedal arm). Then, turn the switch 45 º clockwise to lock it. The gap between the brake pedal position switch and the pad is automatically adjusted to 0.7 mm (0.028 in.) by locking the switch. Make sure the brake lights go off when the pedal is released.
5. Check the brake pedal free play.
Pedal Free Play
1. With the engine off, inspect the pedal free play (A) on the pedal pad (B) by pushing the pedal by hand.
If the brake pedal free play is insufficient, it may result in brake drag. Check for a misadjusted the brake pedal position switch (C).
Free play: 1-5 mm (1/16-3/16 in.)
Parking Brake Inspection and Adjustment
Inspection
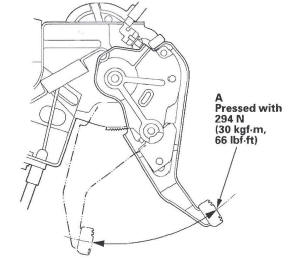
1. Press the parking brake pedal (A) with 294 N (30 kgf, 66 Ibf) of force to fully apply the parking brake. The parking brake pedal should be locked within the specified number of clicks.
Pedal locked clicks: 5 to 6
2. Adjust the parking brake if the pedal clicks are not within the specification.
NOTE: Minor parking brake pedal adjustments (1 to 2 clicks) can be made with the adjusting nut. If a larger adjustment is required, follow the major adjustment procedure using the adjuster at the parking brake drum.
After installing new parking brake shoes and/or new brake disc/drum, make sure you drive the vehicle for "break-in" (see page 19-32).
Minor Adjustment
1. Raise the rear of the vehicle, and support it with safety stands in the proper locations.
2. Release the parking brake pedal fully.
3. Tighten the parking brake adjusting nut (A) until the parking brakes drag slightly when the rear wheels are turned.
4. Back off the adjusting nut in half-turn increments.
5. Release the parking brake pedal fully, and check that the parking brakes do not drag when the rear wheels are turned. Readjust if necessary.
6. Make sure the parking brakes are fully applied when the parking brake pedal is pressed in all the way.
Major Adjustment (to be done when replacing parking brake shoes)
1. Raise the rear of the vehicle, and support it with safety stands in the proper locations.
2. Release the parking brake pedal fully.
3. Back off the parking brake adjusting nut (A) in the parking brake pedal.
4. Remove the rear wheels.
5. Remove the access plug (A).

6. Turn the adjuster (B) with a flat-tip screwdriver (C) until the shoes lock against the parking brake drum.
Then back off the adjuster 8 clicks, and install the access plug.
7. Clean the mating surface of the brake disc/drum and the inside of the wheel, then install the rear wheels.
8. Do the minor adjustment procedure.
Brake System Bleeding
NOTE:
- Do not reuse the drained fluid. Use only clean Honda
DOT 3 Brake Fluid from an unopened container.
Using a non-Honda brake fluid can cause corrosion and shorten the life of the system.
- Do not mix different brands of brake fluid; they may not be compatible.
- Make sure no dirt or other foreign matter is allowed to contaminate the brake fluid.
- Do not spill brake fluid on the vehicle, it may damage the paint; if brake fluid does contact the paint, wash it off immediately with water.
- The reservoir connected to the master cylinder must be at the MAX (upper) level mark at the start of the bleeding procedure and checked after bleeding each brake system. Add fluid as required.
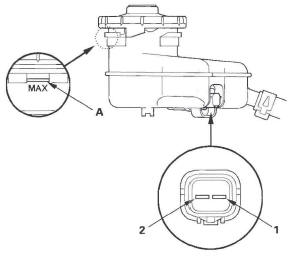
1. Make sure the brake fluid level in the reservoir (A) is at the MAX (upper) level line (B).
2. Have someone slowly pump the brake pedal several times, then apply steady pressure.
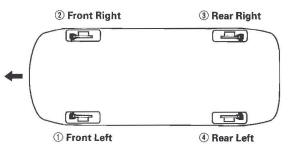
3. Start the bleeding at the driver's side of the front brake system.
NOTE: Bleed the calipers or the wheel cylinders in the sequence shown.
BLEEDING SEQUENCE:
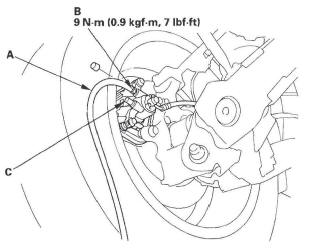
4. Attach a length of clear drain tube (A) to the bleed screw (B), then, loosen the bleed screw to allow air to escape from the system. Then tighten the bleed screw securely.
NOTE: Do not loosen the special bolt (C) on the rear caliper.
Front
Rear
5. Refill the master cylinder reservoir to the MAX (upper) level line.
6. Repeat the procedure for each brake circuit until no air bubbles are in the fluid.
Brake System Indicator Circuit Diagram
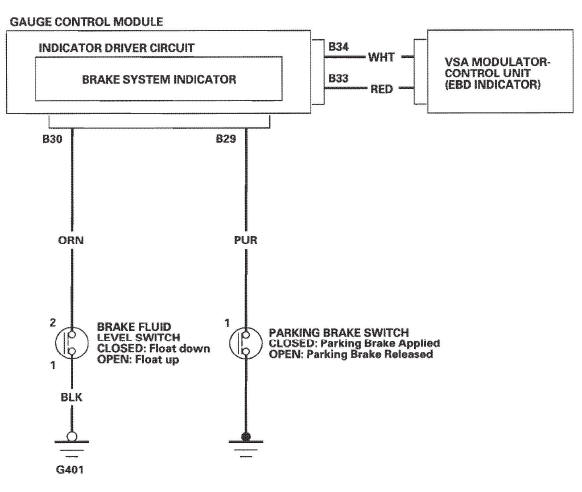
Parking Brake Switch Test
1. Disconnect the parking brake switch connector (A) from the parking brake switch (B).
2. Check for continuity between the positive terminal (C) and body ground.
- With the parking brake pedal pressed, there should be continuity.
- With the parking brake pedal released, there should be no continuity.
NOTE:
- If both the ABS/VSA indicator and the brake system indicator come on at the same time, check the VSA system first.
- If the parking brake switch and fluid level switch are OK, but the brake system indicator does not function, check the VSA system.
Brake Fluid Level Switch Test
Check for continuity between the terminals (1) and (2) with the float in the down position and in the up position.
NOTE:
- Remove the brake fluid completely from the reservoir.
With the float down, there should be continuity.
- Fill the reservoir with brake fluid to the MAX (upper) level (A). With the float up, there should be no continuity.
- If both the ABS/VSA indicator and the brake system indicator come on at same time, check the VSA system first.
- If the parking brake switch and fluid level switch are OK, but brake system indicator does not function, check the VSA system.
READ NEXT:
 Front Brake
Front Brake Pad Inspection and Replacement
Special Tools Required
Brake caliper piston compressor 07 AAE-SEPA 101
CAUTION
Frequent inhalation of brake pad dust, regardless of
material composition, cou
Master Cylinder
Master Cylinder Replacement
NOTICE
Do not spill brake flu id on the vehicle; it may
damage the paint; if brake fluid gets on the paint,
wash it off immediately with water.
Be careful not to dam
Brake Booster
Brake Booster Test
Functional Test
1. With the engine stopped, press the brake pedal several times to deplete
the vacuum reservoir, then press the brake pedal hard, and hold it for 15
seconds. If th
SEE MORE:
Power Windows
Turn the ignition switch to the ON
(II) position to raise or lower any
window. To open the window, push
the switch down and hold it. Release
the switch when you want to stop the
window. To close the window, pull
back on the switch and hold it.
The windows will operate for up to
10
Traction
The traction grades, from highest to
lowest, are AA, A, B, and C. Those
grades represent the tire’s ability to
stop on wet pavement as measured
under controlled conditions on
specified government test surfaces
of asphalt and concrete. A tire
marked C may have poor traction
performa
