Honda CR-V: Brake Booster
Brake Booster Test
Functional Test
1. With the engine stopped, press the brake pedal several times to deplete the vacuum reservoir, then press the brake pedal hard, and hold it for 15 seconds. If the brake pedal sinks, either the master cylinder is bypassing internally, or the brake system is leaking. Inspect the brake hoses and lines.
2. Start the engine with the brake pedal pressed. If the brake pedal sinks slightly, the vacuum booster is operating normally. If the brake pedal height does not vary, do the brake system test.
Leak Test
1. Press the brake pedal with the engine running, then stop the engine. If the brake pedal height does not vary while pressed for 30 seconds, the vacuum booster is OK. If the pedal height rises go to step 6.
If it does not rise go to step 2.
2. Start the engine and let it idle for 30 seconds. Turn the ignition switch off, and wait 30 seconds. Press the brake pedal several times using normal pressure. When the pedal is first pressed, it should be low. On consecutive applications, the pedal height should gradually rise. Does the pedal rise on each consecutive application? If it rises the booster is OK. If it does not go to step 3.
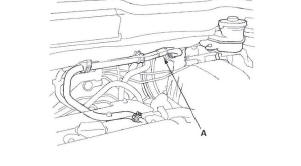
3. Disconnect the brake booster vacuum hose (A) at the booster. The check valve is built into the hose.
4. Start the engine, and let it idle. There should be vacuum available. If no vacuum is available, the check valve is not working properly. Replace the brake booster vacuum hose and check valve, and retest. If vacuum is found, go to step 5.
5. With the engine off, reconnect the vacuum hose to the brake booster.
6. Start the engine, and then pinch the brake booster vacuum hose between the check valve and the booster.
7. Turn the ignition switch off, and wait 30 seconds.
Press the brake pedal several times using normal pressure. When the pedal is first pressed, it should be low. On consecutive applications, the pedal height should gradually rise.
- If the pedal position does not vary inspect the seal between the master cylinder and booster. If the seal is OK, replace the brake booster.
- If the pedal position varies, replace the brake booster vacuum hose/check valve assembly.
Brake Booster Replacement
1. Remove the air cleaner.
2. Remove the master cylinder.
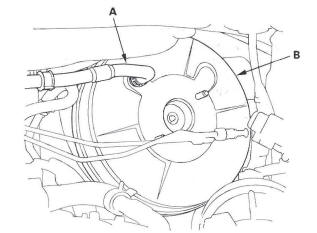
3. Disconnect the vacuum hose (A) from the brake booster (B).
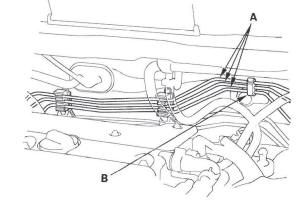
4. Remove the brake lines (A) from the clamp (B).
5. Remove the driver's dashboard undercover.
6. Remove the lock pin (A) and the joint pin (B), then disconnect the yoke from the brake pedal.
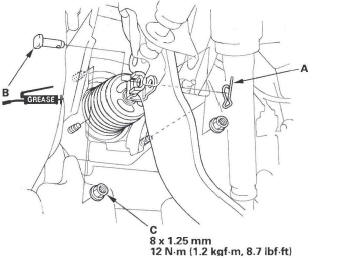
7. Remove the brake booster mounting nuts (C).
8. Pull the brake booster (A) forward, until it clears the cowl, then pull up on the bottom of the brake booster to turn it.
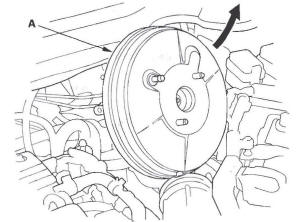
9. Remove the brake booster from the engine compartment.
NOTICE
- Be careful not to damage the booster surfaces and threads of the booster stud bolts.
- Be careful not to bend or damage the brake lines.
10. Install the brake booster in the reverse order of remove, and note these items:
- Tighten all mounting hardware to the specified torque values.
- Install the master cylinder after installing the brake booster.
- Check the brake pedal height and free play after installing the master cylinder, and adjust it.
- Bleed the brake system.
READ NEXT:
 Rear Brake
Rear Brake Pad Inspection and Replacement
Special Tools Required
Brake caliper piston compressor 07AAE-SEPA101
CAUTION
Frequent inhalation of brake pad dust, regardless of material
composition, could
Parking Brake
Parking Brake Inspection
CAUTION
Frequent inhalation of brake pad dust, regardless of material
composition, could be hazardous to your health.
Avoid breathing dust particles.
Never use an air ho
Brake Hose
Brake Hose and Line Inspection
1. Inspect the brake hoses for damage, deterioration, leaks, interference,
and twisting.
2. Check the brake lines for damage, rusting, and leaks. Also check for bent
SEE MORE:
System Description
Security Alarm System
NOTE: This applies to EX and EX-L models.
The security alarm system is armed automatically after the doors, hood, and
tailgate are closed and locked. For the
system to arm, the ignition switch must be off, the key must be removed from the
ignition switch, and the MICU must
re
DTC P0731: Problem in 1st Clutch and 1st
Clutch Hydraulic Circuit
NOTE: Before you troubleshoot, record all freeze data and any on-board
snapshot, and review General Troubleshooting Information.
1. Warm up the engine to normal operating
temperature (the radiator fan comes on).
2. Make sure that the transmission is filled to the
proper level, and check for fluid
