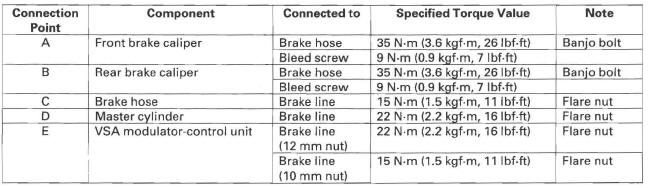
Honda CR-V: Brake Hose
Brake Hose and Line Inspection
1. Inspect the brake hoses for damage, deterioration, leaks, interference, and twisting.
2. Check the brake lines for damage, rusting, and leaks. Also check for bent brake lines.
3. Check for leaks at hose and line joints and connections, and retighten if necessary.
4. Check the master cylinder and the VSA modulator-control unit for damage and leaks.
Brake Hose Replacement
NOTE:
- Before reassembling, check that all parts are free of dirt and other foreign particles.
- Replace parts with new ones whenever specified to do so.
- Do not spill brake fluid on the vehicle; it may damage the paint; if brake fluid gets on the paint, wash it off immediately with water.
- To prevent the brake fluid from flowing, plug and cover the hose ends and joints with a shop towel or equivalent material.
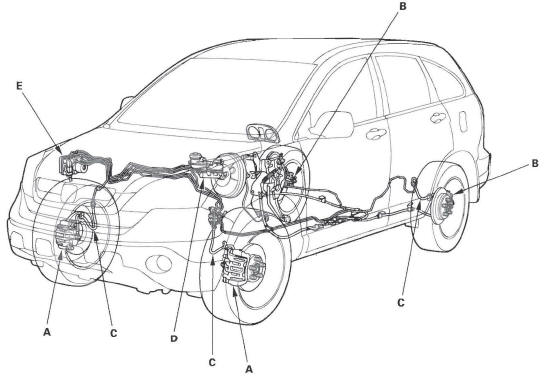
Removal-Front
1. Remove the front wheel.
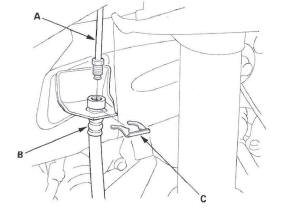
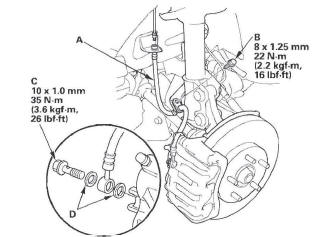
2. Disconnect the brake line (A) from the brake hose (B), then remove the brake hose clip (C).
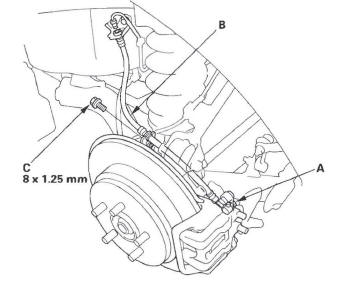
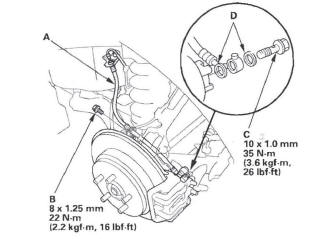
3. Remove the banjo bolt (A), and disconnect the brake hose (B) from the caliper.
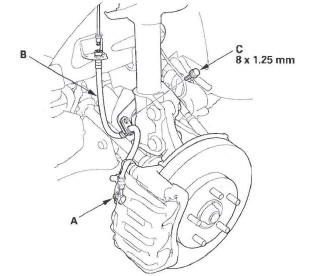
4. Remove the brake hose mounting bolt (C). then remove the brake hose.
Installation-Front
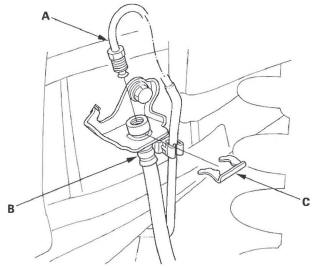
1. Install the brake hose (A) with the mounting bolt (B).
2. Connect the brake hose to the caliper with the banjo bolt (C) and new sealing washers (D).
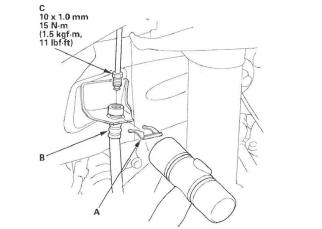
3. Install a new brake hose clip (A) to the brake hose (B) on the bracket, then connect the brake line (C).
Do not twist the brake hose.
4. After installing the brake hose, bleed the brake system.
5. Do these checks:
- Check the brake hose and line joint for leaks and tighten if necessary.
- Check the brake hoses for interference and twisting.
6. Clean the mating surface of the brake disc and the inside of the wheel, then install the front wheel.
Removal-Rear
1. Remove the rear wheel.
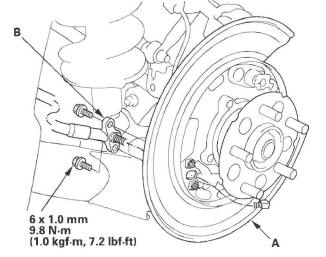
2. Disconnect the brake line (A) from the brake hose (B), then remove the brake hose clip (C).
3. Remove the banjo bolt (A), and disconnect the brake hose (B) from the caliper.
4. Remove the brake hose mounting bolt (C), then remove the brake hose.
Installation-Rear
1. Install the brake hose (A) with the mounting bolt (B).
2. Connect the brake hose to the caliper with the banjo bolt (C) and new sealing washers (D).
3. Install a new brake hose clip (A) to the brake hose (B) on the bracket, then connect the brake line (C).
Do not twist the brake hose.

4. After installing the brake hose, bleed the brake system.
5. Do these checks:
- Check the brake hose and line joint for leaks and tighten if necessary.
- Check the brake hoses for interference and twisting.
6. Clean the mating surface of the brake disc/drum and the inside of the wheel, then install the rear wheel.
Parking Brake Cable Replacement
Exploded View

NOTE:
- The parking brake cable must not be bent or distorted.
This will lead to stiff operation and premature cable failure.
- Refer to the Exploded View as needed during this procedure.
1. Loosen the parking brake cable adjusting nut.
2. Remove the parking brake shoes, and disconnect the parking brake cable from the parking brake lever.
3. Remove the parking brake cable mounting bolts from the backing plate (A), and remove the parking brake cable (B).
4. Pull the parking brake cable, and remove it from the backing plate.
5. Reinstall the parking brake cable in the reverse order of removal, and note these items:
- Be careful not to bend or distort the cable.
- Connect the parking brake cable to the brake lever, and install the brake shoes and disc/drum.
- Do the parking brake adjustment.
Apply the parking brake firmly 10 times then adjust it again.
READ NEXT:
 VSA (Vehicle Stability Assist) System Components
Component Location Index
VSA MODULATOR-CONTROL UNIT
Removal and Installation
UNDER-HOOD FUSE/RELAY BOX
DATA LINK
CONNECTOR (DLC)
STEERING ANGLE SENSOR
Replacement
VSA OFF SWITCH
General Troubleshooting Information
System Indicator
This system has four indicators:
ABS indicator (A)
Brake system indicator (B)
VSA indicator (C)
VSA activation indicator (D)
When the system detects a problem, it will turn the
System Description
VSA Modulator-control Unit Inputs and Outputs for 46P Connector
System Outline
This system is composed of the VSA modulator-control unit, the wheel sensors,
the steering angle sensor, and the
yaw
SEE MORE:
If the Engine Overheats
The reading of the vehicle’s
temperature gauge should stay in
the midrange. If it climbs to the red
mark, you should determine the
reason (hot day, driving up a steep
hill, etc.).
If the vehicle overheats, you should
take immediate action. The only
indication may be the temperature
Using the Heater
The heater uses engine coolant to
warm the air. If the engine is cold, it
will be several minutes before you
feel warm air coming from the
system.
1. Select
.
When you select
, the system
automatically switches to fresh air
mode. If you switch the mode
from
or
, the system
als
