Honda CR-V: Rear Brake
Rear Brake Pad Inspection and Replacement
Special Tools Required
Brake caliper piston compressor 07AAE-SEPA101
CAUTION
Frequent inhalation of brake pad dust, regardless of material composition, could be hazardous to -your health.
- Avoid breathing dust particles.
- Never use an air hose or brush to clean brake assemblies. Use an OSHA-approved vacuum cleaner.
Inspection
1. Raise the rear of the vehicle, and support it with safety stands in the proper locations.
2. Remove the rear wheels.
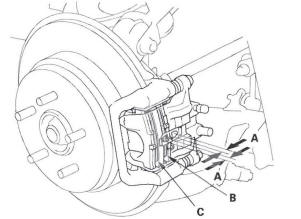
3. Check the thickness (A) of the inner pad (B) and outer pad (C). Do not include the thickness of the backing plate.
Brake pad thickness:
Standard: 8.3-9.0 mm (0.33-0.35 in.)
Service limit: 1.6 mm (0.06 in.)
4. If the brake pad thickness is less than the service limit, replace all of the rear brake pads as a set.
5. Clean the mating surface of the brake disc/drum and the inside of the wheel, then install the rear wheels.
Replacement
1. Remove some brake fluid from the master cylinder.
2. Raise the rear of the vehicle, and support it with safety stands in the proper locations.
3. Remove the rear wheels.
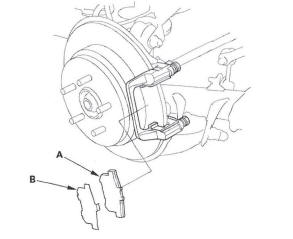
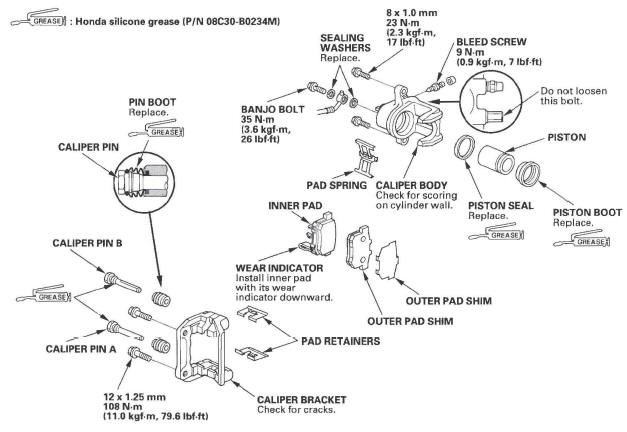
4. Remove the brake hose (A) from the brake hose bracket (B).

5. Remove the flange bolts (C) while holding the caliper pin (D) with a wrench. Be careful not to damage the pin boot, and remove the caliper (E).
Check the hose and pin boots for damage and deterioration.
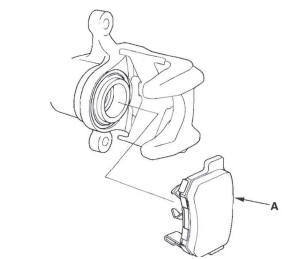
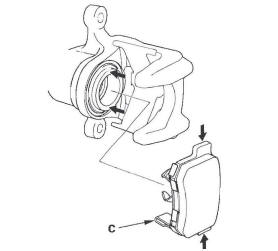
6. Remove the outer pad (A) and the pad shim (B).
7. Remove the inner pad (A) from the caliper.
8. Remove the pad retainers (A).
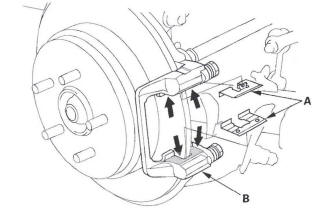
9. Clean the caliper bracket (B) thoroughly; remove any rust, and check for grooves and cracks.
10. Check the brake disc/drum for damage and cracks.
11. Apply a thin coat of M-77 assembly paste (P/N 08798-9010) to the retainers on their mating surfaces (indicated by the arrows) against the caliper bracket.
12. Install the pad retainers. Wipe excess assembly paste off the retainers. Keep any assembly paste off the brake discs and the brake pads.
13. Mount the brake caliper piston compressor (A) on the caliper body (B).
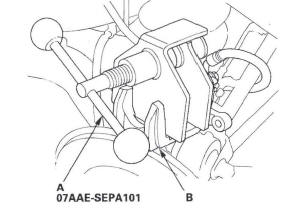
14. Press in the piston with the brake caliper piston compressor so the caliper will fit over the brake pads. Make sure the piston boot is in position to prevent damaging it when pivoting the caliper down.
NOTE: Be careful when pressing in the piston; brake fluid might overflow from the master cylinder's reservoir. If brake fluid gets on any painted surface, wash it off immediately with water.
15. Remove the brake caliper piston compressor.
16. Apply a thin coat of M-77 assembly paste (P/N 08798-9010) to the pad side of the shims (A), the back of the brake pad (B), and the other areas indicated by the arrows. Wipe excess assembly paste off the pad shims and brake pads.
Contaminated brake discs or brake pads reduce stopping ability. Keep grease and assembly paste off the brake discs and brake pads.
Inner pad

Outer pad
17. Install the brake pads and pad shims correctly.
Install the brake pad with the wear indicator (C) on the bottom inside. If you are reusing the brake pads, always reinstall the brake pads in their original positions to prevent a momentary loss of braking efficiency.
18. Install the caliper into position. Install the flange bolts (A), and tighten it to the specified torque while holding the caliper pin (B) with a wrench. Be careful not to damage the pin boots.
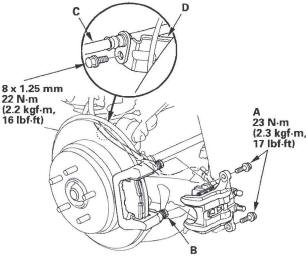
19. Install the brake hose (C) to the brake hose bracket (D).
20. Clean the mating surface of the brake disc/drum and the inside of the wheel, then install the rear wheels.
21. Press the brake pedal several times to make sure the brakes work.
NOTE: Engagement may require a greater pedal stroke immediately after the brake pads have been replaced as a set. Several applications of the brake pedal will restore the normal pedal stroke.
22. Add brake fluid as needed.
23. After installation, check for leaks at hose and line joints or connections, and retighten if necessary.
Test-drive the vehicle, then check for leaks.
Rear Brake Disc Inspection
Runout
1. Raise the rear of the vehicle, and support it with safety stands in the proper locations.
2. Remove the rear wheels.
3. Remove the brake pads.
4. Inspect the brake disc/drum surface for damage and cracks. Clean the brake disc/drum thoroughly, and remove all rust.
5. Install suitable flat washers (A) and wheel nuts (B), and tighten the wheel nuts to the specified torque to hold the brake disc/drum securely against the hub.
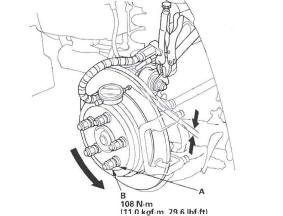
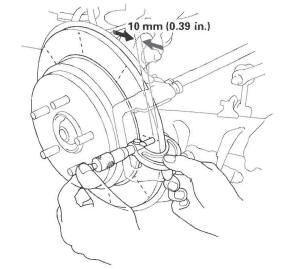
6. Set up the dial gauge against the brake disc/drum as shown, and measure the runout at 10 mm (3/8 in.) from the outer edge of the brake disc/drum.
Brake disc/drum runout: Service limit: 0.04 mm (0.0016 in.)
7. If the brake disc/drum is beyond the service limit, refinish the brake disc/drum with an on-car brake lathe. The Kwik-Lathe produced by Kwik-Way Manufacturing Co. and the "Front Brake Disc Lathe" offered by Snap-on Tools Co. are approved for this operation.
Max. refinishing limit: 7.5 mm (0.30 in.)
NOTE:
- If the brake disc/drum is beyond the service limit for refinishing, replace it (see page 18-32).
- A new brake disc/drum should be refinished if its runout is greater than 0.04 mm (0.0016 in.).
Thickness and Parallelism
1. Raise the rear of the vehicle, and support it with safety stands in the proper locations.
2. Remove the rear wheels.
3. Remove the brake pads.
4. Using a micrometer, measure the brake disc/drum thickness at eight points, about 45 º apart and 10 mm (3/8 in.) in from the outer edge of the brake disc/drum. Replace the brake disc/drum if the smallest measurement is less than the max. refinishing limit.
Brake disc/drum thickness:
Standard: 8.9-9.1 mm (0.35-0.36 in.)
Max. refinishing limit: 7.5 mm (0.30 in.)
Brake disc/drum parallelism: 0.015 mm (0.0006 in.) max.
NOTE: This is the maximum allowable difference between the thickness measurements.
5. If the brake disc/drum is beyond the service limit for parallelism, refinish the brake disc/drum with an on-car brake lathe. The Kwik-Lathe produced by Kwik-Way Manufacturing Co. and the "Front Brake Disc Lathe" offered by Snap-on Tools Co. are approved for this operation.
NOTE: If the brake disc/drum is beyond the service limit for refinishing, replace it.
Rear Brake Caliper Overhaul
CAUTION
Frequent inhalation of brake pad dust, regardless of material composition, could be hazardous to your health.
- Avoid breathing dust particles.
- Never use an air hose or brush to clean brake assemblies. Use an OSHA-approved vacuum cleaner.
Remove, disassemble, inspect, reassemble, and install the caliper, and note these items:
- Do not spill brake fluid on the vehicle; it may damage the paint; if brake fluid gets on the paint. wash it off immediately with water.
- To prevent dripping brake fluid, cover disconnected hose joints with rags or shop towels.
- Clean all parts in brake fluid and air dry; blow out all passages with compressed air.
- Before reassembling, check that all parts are free of dirt and other foreign particles.
- Replace parts with new ones as specified in the illustration.
- Make sure no dirt or other foreign matter gets in the brake fluid.
- Make sure no grease or oil gets on the brake discs or pads.
- When reusing brake pads, always reinstall them in their original positions to prevent loss of braking efficiency.
- Do not reuse drained brake fluid. Use only clean Honda DOT 3 Brake Fluid from an unopened container. Using a non-Honda brake fluid can cause corrosion and shorten the life of the system.
- Do not mix different brands of brake fluid as they may not be compatible.
- Coat the pistons, piston seal grooves, and caliper bores with clean brake fluid.
- Replace all rubber parts with new ones whenever disassembled.
- After installing the caliper, check the brake hose and line for leaks, interference, and twisting.
READ NEXT:
 Parking Brake
Parking Brake Inspection
CAUTION
Frequent inhalation of brake pad dust, regardless of material
composition, could be hazardous to your health.
Avoid breathing dust particles.
Never use an air ho
Brake Hose
Brake Hose and Line Inspection
1. Inspect the brake hoses for damage, deterioration, leaks, interference,
and twisting.
2. Check the brake lines for damage, rusting, and leaks. Also check for bent
VSA (Vehicle Stability Assist) System Components
Component Location Index
VSA MODULATOR-CONTROL UNIT
Removal and Installation
UNDER-HOOD FUSE/RELAY BOX
DATA LINK
CONNECTOR (DLC)
STEERING ANGLE SENSOR
Replacement
VSA OFF SWITCH
SEE MORE:
If You Must Drive with Several Children
Your vehicle has a back seat where
children can be properly restrained.
If you ever have to carry a group of
children, and a child must ride in
front:
Place the largest child in the front
seat, provided the child is large
enough to wear the lap/shoulder
belt properly.
Move the vehicle
General Troubleshooting Information
How to Check for DTCs with the Honda
Diagnostic System (HDS)
When the powertrain control module (PCM) senses an
abnormality in the input or output system, the D
indicator (A) in the gauge control module (tach) (B) will
usually blink.
When the Honda Diagnostic System (HDS) is connected
to the data l
