Honda CR-V: A/T Differential
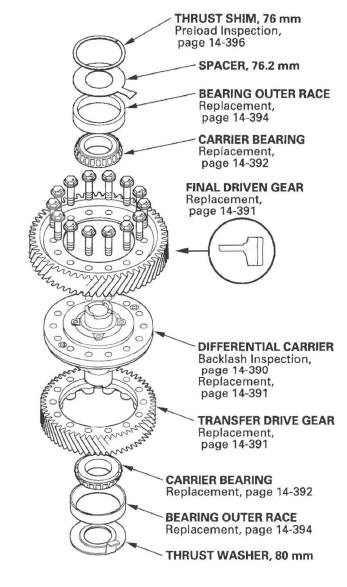
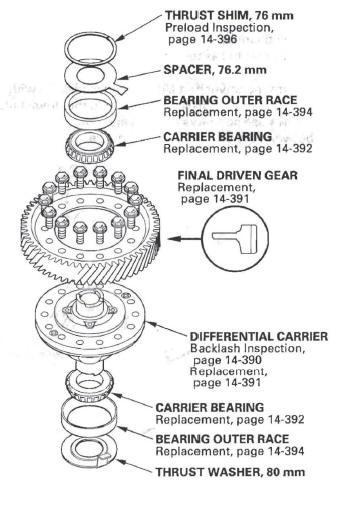
Component Location Index
4WD
2WD
Backlash Inspection
NOTE: The illustration shows the 4WD model; 2WD is similar.
1. Install the drive shaft and intermediate shaft into the differential assembly.
2. Secure the driveshaft (A) in a bench vise (B) with soft jaws (C). To prevent damage to the driveshaft, always use soft jaws or equivalent material between the driveshaft and the vise.
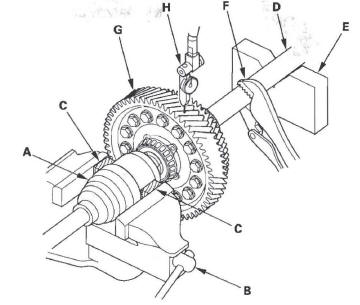
3. Place the intermediate shaft (D) on a V-block (E), then fix the intermediate shaft using a grip (F) or equivalent.
4. Measure the backlash of the final driven gear (G) with a dial indicator (H).
Standard: 0.4-1.3 mm (0.016-0.051 in.)
5. If the backlash is out of standard, replace the differential carrier; 4WD (see page 14-391), 2WD.
Differential Carrier, Final Driven Gear, and Transfer Drive Gear Replacement
4WD
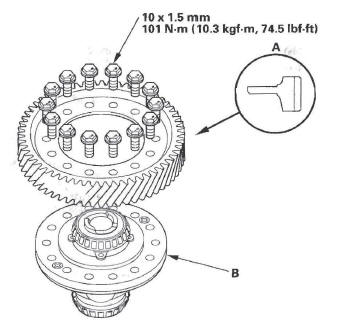
1. Remove the final driven gear (A) and transfer drive gear (B) from the differential carrier (C).
NOTE: The final driven gear bolts have left-hand threads.
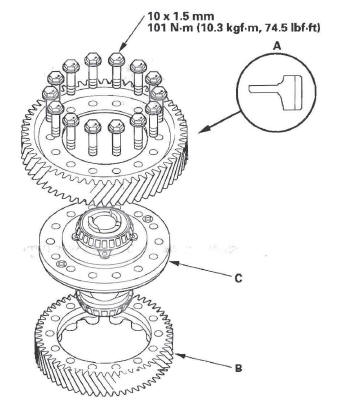
2. Install the final driven gear and transfer drive gear on the differential carrier in the direction shown.
3. Secure the final drive gear, differential carrier, and transfer drive gear with the bolts. Tighten the bolts to the specified torque in a crisscross pattern in two or more steps.
Differential Carrier, Final Driven Gear Replacement
2WD
1. Remove the final driven gear (A) from the differential carrier (B).
NOTE: The final driven gear bolts have left-hand threads.
2. Install the final driven gear on the differential carrier in the direction shown.
3. Secure the final drive gear and differential carrier with the bolts. Tighten the bolts to the specified torque in a crisscross pattern in two or more steps.
Carrier Bearing Replacement
Special Tools Required
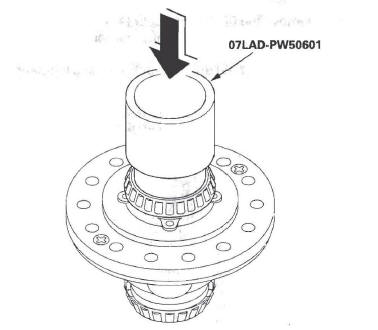
Attachment, 40 x 50 mm 07LAD-PW50601
NOTE:
- The bearing and bearing outer race should be replaced as a set.
- Inspect and adjust the carrier bearing preload whenever bearing is replaced.
- Check the bearing for wear and rough movement. If the bearing is OK, removal is not necessary.
- The illustration shows the 4WD model; 2WD is similar.
1. Remove the final driven gear from the differential carrier.
NOTE: Final driven gear removal is no needed when the carrier bearing on opposite side of the final driven gear.
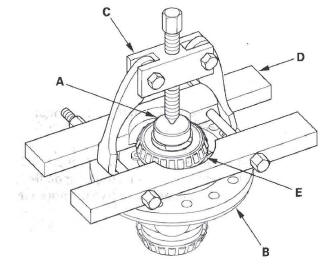
2. Place a step adapter (A) on the differential carrier (B), and set a commercially available puller (C) and bearing separator (D) under the carrier bearing (E), then remove the carrier bearing.
3. Install the new carrier bearing using the attachment (40 x 50 mm) and a press. Press the bearing on securely until it bottoms so there is no clearance between the bearing and the differential carrier.
4. Install the final driven gear if the gear was removed.
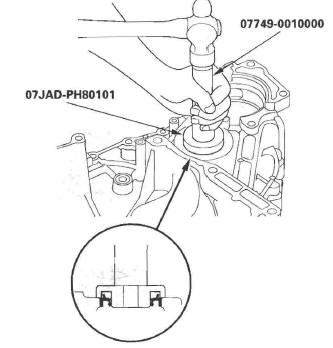
Oil Seal Replacement
Special Tools Required
- Driver 07749-0010000
- Oil seal driver attachment 07947-SD90101
- Oil seal driver attachment 07JAD-PH80101
1. Remove the oil seal from the transmission housing.
2. Remove the oil seal from the torque converter housing.

3. Install the new oil seal flush with the transmission housing using the driver and the oil seal driver attachment.
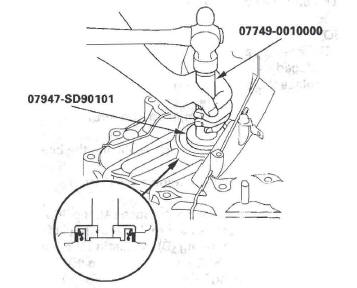
4. Install the new oil seal flush with the torque converter housing using the driver and the oil seal driver attachment.
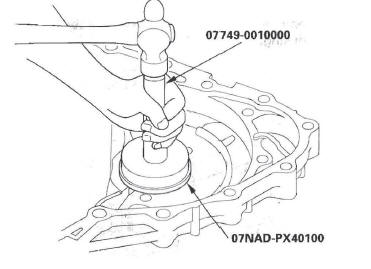
Carrier Bearing Outer Race Replacement
Special Tools Required
- Attachment. 78 x 80 mm 07NAD-PX40100
- Attachment, 72 x 75 mm 07746-0010600
- Driver 07749-0010000
NOTE:
- The bearing and the bearing outer race should be replaced as a set.
- Replace the bearing with a new one whenever the outer race is replaced.
- Do not use the thrust shim on the torque converter housing.
- Adjust bearing preload after replacing the bearing and outer race.
- Coat all parts with ATF during installation.
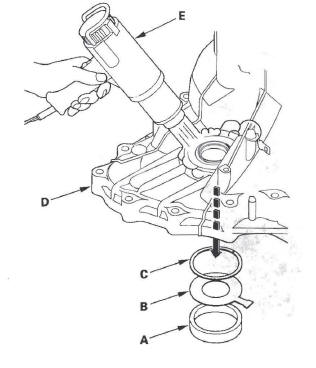
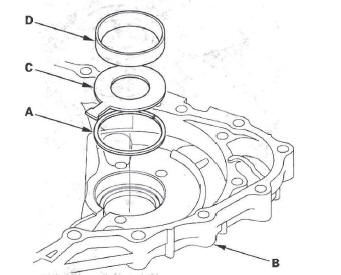
1. Remove the bearing outer race (A), the 76.2 mm spacer (B), and the 76 mm thrust shim (C) from the transmission housing (D) by heating the housing to about 212 ºF (100 ºC) with a heat gun (E). Do not heat the housing in excess of 212 ºF (100ºC).
NOTE: Let the transmission housing cool to room temperature before installing the bearing outer race.
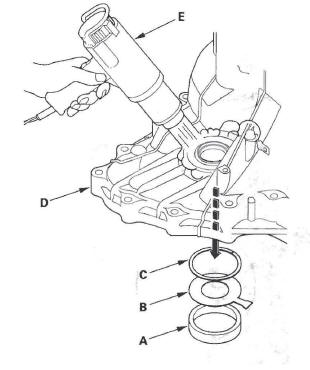
2. Install the 76 mm thrust shim (A), 76.2 mm spacer (B) and the new bearing outer race (C) in the transmission housing (D).
3. Using the driver and the attachment (78 x 80 mm), drive the bearing outer race securely in the housing so there is no clearance between the outer race, spacer, shim, and housing.
4. Remove the bearing outer race (A) and 80 mm thrust washer (B) from the torque converter housing (C).
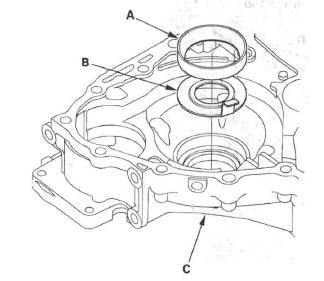
5. Install the 80 mm thrust washer and the new bearing outer race in the torque converter housing.
6. Drive the bearing outer race securely in the housing using the driver and the attachment (72x75 mm).
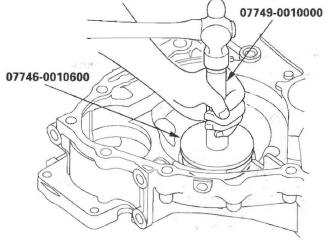
Carrier Bearing Preload Inspection
Special Tools Required
- Attachment, 78 x 80 mm 07NAD-PX40100
- Preload inspection tool 070AJ-0020101
- Attachment, 72 x 75 mm 07746-0010600
- Driver 07749-0010000
NOTE:
- If the transmission housing, torque converter housing, differential carrier, carrier bearing and the outer race, or thrust shim were replaced, the bearing preload must be adjusted.
- Replace the bearing with a new one whenever the outer race is replaced.
- Do not use the thrust shim on the torque converter housing.
- Coat all parts with ATF during installation.
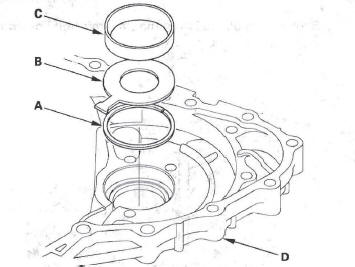
1. Remove the bearing outer race (A), the 76.2 mm spacer (B), and the 76 mm thrust shim (C) from the transmission housing (D) by heating the housing to about 212 ºF (100ºC) with a heat gun (E). Do not heat the housing in excess of 212 ºF (100 ºC).
NOTE: Let the transmission housing cool to room temperature before adjusting the bearing preload.
2. Install the 76 mm thrust shim (A) in the transmission housing (B). If you replace the 76 mm thrust shim with a new one, use the same thickness shim as the old one.
3. Install the 76.2 mm spacer (C) and the bearing outer race (D) in the transmission housing.
4. Drive the bearing outer race securely in the housing using the driver and the attachment (78 x 80 mm) so there is no clearance between the outer race, spacer, shim, and housing.

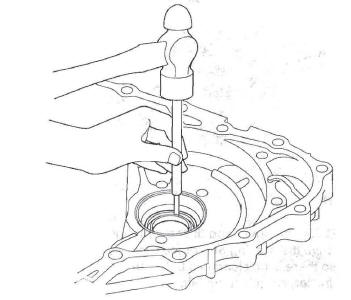
5. Install the differential assembly (A) in the torque converter housing (B).
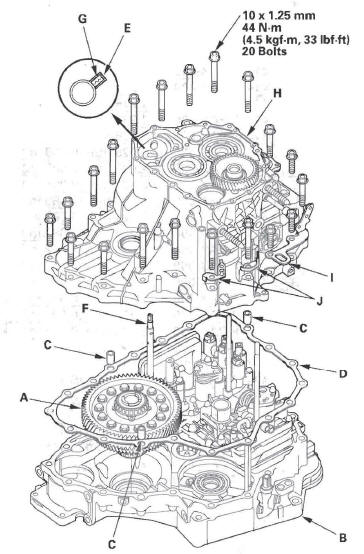
6. Install the three dowel pins (C) and a new gasket (D) on the torque converter housing.
7. Align the spring pin (E) of the control shaft (F) with the transmission housing groove (G) by turning the control shaft. Do not squeeze the end of the control shaft tips together when turning the shaft.
8. Place the transmission housing (H) on the torque converter housing.
9. Install the transmission housing mounting bolts (20 bolts) along with the transmission hanger (I) and harness clamp brackets (J). Tighten the mounting bolts to 44 N*m (4.5 kgf*m, 33Ibf*ft) in two or more steps in a crisscross pattern.
10. Rotate the differential assembly in both directions to seat the bearings.
11. Measure the starting torque of the differential assembly with the special tool, a torque wrench (A), and a socket (B). Measure the starting torque at normal room temperature in both directions.
Standard
New Bearing:
2.7-3.9 N*m (28-40 kgf*cm, 24-35 Ibf*in.)
Reused Bearing:
2.5-3.6 N*m (25-37 kgf.cm, 22-32 Ibf*in.)
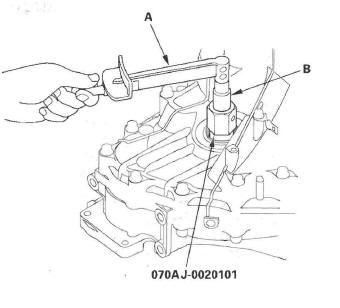
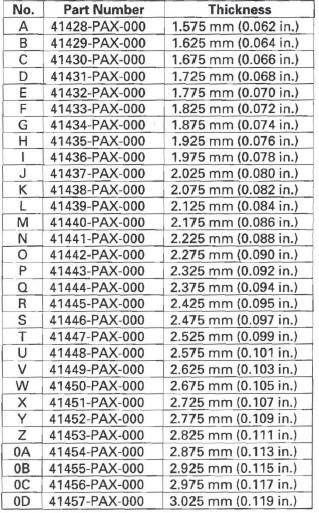
12. If the measurement is out of standard, remove the thrust shim and select the thrust shim from table below. Install the new thrust shim and recheck. To increase the starting torque, increase the thickness of the thrust shim. To decrease the starting torque, decrease the thickness of the shim. Changing the shim to the next size will increase or decrease starting torque about 0.3- 0.4 N*m (3- 4 kgf*cm, 2- 3 Ibf.in.).
THRUST SHIM, 76 mm

THRUST SHIM, 76 mm
READ NEXT:
 Transfer Assembly Inspection/Disassembly/Reassembly
Inspection
1. Set the dial indicator (A) on the companion flange
(B).
2. Measure the transfer gear backlash.
Standard: 0.06-0.16 mm (0.02-0.06 in.)
3. Secure the transfer housing (A) in a bench vise
Rear Differential
Special Tools
Holder Handle
Oil Seal Driver
Attachment, 78 x 80 mm
Attachment, 52 x 55 mm
Companion Flange Holder
Driver
Component Location Index
REAR DIFFERENTIAL MOUNT
Replacement
System Description
Outline
The rear differential has a real-time 4WD control mechanism that enables 4WD
by transmitting appropriate driving
force from the front wheels to the rear wheels when necessary. It uses a
real
SEE MORE:
DTC P0716: Problem in Input Shaft
(Mainshaft) Speed Sensor Circuit
DTC P0716: Problem in Input Shaft
(Mainshaft) Speed Sensor Circuit
DTC P0717: Problem in Input Shaft
(Mainshaft) Speed Sensor Circuit (No Signal
Input)
NOTE:
Before you troubleshoot, record all freeze data and any on-board
snapshot, and review General Troubleshooting Information.
This code is c
DTC 71-2x ("x" can be 0 thru 9 or A thru F):
Short in Driver's Seat Position Sensor
NOTE: Before doing this troubleshooting procedure,
review SRS Precautions and Procedures.
1. Erase the DTC memory.
2. Turn the ignition switch ON (II), and check that the
SRS indicator comes on for about 6 seconds and
then goes off.
Does the SRS indicator stay on, and is DTC 71-2x
indicated?
YES-G
