Honda CR-V: ATF Level Check
NOTE: Keep all foreign particles out of the transmission.
1. Park the vehicle on the level ground.
2. Warm up the engine to normal operating temperature (the radiator fan comes on), and turn the engine off. Do not allow the engine to warm up longer than the time it takes for the radiator fan to come on twice.
NOTE: Check the fluid level within 60-90 seconds after turning the engine off. Higher fluid level may be indicated if the radiator fan comes on twice or more.
3. Remove the dipstick (yellow loop) (A) from the dipstick guide tube, and wipe it with a clean cloth.
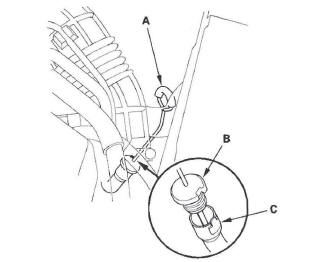
4. Insert the dipstick into the guide tube aligning the notch (B) with the guide tab (C).
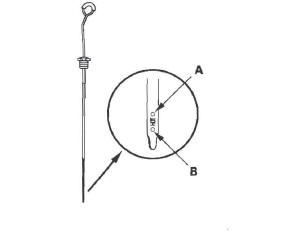
5. Remove the dipstick and check the fluid level. It should be between the upper mark (A) and lower mark (B).
6. If the level is below the lower mark, check for fluid leaks at the transmission, and hose and line joints.
If a problem is found, fix it before filling the transmission.
NOTE: If the vehicle is driven when the ATF level is below the lower mark:
- Transmission damage will result.
- Vehicle does not move in any gear.
- Vehicle accelerates poorly, and flares when starting off in the D and R positions.
- The engine vibrates at idle. I
7. If the level is above the upper mark, drain the ATF to proper level (see step 3).
NOTE: If the vehicle is driven when the ATF level is above the upper mark, the vehicle may creep forward while in the N position, or have a shifting problem.
8. If necessary, fill the transmission with ATF through the dipstick guide tube opening (A) to bring the fluid level midway between the upper mark and lower mark of the dipstick. Do not fill past the upper mark. Always use Honda ATF-Z1 Automatic Transmission Fluid (ATF). Using a non-Honda ATF can affect shift quality.
9. Insert the dipstick into the guide tube aligning the notch with the guide tab.
READ NEXT:
 ATF Replacement
NOTE: Keep all foreign particles out of the transmission.
1. Park the vehicle on the level ground.
2. Warm up the engine to normal operating
temperature (the radiator fan comes on), and turn
the eng
Transfer Assembly Inspection/Removal/Installation
Transfer Assembly Inspection
1. Shift the transmission into the N position.
2. Raise the vehicle on a lift, and make sure it is
supported securely.
3. Make a reference mark (A) across the propeller
Transmission Removal/Installation
Transmission Removal
Special Tools Required
Engine hanger adapter VSB02C000015
CR-V engine hanger adapter VSB02C000032
Front subframe adapter VSB02C000016
Engine support hanger, A and Reds AAR-T-
SEE MORE:
Symptom Troubleshooting
No picture is displayed
NOTE: Always check the connectors for poor
connections or loose terminals between the audio unit,
audio disc changer, navigation unit, and XM receiver.
1. Check the No. 23 (10 A) fuse in the under-hood
fuse/relay box and No. 34 (7.S A) fuse in the under-dash
fuse/relay box, a
PGM-FI System
Component Location Index
CAMSHAFT POSITION (CMP)
SENSOR B (EXHAUST)
OUTPUT SHAFT (COUNTERSHAFT)
SPEED SENSOR
POWERTRAIN CONTROL
MODULE (PCM)
ELECTRICAL LOAD
DETECTOR (ELD)
(bottom of fuse/relay box)
A/F SENSOR
(LAF) RELAY
(RELAY SOCKET E)
IGNITION
CO
