Honda CR-V: DTC Troubleshooting
DTC indicator 1: An Open in the Air Mix Control Motor Circuit
1. Start the engine.
2. Turn on the A/C, then set the temperature control dial to Max Hot.
3. Turn the ignition switch OFF and then ON (II).
4. Do the self-diagnostic with the HVAC control unit.
5. Check for DTCs.
Is DTC 1 indicated? YES-Go to step 6.
NO-Intermittent failure, check for loose wires or poor connections on the air mix control motor circuit.
6. Turn the ignition switch OFF.
7. Test the air mix control motor.
Is the air mix control motor OK? YES-Go to step 8.
NO-Replace the air mix control motor.
8. Disconnect the air mix control motor 7P connector.
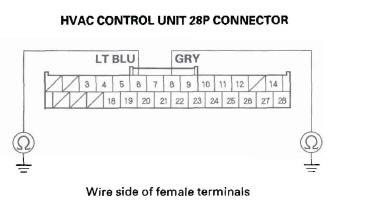
9. Disconnect the HVAC control unit 28P connector.
10. Check for continuity between the following terminals of the HVAC control unit 28P connector and the air mix control motor 7P connector.
28P:
No.6
No.8
No.19
7P:
No.5
No.3
No.7

Is there continuity? YES-Check for loose wires or poor connections at the HVAC control unit 28P connector and at the air mix control motor 7P connector. If the connections are good, substitute a known-good HVAC control unit and recheck. If the symptom/indication goes away, replace the original HVAC control unit.
NO-Repair open in the wire(s) between the HVAC control unit and the air mix control motor.
DTC indicator 2: A Short in the Air Mix Control Motor Circuit
1. Turn the ignition switch OFF and then ON (II).
2. Do the self-diagnostic with the HVAC control unit.
3. Check for DTCs.
Is DTC 2 indicated? YES-Go to step 4.
NO-Intermittent failure.
4. Turn the ignition switch OFF.
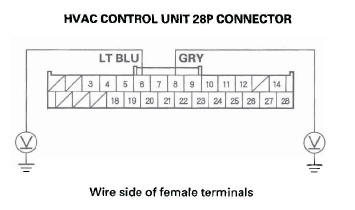
5. Disconnect the air mix control motor 7P connector.
6. Disconnect the HVAC control unit 28P connector.
7. Check for continuity between body ground and the HVAC control unit 28P connector terminals No.6 and No.8 individually.
Is there continuity? YES-Repair short to body ground in the wire(s) between the HVAC control unit and the air mix control motor.
NO-Go to step 8.
8. Check for continuity between the HVAC control unit 28P connector terminals No.6 and No.8.

Is there continuity? YES-Repair the short in the wires.
NO-Go to step 9.
9. Turn the ignition switch ON (II), and check the same terminals for voltage to body ground.
Is there battery voltage? YES-Repair short to power in the wire(s) between the HVAC control unit and the air mix control motor.
This short may also damage the HVAC control unit.
Repair the short to power before replacing the HVAC control unit.
NO-Go to step 10.
10. Test the air mix control motor.
Is the air mix control motor OK? YES-Check the air mix control motor operation with the original HVAC control unit. If the motor operation is no good, substitute a known-good HVAC control unit and recheck.
If the symptom/indication goes away and the air mix control motor runs, replace the original HVAC control unit.
NO-Replace the air mix control motor.
DTC indicator 3: A Problem in the Air Mix Control Linkage, Door, or Motor Circuit
1. Turn the ignition switch OFF and then ON (II).
2. Do the self-diagnostic with the HVAC control unit.
3. Check for DTCs.
Is DTC 3 indicated? YES-Go to step 5.
NO-Intermittent failure, check for loose wires or poor connections on the air mix control motor circuit.
4. Turn the ignition switch OFF.
5. Test the air mix control motor.
Is the air mix control motor OK? YES-Go to step 6.
NO-Replace the air mix control motor, or repair the air mix control linkage or door.
6. Disconnect the air mix control motor 7P connector.
7. Disconnect the HVAC control unit 28P connector.
8. Check for continuity between the following terminals of the HVAC control unit 28P connector and the air mix control motor 7P connector.
28P:
No. 23
No. 24
7P:
No.1
No.2
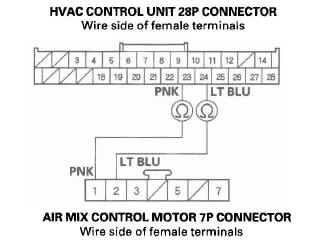
Is there continuity? YES-Go to step 9.
NO-Repair open in the wire(s) between the HVAC control unit and the air mix control motor.
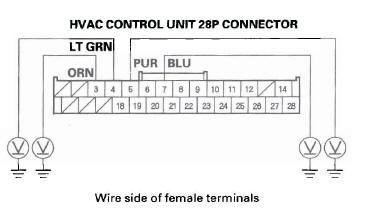
9. Check for continuity between body ground and the HVAC control unit 28P connector terminals No. 23 and No. 24 individually.
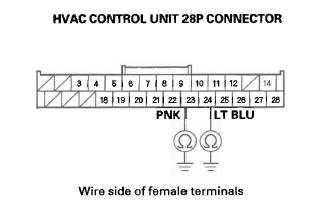
Is there continuity? YES-Repair short to body ground in the wire(s) between the HVAC control unit and the air mix control motor.
NO-Substitute a known-good HVAC control unit, and recheck. If the symptom/indication goes away, replace the original HVAC control unit.
DTC indicator 4: An Open or Short in the Mode Control Motor Circuit
1. Turn the ignition switch OFF and then ON (II).
2. Do the self-diagnostic with the HVAC control unit.
3. Check for DTCs.
Is DTC 4 indicated? YES-Go to step 4.
NO-Intermittent failure, check for loose wires or poor connections on the mode control motor circuit.
4. Turn the ignition switch OFF.
5. Test the mode control motor.
Is the mode control motor OK? YES-Go to step 6.
NO-Replace the mode control motor.
6. Disconnect the mode control motor 7P connector.
7. Disconnect the HVAC control unit 28P connector.
8. Check for continuity between the following terminals of the HVAC control unit 28P connector and the mode control motor 7P connector.
28P:
No.3
No.4
No.5
No.7
No. 19
7P:
No.6
No.5
No.4
No.3
No.7
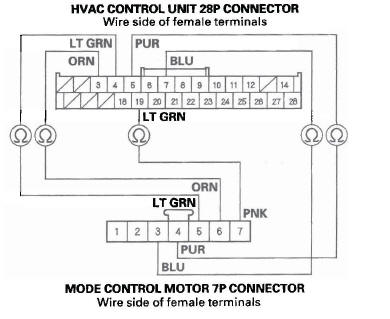
Is there continuity? YES-Go to step 9.
NO-Repair open in the wire(s) between the HVAC control unit and the mode control motor.
9. Check for continuity between body ground and the HVAC control unit 28P connector terminals No.3, 4, 5 and 7 individually.

Is there continuity? YES-Repair short to body ground in the wire(s) between the HVAC control unit and the mode control motor.
NO-Go to step 10.
10. Check for continuity between the HVAC control unit 28P connector terminals as follows.
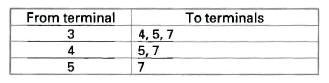
Is there continuity between any of the terminals? YES-Repair the short in the wires.
NO-Go to step 11.
11. Turn the ignition switch ON (II), and check the same terminals for voltage to body ground.
Is there any voltage? YES-Repair short to power in the wire(s) between the HVAC control unit and the mode control motor.
This short may also damage the HVAC control unit.
Repair the short to power before replacing the HVAC control unit.
NO-Check for loose wires or poor connections at the HVAC control unit 28P connector and at the mode control motor 7P connector. If the connections are good, substitute a known-good HVAC control unit, and recheck. lfthe symptom/ indication goes away, replace the original HVAC control unit.
DTC indicator 5: A Problem in the Mode Control Linkage, Doors, or Motor Circuit
1. Turn the ignition switch OFF and then ON (II).
2. Do the self-diagnostic with the HVAC control unit.
3. Check for DTCs.
Is DTC 5 indicated? YES-Go to step 4.
NO-Intermittent failure, check for loose wires or poor connections on the mode control motor circuit.
4. Turn the ignition switch OFF.
5. Test the mode control motor.
Is the mode control motor OK? YES-Go to step 6.
NO-Replace the mode control motor (see page 21-51), or repair the mode control linkage or doors.
6. Disconnect the mode control motor 7P connector.
7. Disconnect the HVAC control unit 28P connector.
8. Check for continuity between the following terminals of the HVAC control unit 28P connector and the mode control motor 7P connector.
28P:
No.25
No. 26
7P:
No.1
No.2
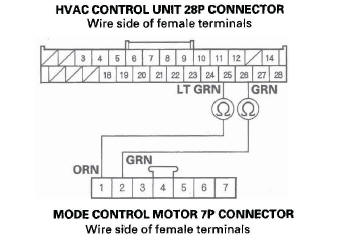
Is there continuity? YES-Go to step 9.
NO-Repair open in the wire(s) between the HVAC control unit and the mode control motor.
9. Check for continuity between body ground and the HVAC control unit 28P connector terminals No. 25 and No. 26 individually.
Is there continuity? YES-Repair short to body ground in the wire(s) between the HVAC control unit and the mode control motor.
NO-Substitute a known-good HVAC control unit, and recheck. If the symptom/indication goes away, replace the original HVAC control unit.
DTC indicator 6: A Problem in the Blower Motor Circuit
NOTE: If the blower motor does not work, the A/C compressor, A/C condenser fan, and radiator fan will not work.
1. Turn the ignition switch OFF and then ON (II).
2. Do the self-diagnostic with the HVAC control unit.
3. Check for DTCs.
Is DTC 6 indicated? YES-Go to step 4.
NO-Intermittent failure, check for loose wires or poor connections on the blower motor circuit.
4. Turn the ignition switch OFF.
5. Check the No.9 (40 A) fuse in the under-hood fuse/relay box, and the No. 36 (10 A) fuse in the under-dash fuse/relay box.
Are the fuses OK? YES-Go to step 6.
NO-Replace the fuses, and recheck. If the fuses blow again, check for a short in the No.9 (40 A) and No. 36 (10 A) fuses circuit.
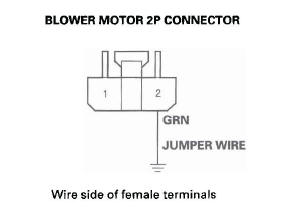
6. Connect the blower motor 2P connector terminal No.2 to body ground with a jumper wire.
7. Turn the ignition switch ON (II).
Does the blower motor run? YES-Go to step 8.
NO-Go to step 23.
8. Turn the ignition switch OFF.
9. Disconnect the jumper wire.
10. Disconnect the power transistor 4P connector.
11. Check for continuity between the power transistor 4P connector terminal No.2 and body ground.
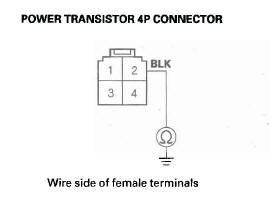
Is there continuity? YES-Go to step 12.
NO-Check for an open in the wire between the power transistor and body ground. If the wire is OK, check for poor ground at G401.
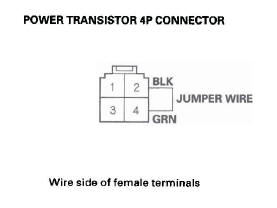
12. Connect the power transistor 4P connector terminals No.2 and No.4 with a jumper wire.
13. Turn the ignition switch ON (II).
Does the blower motor run at high speed? YES-Go to step 14.
NO-Repair open in the GRN wire between the power transistor and the blower motor.
14. Turn the ignition switch OFF.
15. Disconnect the jumper wire.
16. Disconnect the HVAC control unit 28P connector.
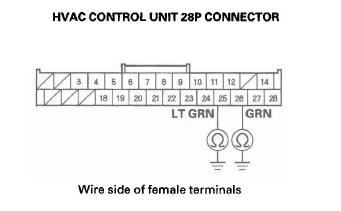
17. Check for continuity between body ground and the HVAC control unit 28P connector terminals No. 11 and No. 12 individually.
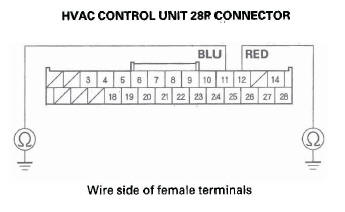
Is there continuity? YES-Repair short to body ground in the wire(s) between the HVAC control unit and the power transistor.
NO-Go to step 18.
28. Measure the voltage between the blower motor relay 4P socket terminal No.1 and body ground.
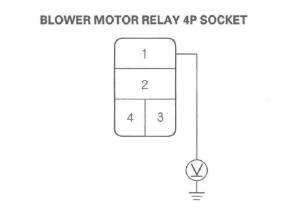
Is there battery voltage? YES-Go to step 29.
NO-Replace the under-hood fuse/relay box.
29. Turn the ignition switch ON (II).
30. Measure the voltage between the blower motor relay 4P socket terminal No. 3 and body ground.
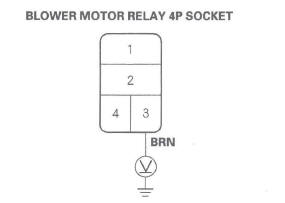
Is there battery voltage? YES-Go to step 31.
NO-Repair open in the wire between the No. 36 (10 A) fuse in the under-dash fuse/relay box and the blower motor relay.
31. Turn the ignition switch OFF.
32. Check for continuity between the blower motor relay 4P socket terminal No.4 and body ground.
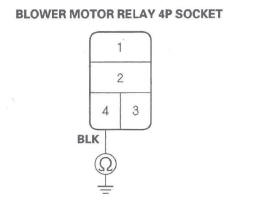
Is there continuity? YES-Repair open in the WHT wire between the blower motor relay and the blower motor.
NO-Check for an open in the wire between the blower motor relay and body ground. If the wire is OK, check for poor ground at G302.
DTC indicator 7: HVAC Control Unit Internal Error
NOTE: Check the battery condition and the charging system.
1. Turn the ignition switch OFF and then ON (II).
2. Do the self-diagnostic with the HVAC control unit.
3. Check for DTCs.
Is DTC 7 indicated? YES-The HVAC control unit is faulty, replace the HVAC control unit.
NO-Intermittent failure, the HVAC control unit is OK at this time. Check for poor connections at the HVAC control unit and at G503.
DTC indicator 8: An Open in the Evaporator Temperature Sensor Circuit
1. Turn the ignition switch OFF and then ON (II).
2. Do the self-diagnostic with the HVAC control unit.
3. Check for DTCs.
Is DTC 8 indicated? YES-Go to step 4.
NO-Intermittent failure, check for loose wires or poor connections on the evaporator temperature sensor circuit.
4. Turn the ignition switch OFF.
5. Remove the evaporator temperature sensor and test it.
Is the evaporator temperature sensor OK? YES-Go to step 6.
NO-Replace the evaporator temperature sensor.
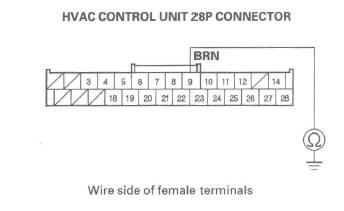
6. Disconnect the HVAC control unit 28P connector.
7. Check for continuity between the HVAC control unit 28P connector terminal No.9 and the evaporator temperature sensor 2P connector terminal No.2.
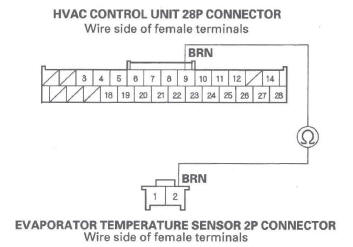
Is there continuity? YES-Go to step 8.
NO-Repair open in the wire between the HVAC control unit and the evaporator temperature sensor.
8. Check for continuity between the HVAC control unit 28P connector terminal No. 19 and the evaporator temperature sensor 2P connector terminal No.1.
Is there continuity? YES-Check for loose wires or poor connections at the HVAC control unit 28P connector and at the evaporator temperature sensor 2P connector. If the connections are good, substitute a known-good HVAC control unit, and recheck. If the symptom/ indication goes away, replace the original HVAC control unit.
NO-Repair open in the wire between the HVAC control unit and the evaporator temperature sensor.
DTC indicator 9: A Short in the Evaporator Temperature Sensor Circuit
1. Turn the ignition switch OFF and then ON (II).
2. Do the self-diagnostic with the HVAC control unit.
3. Check for DTCs.
Is DTC 9 indicated? YES-Go to step 4.
NO-Intermittent failure.
4. Turn the ignition switch OFF.
5. Remove the evaporator temperature sensor and test it.
Is the evaporator temperature sensor OK? YES-Go to step 6.
NO-Replace the evaporator temperature sensor.
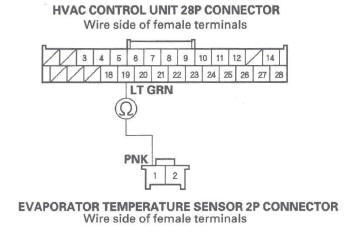
6. Disconnect the HVAC control unit 28P connector.
7. Check for continuity between body ground and the HVAC control unit 28P connector terminal No.9.
Is there continuity? YES-Repair short to body ground in the wire between the HVAC control unit and the evaporator temperature sensor.
NO-Go to step 8.
8. Check for continuity between the HVAC control unit 28P connector terminals No.9 and No. 19.
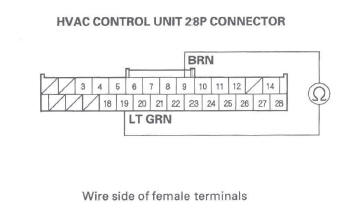
Is there continuity? YES-Repair short in the wires between the HVAC control unit and the evaporator temperature sensor.
NO-Substitute a known-good HVAC control unit, and recheck. If the symptom/indication goes away, replace the original HVAC control unit.
READ NEXT:
 Recirculation Control Motor
Circuit Troubleshooting
Recirculation Control Motor
Circuit Troubleshooting
1. Check the No. 36 (10 A) fuse in the under-dash fuse/
relay box.
Is the fuse OK?
YES-Go to step 2.
NO-Replace the fuse, and recheck. If the fuse blows again, check for a short in
the No. 36 (10 A
Radiator and A/C Condenser Fan Low Speed Circuit Troubleshooting
NOTE:
Do not use this troubleshooting procedure if the A/C
compressor is inoperative. Refer to the symptom
troubleshooting index.
Before doing symptom troubleshooting, check for
powertrain DTCs.
A/C Condenser Fan High Speed Circuit Troubleshooting
NOTE:
Do not use this troubleshooting procedure if the
radiator fan and/or A/C compressor is inoperative.
Refer to the symptom troubleshooting index.
Before doing symptom troubleshooting, check
SEE MORE:
Engine Compression Inspection
NOTE: After this inspection, you must reset the
powertrain control module (PCM), otherwise the PCM
will continue to stop the injectors from functioning.
Select PCM reset using the Honda Diagnostic System
(HDS).
1. Warm up the engine to normal operating
temperature (cooling fan comes on).
2. Turn t
Upper Arm Replacement
1. Raise the rear of the vehicle, and support it with safety stands in the
proper locations.
2. Remove the rear wheel.
3. Place a floor jack under the trailing arm, and
support the suspension.
4. Remove the wheel sensor harness bracket (A) from
the upper arm (B).
5. Remove the flange bolts (A),
