Honda CR-V: Radiator and A/C Condenser Fan Low Speed Circuit Troubleshooting
NOTE:
- Do not use this troubleshooting procedure if the A/C compressor is inoperative. Refer to the symptom troubleshooting index.
- Before doing symptom troubleshooting, check for powertrain DTCs.
1. Check the No.7 (20 A) fuse in the under-hood fuse/relay box, and the No. 36 (10 A) fuse in the under-dash fuse/relay box.
Are the fuses OK? YES-Go to step 2.
NO-Replace the fuses, and recheck. If the fuses blow again, check for a short in the No.7 (20 A) and No. 36 (10 A) fuses circuit:.
2. Remove the radiator fan relay from the under-hood fuse/relay box, and test it.
Is the relay OK? YES-Go to step 3.
NO-Replace the radiator fan relay.
3. Connect the HDS to the DLC.
4. Turn the ignition switch ON (II).
5. Turn on the A/C on.
6. Check the FAN LOW CTRL in the PGM-FI Data List with the HDS.
Is the FAN LOW CTRL on? YES-Go to step 7.
NO-Substitute a known-good PCM, and retest. If the symptom/indication goes away with a known-good PCM, replace the original PCM.
7. Measure the voltage between the radiator fan relay 4P socket terminal No.1 and body ground.
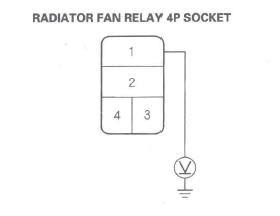
Is there battery voltage? YES-Go to step 8.
NO-Replace the under-hood fuse/relay box.
8. Connect the radiator fan relay 4P socket terminals No.1 and No.2 with a jumper wire.
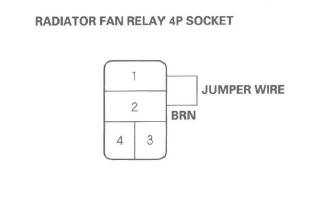
Do the A/C condenser and radiator fans run on low? YES-Go to step 9.
NO-Go to step 18.
9. Disconnect the jumper wire.
10. Turn the ignition switch ON (II).
11. Measure the voltage between the radiator fan relay 4P socket terminal No.3 and body ground.
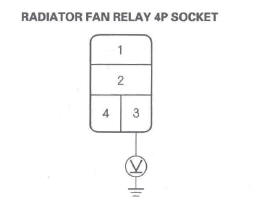
Is there battery voltage? YES-Go to step 12.
NO-Go to step 36.
12. Turn the ignition switch OFF.
13. Reinstall the radiator fan relay.
14. Jump the SCS line with the HDS.
NOTE: This step must be done to protect the powertrain control module (PCM) from damage.
15. Disconnect PCM connector A (44P).
16. Connect the PCM connector A (44P) terminal No.4 to body ground with a jumper wire.
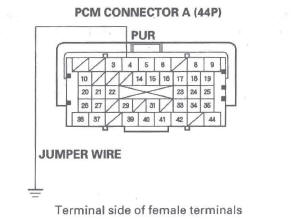
17. Turn the ignition switch ON (II).
Do the A/C condenser and radiator fans run on low? YES-Check for loose wires or poor connections at PCM connector A (44P) terminal No.4. If the connections are good, substitute a known-good PCM, and recheck. If the symptom/indication goes away, replace the original PCM.
NO-Repair open in the wire between the radiator fan relay and the PCM.
18. Disconnect the jumper wire.
19. Reinstall the radiator fan relay.
20. Disconnect the radiator fan 2P connector.
21. Turn the ignition switch ON (II), then set the A/C button and fan control dial ON.
22. Measure the voltage between the radiator fan 2P connector terminal No.2 and body ground.
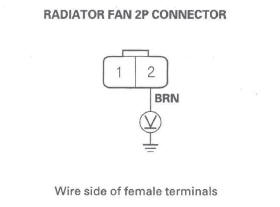
Is there battery voltage? YES-Go to step 23.
NO-Repair open in the wire between the radiator fan relay and the radiator fan.
23. Set the A/C button and fan control dial to OFF, then turn the ignition switch OFF.
24. Reconnect the radiator fan 2P connector.
25. Connect the radiator fan 2P connector terminal NO.1 to body ground with a jumper wire.
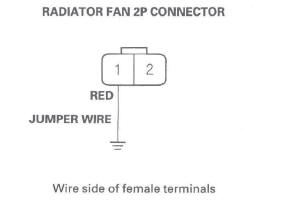
26. Turn the ignition switch ON (II), then set the A/C button and fan control dial to ON.
Does the radiator fan run? YES-Go to step 27.
NO-Replace the radiator fan motor.
27. Set the A/C button and fan control dial to OFF, then turn the ignition switch OFF.
28. Disconnect the jumper wire.
29. Remove the fan control relay from the under-hood relay box, and test it.
Is the relay OK? YES-Go to step 29.
NO-Replace the fan control relay.
30. Turn the ignition switch ON (II), then set the A/C button and fan control dial ON.
31. Measure the voltage between the fan control relay 5P socket terminal No. 1 and body ground.
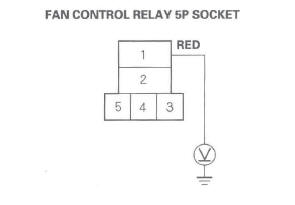
Is there battery voltage? YES-Go to step 32.
NO-Repair open in the wire between the radiator fan and the fan control relay.
32. Set the A/C button and fan control dial to OFF, then turn the ignition switch OFF.
33. Disconnect the A/C condenser fan 2P connector.
34. Check for continuity between the fan control relay 5P socket terminal No.4 and the A/C condenser fan 2P connector terminal No.2.
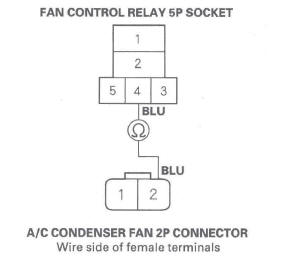
Is there continuity? YES-Go to step 35.
NO-Repair open in the wire between the fan control relay and the A/C condenser fan.
35. Check for continuity between the A/C condenser fan 2P connector terminal No.1 and body ground.
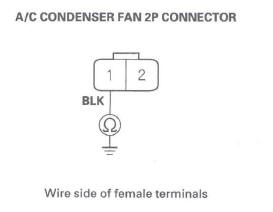
Is there continuity? YES-Replace the A/C condenser fan motor.
NO-Check for an open in the wire between the A/C condenser fan and body ground. If the wire is OK, check for poor ground at G301.
36. Turn the ignition switch OFF.
37. Remove A/C diode A from the under-hood fuse/ relay box.
38. Using the diode setting ( ) on
a DVOM, check
for current flow in both directions between the A/C
diode A terminals No.1 and No.2.
) on
a DVOM, check
for current flow in both directions between the A/C
diode A terminals No.1 and No.2.
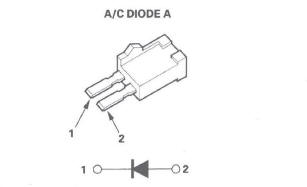
Is there current flow in only one direction? YES-Go to step 39.
NO-Replace A/C diode A.
39. Turn the ignition switch ON (II).
40. Measure the voltage between the A/C diode A 2P socket terminal No.2 and body ground.
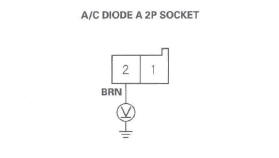
Is there battery voltage? YES-Replace the under-hood fuse/relay box.
NO-Repair open in the wire between the No. 36 (10 A) fuse in the under-dash fuse/relay box and A/C diode A.
READ NEXT:
 A/C Condenser Fan High Speed Circuit Troubleshooting
NOTE:
Do not use this troubleshooting procedure if the
radiator fan and/or A/C compressor is inoperative.
Refer to the symptom troubleshooting index.
Before doing symptom troubleshooting, check
A/C Signal Circuit Troubleshooting
NOTE:
Use this troubleshooting procedure if the A/C
compressor, the A/C condenser fan, and radiator fan are inoperative.
Before doing symptom troubleshooting, check for and resolve any
powertrai
Blower Unit
Removal/Installation
1. Remove the glove box.
2. Disconnect the connector (A), then remove the
connector clip (B), the wire harness clips (C), the
bolts, and the glove box frame (D).
3. Cut the plastic cross brace (A) i
SEE MORE:
Carrying Cargo in the Cargo Area or on a Roof Rack
Distribute cargo evenly on the
floor of the cargo area, placing the
heaviest items on the bottom and
as far forward as possible. Tie
down items that could be thrown
about the vehicle during a crash or
sudden stop.
Do not stack items higher than the
back of the rear seats. They can
b
Turn Signal and Headlights
1. Turn Signal
2. OFF
3. Parking and interior lights
4. AUTO
5. Headlights on
6. High Beams
7. Flash high beams
*: If equipped
Turn Signal - Push down on the
lever to signal a left turn and up to
signal a right turn. To signal a lane
change, push lightly on the lever,
and hold it
