Honda CR-V: Blower Unit Removal/Installation
1. Remove the glove box.
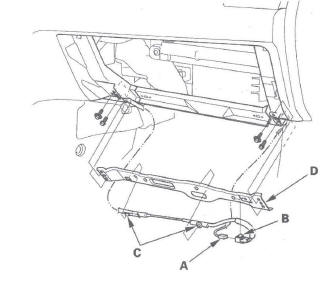
2. Disconnect the connector (A), then remove the connector clip (B), the wire harness clips (C), the bolts, and the glove box frame (D).
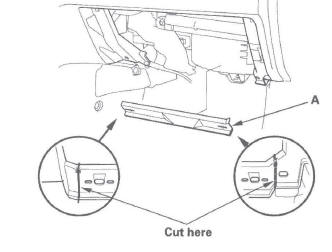
3. Cut the plastic cross brace (A) in the glove box opening with diagonal cutters in the area shown.
Retain plastic cross brace to be reinstalled later.
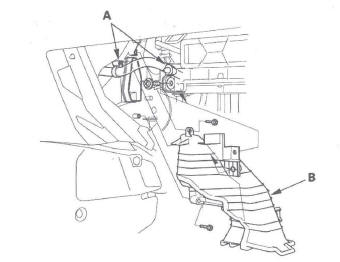
4. Remove the wire harness clips (A), the self-tapping screws, and the passenger's heater duct (B).
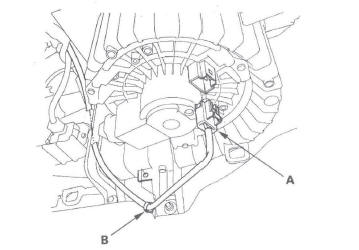
5. Disconnect the connector (A) from the blower motor. Remove the wire harness clip (B).
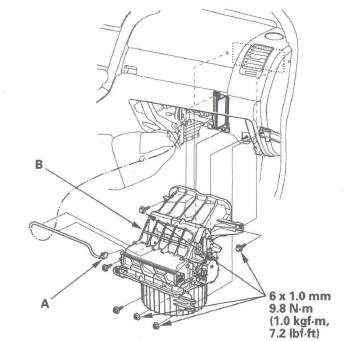
6. Disconnect the connector (A) from the recirculation control motor. Remove the self-tapping screws, the bolt, the mounting nuts, and the blower unit (B).
7. Install the unit in the reverse order of removal.
Make sure that there is no air leakage.
Blower Unit Component Replacement
Note these items when overhauling the blower unit:
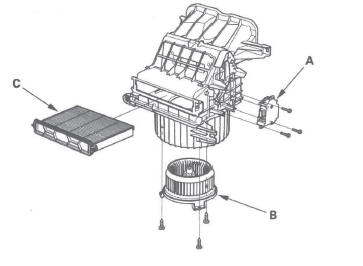
- The recirculation control motor (A), blower motor (B), and the dust and pollen filter (C) can be replaced without removing the blower unit.
- Before reassembly, make sure that the recirculation control linkage and door move smoothly without binding.
- After reassembly, make sure the recirculation control motor runs smoothly.
READ NEXT:
 Evaporator Core
Replacement
Evaporator Core
Replacement
1. Recover the refrigerant with a recovery/recycling/ charging station.
2. Remove the bolt from the A/C line clamp, and
remove the receiver line (A) from the clips (B).
3. Remove the nut, then disco
Heater Unit/Core
Replacement
SRS components are located in this area. Review the
SRS component locations, and the
precautions and procedures before
doing repairs or service.
1. Make sure you have anti-theft codes for the audio
sy
A/C Compressor
Replacement
NOTE: Do not install an A/C compressor into a system
unless you are completely sure that the system is free
of contamination. Installing the A/C compressor into a
contaminated system can result in pre
SEE MORE:
Engine Oil Life Display
To see the current engine oil life,
turn the ignition switch to the ON
(II) position, then press and release
the select/reset knob repeatedly
until the engine oil life indicator
appears.
The remaining engine oil life is
shown on the display according to
this table:
If the remai
Temperature
The temperature grades are A (the
highest), B, and C, representing the
tire’s resistance to the generation of
heat and its ability to dissipate heat
when tested under controlled
conditions on a specified indoor
laboratory test wheel. Sustained high
temperature can cause the material
