Honda CR-V: Tailgate
Tailgate Adjustment
NOTE:
- Have an assistant help you when adjusting the tailgate.
- Take care not to scratch the tailgate, body, and other related parts.
- Put on gloves to protect your hands.
1. Remove these items:
- Quarter pillar glass trim, both sides
- Tailgate weatherstrip, as needed
- Cargo area light
2. Pull down the rear portion of the headliner. Take care not to bend the headliner excessively.
3. Remove the tailgate support strut from each side.
4. Remove the cap (A) from the rear trim panel (B).
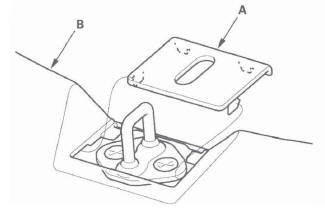
5. Slightly loosen the screws.
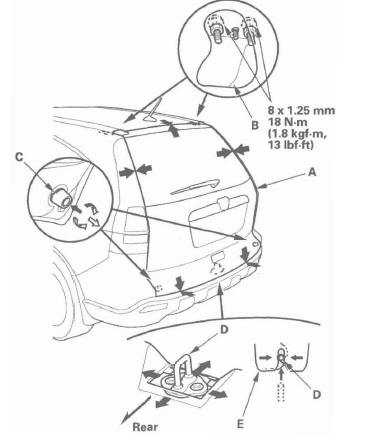
6. Adjust the tailgate (A) alignment in the following sequence:
- Adjust the tailgate hinges (B) right and left, using the elongated holes.
- Turn the tailgate edge cushions (C), in or out as necessary, to make the tailgate fit flush with the body at the side edges.
- Adjust the fit between the tailgate and tailgate opening by moving the striker (D), and adjust the striker right or left until it is centered in the tailgate latch (E).
7. Tighten each bolt and nut securely.
8. Check that the tailgate opens properly and locks securely.
9. Reinstall the support struts securely.
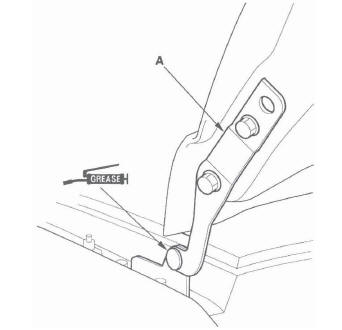
10. Apply touch-up paint to the hinge mounting nuts and around the hinges, and let the paint dry.
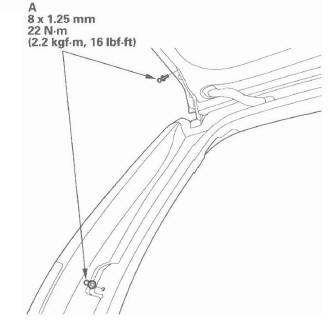
11. Apply multipurpose grease to the pivot portion of the tailgate hinges (A) as indicated by the arrows.
12. Reinstall all of the removed parts.
Tailgate Support Strut Replacement
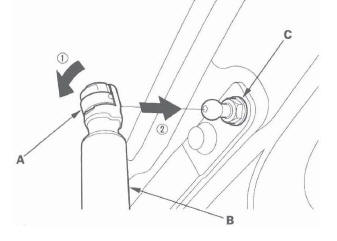
1. With the help of an assistant, use a flat-tip screwdriver (A) to pry the support strut clips (B) from each end of the support strut (C) at the tailgate and body, then release the support strut from the pivot bolts (D). Do not remove the clips from the support strut.
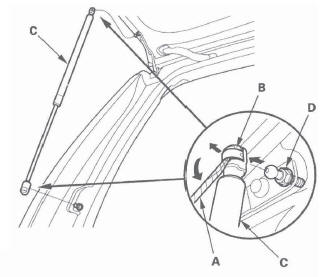
2. Remove the pivot bolts (A).
3. Set the clips (A) to the original position, then reattach the support strut (B) on the pivot bolts (C) by pushing the support strut onto the pivot.
Tailgate Weatherstrip Replacement
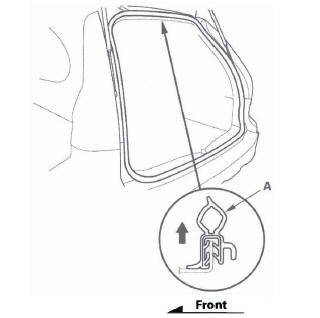
1. Remove the tailgate weatherstrip (A) by pulling out on it.
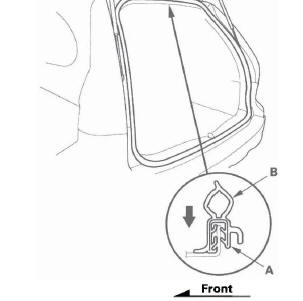
2. Locate the painted alignment mark (A) on the tailgate weatherstrip (B). Align the painted mark with the alignment tab in the center of the tailgate opening, and install the weatherstrip. Make sure it's seated completely and facing in the direction shown. Make sure there are no wrinkles in the weatherstrip.
3. Check for water leaks.
READ NEXT:
 Fuel Fill Door
Fuel Fill Door Adjustment
1. Remove the nut (A), then remove the open spring
(B).
2. Slightly loosen the hinge mounting bolts (A).
3. Adjust the fuel fill door (B) in or out until it's flush
with th
Upper/Lower Front Grille Replacement
Upper Front Grille Replacement
NOTE: Take care not to scratch the bumper and grille.
1. Remove the front bumper.
2. Remove the clips from the back of the front grille
and release the hooks (A), then
SEE MORE:
To Change or Select Files
Use the SKIP button while a USB
flash memory device is playing to
change files.
SKIP - Each time you press the
(SKIP +) button, the system
skips forward to the beginning of the
next file. Press the (SKIP -)
button, to skip backward to the
beginning of the current file. Press it
ag
To Play a USB Flash Memory Device
This audio system can select and
play the audio files from a USB flash
memory device with the same
controls used for the in-dash disc
player. To play a USB flash memory
device, connect it to the USB adapter
cable in the upper glove box. The
ignition switch must be in the
ACCESSORY (I
