Honda CR-V: Upper/Lower Front Grille Replacement
Upper Front Grille Replacement
NOTE: Take care not to scratch the bumper and grille.
1. Remove the front bumper.
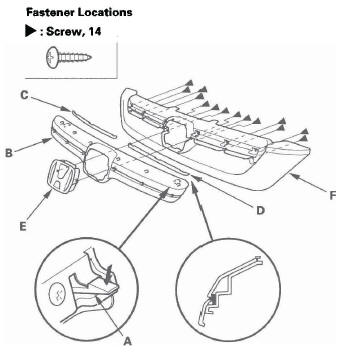
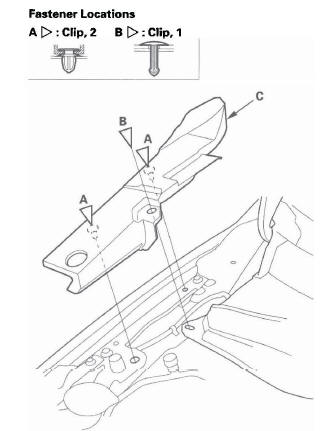
2. Remove the clips from the back of the front grille and release the hooks (A), then release the hooks (B) and remove the upper front grille (C) from the lower front grille (D).
3. Remove the screws, then release the hooks (A) and remove the upper front grille molding (B), the right upper front grille spacer (C), the left upper front grille spacer (D), and front emblem base (E) from the upper front grille base (F).
4. If emblem replacement is necessary, refer to emblem/sticker replacement.
5. Install the grille in the reverse order of removal, and note these items:
- Check if the clips are damaged or stress-whitened, and if necessary, replace them with new ones.
- Push the clips and hooks into place securely.
Lower Front Grille Replacement
NOTE: Take care not to scratch the bumper and grille.
1. Remove these items:
- Front bumper
- Front upper grille
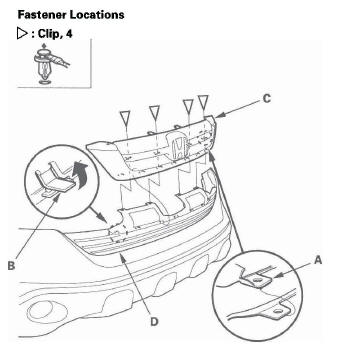
2. Remove the clips and push nuts (A), then release the hooks (B) and remove the lower front grille (C) from the front bumper (D).
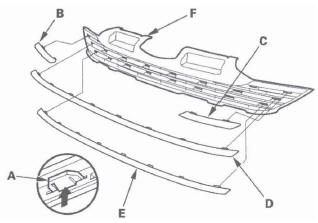
3. Release the hooks (A), then remove the right lower front grille molding (B), left lower front grille molding (C), middle lower front grille molding (D), and lower lower front grille molding (E) from the lower front grille base (F).
4. Install the grille in the reverse order of removal, and note these items:
- Check if the clips are damaged or stress-whitened, and if necessary, replace them with new ones.
- Push the clips and hooks into place securely.
Front Fender Trim Replacement
Special Tools Required
KTC trim tool set SOJATP2014 *
* Available through the American Honda Tool and Equipment Program; call 888-424-6857
NOTE:
- Take care not to scratch the fender trim and body.
- Use the appropriate tool from the KTC trim tool set to avoid damage when prying components.
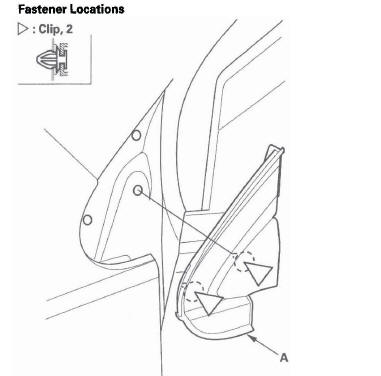
1. Remove the clips (A, B), then remove the front fender trim (C).
2. Install the trim in the reverse order of removal, and note these items:
- Check if the clips are damaged or stress-whitened, and if necessary, replace them with new ones.
- Push the clips into place securely.
Front Bulkhead Cover Replacement
NOTE:
- Put on gloves to protect your hands.
- Take care not to scratch the front bumper and body.
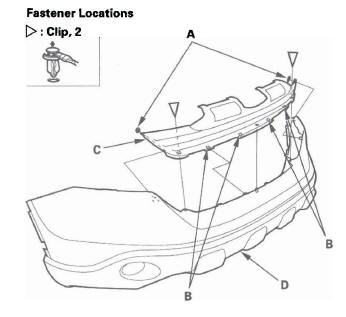
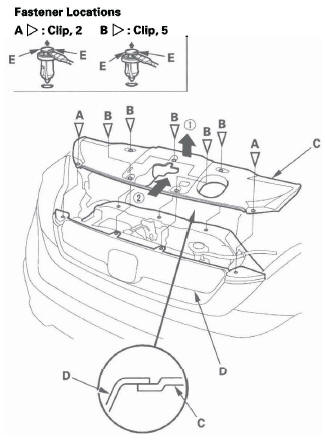
1. Remove the clips (A, B) by carefully pulling the front grille cover (C) up, then remove the cover by releasing the front edge of the cover from the grille (D). Take care not to scratch the body.
NOTE: To remove the clips, pry the inner clip up at the edge near the line (E) on its head.
2. Install the cover in the reverse order of removal, and note these items:
- Check if the clips are damaged or stress-whitened, and if necessary, replace them with new ones.
- Push the clips and hooks into place securely.
A-Pillar Corner Trim Replacement
Special Tools Required
KTC trim tool set SOJATP2014 *
* Available through the American Honda Tool and Equipment Program; call 888-424-6857
NOTE:
- Put on gloves to protect your hands.
- Take care not to scratch the corner trim and body.
- Use the appropriate tool from the KTC trim tool set to avoid damage when prying components.
1. Open the front door.
2. Carefully insert a appropriate trim tool next to the upper clip, and detach the clip by prying on the A-pillar corner trim (A). Take care not to scratch the body and related parts.
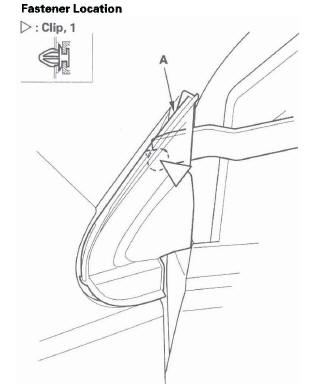
3. Pull the A-pillar corner trim (A) back by hand to detach remaining lower clips, then remove the trim.
4. Install the trim in the reverse order of removal, and note these items:
- Check if the clips are damaged or stress-whitened, and if necessary, replace them with new ones.
- Push the clips into place securely.
READ NEXT:
 Cowl Cover Replacement
Special Tools Required
KTC trim tool set SOJATP2014 *
* Available through the American Honda Tool and
Equipment Program; call 888-424-6857
NOTE:
Put on gloves to protect your hands.
Take care not t
Door Lower Trim Replacement
NOTE:
Take care not to scratch the door.
Put on gloves to protect your hands.
1. Remove these items:
Door panel, front , rear.
Door speaker, front, rear.
2. From the front or the rear door, re
Side Windshield Trim Replacement
Special Tools Required
KTC trim tool set SOJATP2014 *
* Available through the American Honda Tool and
Equipment Program; call 888-424-6857
NOTE:
Put on gloves to protect your hands.
Take care not t
SEE MORE:
Adjusting the Sound
You can adjust the sound on the
navigation screen. To adjust the
sound, push the AUDIO button, then
enter the sound grid by touching the
SOUNDicon on the display.
BASS - Adjusts the bass.
TREBLE - Adjusts the treble. To
adjust the treble and bass, touch
either
or
on the tr
Relay and Control Unit
Locations
Engine Compartment
VSA MODULATOR-CONTROL UNIT
AUXILIARY UNDER-HOOD
RELAY BOX
POWER MIRROR
DEFOGGER RELAY
PCM
RADIATOR FAN RELAY
ELECTRONIC THROTTLE CONTROL SYSTEM (ETCS) CONTROL RELAY
ELD UNIT
PGM-FI MAIN RELAY 1 (FI MAIN)
UNDER-HOOD FUSE/RELAY BOX
FAN CONTROL RELAY
BLOWER MOTOR RELAY
