Honda CR-V: Cowl Cover Replacement
Special Tools Required
KTC trim tool set SOJATP2014 *
* Available through the American Honda Tool and Equipment Program; call 888-424-6857
NOTE:
- Put on gloves to protect your hands.
- Take care not to scratch the cowl cover and body.
- Use the appropriate tool from the KTC trim tool set to avoid damage when prying components.
1. Remove these items:
- Windshield wiper arms
- Front fender trim, both sides
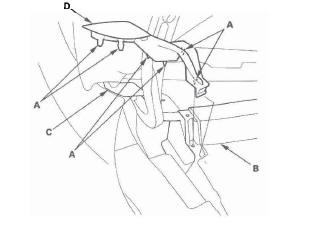
2. From both sides of the cowl cover, release the hooks (A) from the cowl cover (B) and the front fender (C), then release the hood hinge cover (D), then remove the covers.
Driver's side
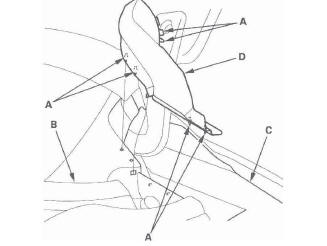
Passenger's side
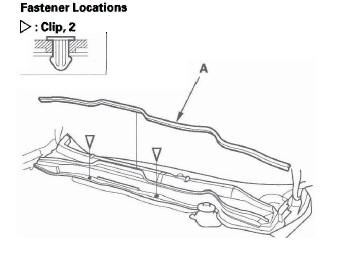
3. Remove the rear hood seal (A) by pulling it out.
Using a clip remover, detach the clips from the cowl covers.
4. Detach the clips (A) by carefully pulling the passenger's cowl cover (B) upward, and release the hook (C) on the passenger's cowl cover from the driver's cowl cover, then release the hooks (D) from the under cowl panel (E), disconnect the windshield washer tubes (F), and remove the passenger's cowl cover.
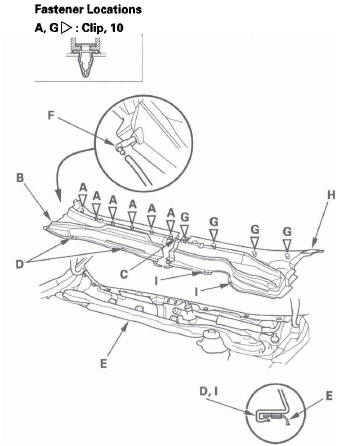
5. Detach the clips (G) by carefully pulling the driver's cowl cover (H) upward, then release the hooks (I) from the under cowl panel, and remove the driver's cowl cover.
6. Install the covers in the reverse order of removal, and note these items:
- Make sure the washer tubes are connected securely.
- Check if the clips are damaged or stress-whitened, and if necessary, replace them with new ones.
- Push the clips and hooks into place securely.
READ NEXT:
 Door Lower Trim Replacement
NOTE:
Take care not to scratch the door.
Put on gloves to protect your hands.
1. Remove these items:
Door panel, front , rear.
Door speaker, front, rear.
2. From the front or the rear door, re
Side Windshield Trim Replacement
Special Tools Required
KTC trim tool set SOJATP2014 *
* Available through the American Honda Tool and
Equipment Program; call 888-424-6857
NOTE:
Put on gloves to protect your hands.
Take care not t
Fenderwell
Front Inner Fender Replacement
NOTE: Take care not to scratch the body.
1. Remove the front wheel arch protector, as needed.
2. Remove the front inner fender (A).
Remove the screws (B, C), and remo
SEE MORE:
System Description
Headlights System Description
The headlight system is composed of the MICU, the headlight and
dimmer/flash-to-pass switches (inside the
combination light switch), the left and right headlights, and the high beam
indicator.
The MICU controls the headlights with a built-in low beam headlight relay
Oil Pan Removal
1. If the engine is already out of the vehicle, go to step
20.
2. Raise the vehicle on the lift to full height.
3. Drain the engine oil.
4. Remove the front wheels.
5. Remove the splash shield (see step 21).
6. Disconnect the air fuel ratio (A/F) sensor connector
and secondary heated oxygen sen
