Honda CR-V: Door Lower Trim Replacement
NOTE:
- Take care not to scratch the door.
- Put on gloves to protect your hands.
1. Remove these items:
- Door panel, front , rear.
- Door speaker, front, rear.
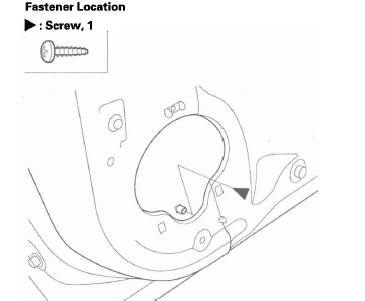
2. From the front or the rear door, remove the screw.
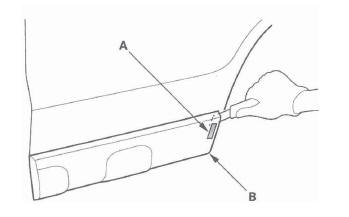
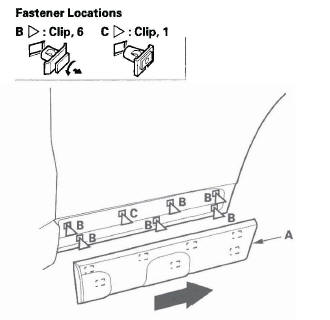
3. Using a utility knife, carefully cut the double-sided adhesive tape (A) along the edge of the door lower trim (B).
Front door
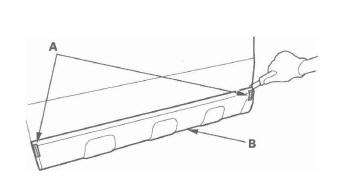
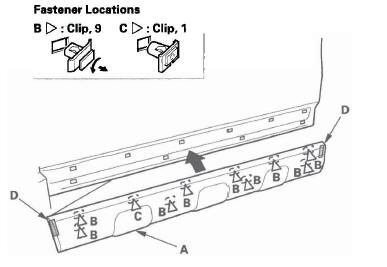
Rear door
4. With the help of an assistant, slide the door lower trim (A) rearward, and remove it. The clips (B, C) stay in the body. Turn the clips (B) 45 º counterclockwise, and remove them.
Front door
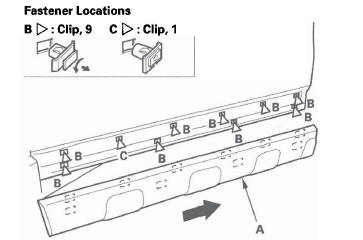
Rear door
5. Check if the clips are damaged or stress-whitened, and if necessary, replace them with new ones.
6. Install the clips on the trim.
7. Scrape off the remaining double-sided adhesive tape from the trim and door, then clean the trim and door surfaces with a sponge dampened in isopropyl alcohol.
8. Apply primer to the area where the panel will be applied.
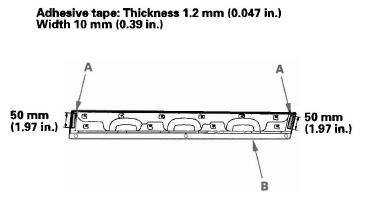
9. Attach the double-sided adhesive tape (A) to the trim (B), and fold the edge of each adhesive backing from the double-sided adhesive tape.
Front door
Rear door

10. Hold the trim (A) up, and fit all the clips (B, C) into the holes in the door, then push on the trim until the clips snap into place.
Front door
Rear door
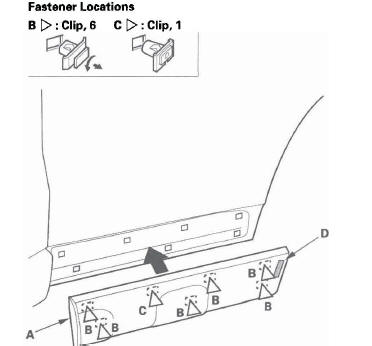
11. Carefully pull the adhesive backing (D) away, and push the trim into place securely.
12. Set the screw into the back of clip, then reinstall the door speaker and the door panel.
READ NEXT:
 Side Windshield Trim Replacement
Special Tools Required
KTC trim tool set SOJATP2014 *
* Available through the American Honda Tool and
Equipment Program; call 888-424-6857
NOTE:
Put on gloves to protect your hands.
Take care not t
Fenderwell
Front Inner Fender Replacement
NOTE: Take care not to scratch the body.
1. Remove the front wheel arch protector, as needed.
2. Remove the front inner fender (A).
Remove the screws (B, C), and remo
Openers
Component Location Index
HOOD OPENER CABLE
Replacement
FUEL FILL DOOR OPENER
Replacement
TAILGATE LATCH
Replacement
FUEL FILL DOOR LATCH
Replacement
FUEL FILL DOOR OPENE
SEE MORE:
Additional Safety Precautions
Do not attempt to deactivate your
airbags. Together, airbags and
seat belts provide the best
protection.
Do not tamper with airbag
components or wiring for any
reason. Tampering could cause
the airbags to deploy, possibly
causing very serious injury.
Do not expose the front passenger
DTC 33-9x ("x" can be 0 thru 9 or A thru F):
Short to Ground in Left Side Curtain Airbag
Inflator
Special Tools Required
SRS inflator simulator 07SAZ-TB4011A
SRS simulator lead L 070AZ-SNAA300
NOTE: Before doing this troubleshooting procedure,
review SRS Precautions and Procedures.
1. Erase the DTC memory.
2. Turn the ignition switch ON (II), and check that the
SRS indicator comes on for a
