Honda CR-V: Loading CDs in the Changer
Your vehicle has the CD changer in
the center console.
CD-R, CD-RWdisc, and CD
compressed inMP3 andWMA will
not work in this unit. Video CDs and
DVD discs also will not work.
Do not spill any liquids on the center
console. Spilled liquids can damage
electrical components in the CD
changer.

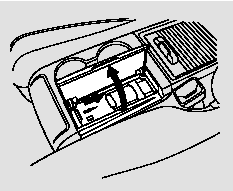
1. Open the center console cover,
then slide open the CD changer
cover by pulling it rearward.

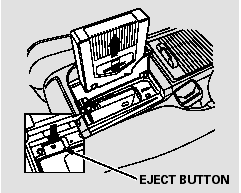
2. Push the EJECT button to remove
the CD magazine. The magazine
will pop up automatically.

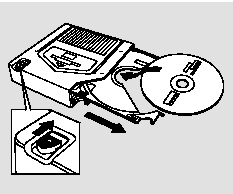
3. To install a CD into the magazine,
push the button while pulling out
on the tab.
4. Put a CDon the tray with the
printed surface facing up as shown.
5. Reinstall the tray in the magazine.
Repeat this procedure to open the
other five trays.

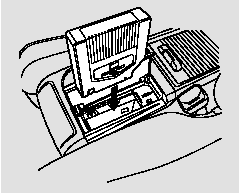
6. Store all six trays in the magazine,
and reinstall the magazine in the
CD changer as shown.
7. Make sure to slide the CD
changer cover closed until it clicks.
To remove CDs from the CD
changer, refer to the loading
procedure.
READ NEXT:
To play CDs, the ignition switch
must be in the ACCESSORY (I) or
ON (II) position.
You operate the CD changer with
the same controls used for the indash
disc player or the radio. To
select
Press the AM/FMor CD/XM
button to switch to the radio or
satellite radio while a CD is playing.
If there is a PC card in the audio unit,
touch the CARD icon to switch to
the PC card while a C
If you see an error message in the
display while playing a disc, find the
cause in the chart to the right. If you
cannot clear the error message, take
your vehicle to your dealer.
The cha
SEE MORE:
Fuel economy is not a fixed number.
It varies based on driving conditions,
driving habits and vehicle condition.
Therefore, it is not possible for one
set of estimates to predict fuel
economy precisely for all drivers in
all environments.
The EPA fuel economy estimates
shown in the exam
The spotlights have a two-position
switch. In the DOOR position, the
lights come on when you open any
door. In the OFF position, the lights
do not come on.
The spotlights (with the switch in
the DOOR position) also come on
when you unlock the door with the
key or the remote transm
© 2016-2026 Copyright www.hcrv.net


