Honda CR-V: CD Changer Error Messages (EX-L model with navigation system)
If you see an error message in the display while playing a disc, find the cause in the chart to the right. If you cannot clear the error message, take your vehicle to your dealer.
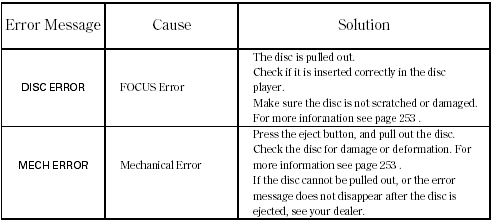
The chart on the right explains the error messages you may see in the display while playing a disc.
If you see an error message in the display while playing a disc, press the eject button. After ejecting the disc, check it for damage or deformation. If there is no damage, insert the disc again.
For additional information on damaged discs.
Insert a different disc. If the new disc plays, there is a problem with the first disc. If the error message cycle repeats and you cannot clear it, take your vehicle to a dealer.
The audio systemwill try to play the disc. If there is still a problem, the error message will reappear. Press the eject button, and pull out the disc.
READ NEXT:
 Playing a PC card (EX-L model with navigation system)
Playing a PC card (EX-L model with navigation system)
To Play a PC Card
You operate the PC card player with
the same controls used for the radio
and the disc player. To load or play a
card, the ignition switch must be in
the ACCESSORY (I) or ON (II)
position.
T
Loading a PC Card
The PC card slot is behind the
navigation screen. To use the PC
card player, press the OPEN button
beside the screen. The screen folds
back, and the PC card slot appears.
Insert a PC card
SEE MORE:
DTC U0028: F-CAN Malfunction (BUS-OFF
(PCM) )
NOTE: Before you troubleshoot, record all freeze data and any on-board
snapshot, and review the general troubleshooting information.
1. Turn the ignition switch ON (II).
2. Clear the DTC with the HDS.
3. Check for Temporary DTCs or DTCs with the HDS.
Is DTC U0028 indicated? YES-Update the PCM i
Power Flow
P Position
Hydraulic pressure is not applied to the clutch. Power is not transmitted to
the countershaft. The countershaft is locked
by the park pawl, interlocking the park gear.
N Position
Engine power transmitted from the torque converter drives the mainshaft idler
gear, the idler shaft idler ge
