Honda CR-V: Fenderwell
Front Inner Fender Replacement
NOTE: Take care not to scratch the body.
1. Remove the front wheel arch protector, as needed.
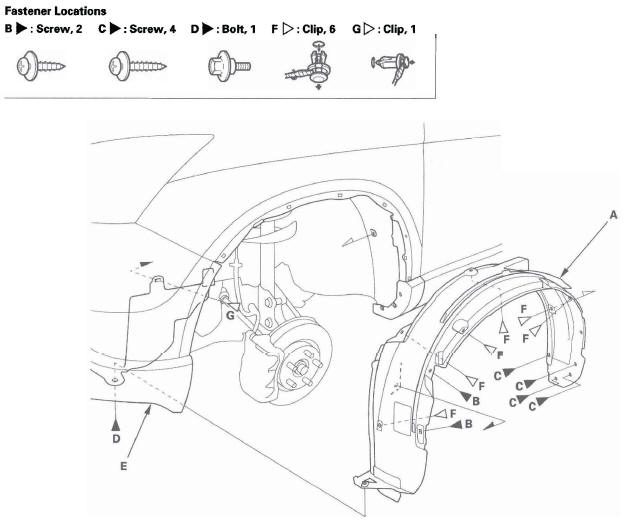
2. Remove the front inner fender (A).
- Remove the screws (B, C), and remove the bolt (D) securing the front bumper (E) and front inner fender.
- Remove the clips (F, G) securing the front inner fender (and splash shield) on the body.
3. Install the inner fender in the reverse order of removal, and note these items:
- Check if the clips are damaged or stress-whitened, and if necessary, replace them with new ones.
- Push the clips into place securely.
Front Splash Shield Replacement
NOTE:
- Put on gloves to protect your hands.
- Take care not to scratch the body and related parts.
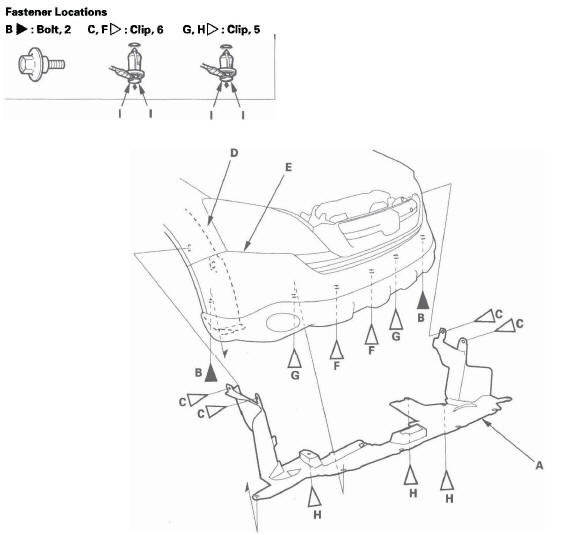
1. Remove the splash shield (A).
- Remove the bolts (B), then remove the clips (C) that secure the front inner fender (D) and front splash shield to the body.
- From under the front bumper (E), remove the clips (F, G).
- From under the body, remove the clips (H).
- Pull the splash shield out.
NOTE: To remove the clips, pry the inner clip up at the edge near the line (I) on its head.
2. Install the splash shield in the reverse order of removal, and note these items:
- Check if the clips is damaged or stress-whitened, and if necessary, replace them with new ones.
- Push the clips into place securely.
Front Fender Fairing Replacement
1. Remove the front inner fender, as needed.
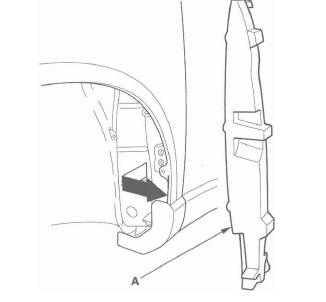
2. Pull out and remove the front fender fairing (A).
3. Install the fender fairing in the reverse order of removal.
Fuel Pipe Protector Replacement
NOTE:
- Take care not to scratch the body.
- Put on gloves to protect your hands.
1. Remove the left rear wheel.
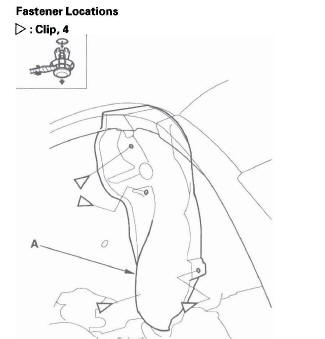
2. Remove the clips, then remove the fuel pips protector (A). Take care not to scratch the body.
3. Install the protector in the reverse order of removal, and note these items:
- Check if the clips are damaged or stress-whitened, and if necessary, replace them with new ones.
- Push the clips into place securely.
Rear Splash Guard Replacement
NOTE: Take care not to scratch the rear bumper and body.
1. Remove the screws, then remove the rear splash guard (A) from the rear bumper (B) and body.
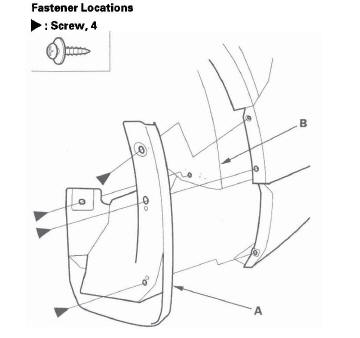
2. Install the splash guard in the reverse order of removal.
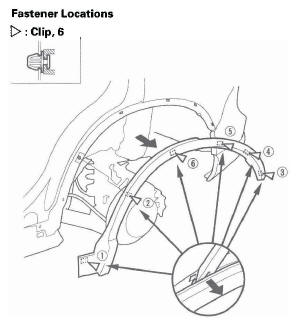
Front Wheel Arch Protector Replacement
Special Tools Required
KTC trim tool set SOJATP2014 *
* Available through the American Honda Tool and Equipment Program; call 888-424-6857
NOTE:
- Use the appropriate tool from the KTC trim tool set to avoid damage when prying components.
- Take care not to scratch the body.
- Put on gloves to protect your hands.
1. Remove the screws (A) and clip (B) securing the front wheel arch protector (C).
2. In the sequence shown, start at each end and work to the middle of the wheel arch, prying the clip portions of the wheel arch protector up with a trim tool to detach the clips and separate the double-sided adhesive tape (A).
NOTE: Take care not to damage paint around a clip hole in the rear outside panel during clip removal. If paint is damaged, repair it with touch-up paint to ensure corrosion protection.
3. Check if the clips are damaged or stress-whitened.
and if necessary, replace them with new ones.
4. Scrape off the remaining double-sided adhesive tape from the body, then clean the body surfaces with a sponge dampened in alcohol.
5. If the spacers (B) are removed, scrape off the remaining double-sided adhesive tape from the protector, then clean the protector surfaces with a sponge dampened in alcohol.
6. Apply the primer to the ares where the adhesive tape will be applied. Then attach the double-sided adhesive tape (A) to the spacers (B), and peel the adhesive backing away from the spacers.
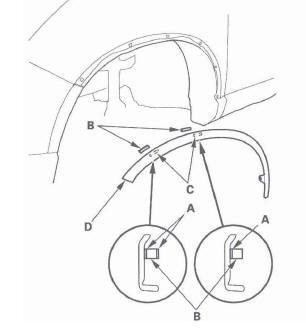
7. Line up the spacers with the alignment marks (C) on the protector (D), and attach them with adhesive tape.
8. Hold the protector up, push the adhesive portions and clips into place securely.
9. Reinstall the bolts and clip.
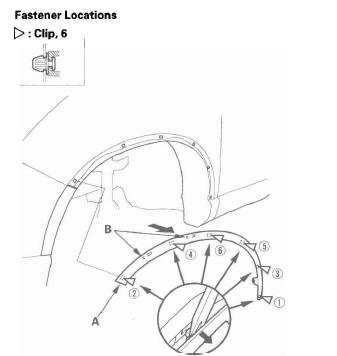
Rear Wheel Arch Protector Replacement
Special Tools Required
KTC trim tool set SOJATP2014 *
* Available through the American Honda Tool and Equipment Program; call 888-424-6857
NOTE:
- Use the appropriate tool from the KTC trim tool set to avoid damage when prying components.
- Take care not to scratch the body.
- Put on gloves to protect your hands.
1. Remove the screws securing the rear wheel arch protector (A).

2. In the sequence shown, start at each end and work to the middle of the wheel arch, prying the clip portions of the wheel arch protector up with a trim tool to detach the clips.
NOTE: Take care not to damage paint around a clip hole in the rear outside panel during clip removal. If paint is damaged, repair it with touch-up paint to ensure corrosion protection.
3. Install the protector in the reverse order of removal, and note these items:
- Check if the clips are damaged or stress-whitened, and if necessary, replace them with new ones.
- Push the clips into place securely.
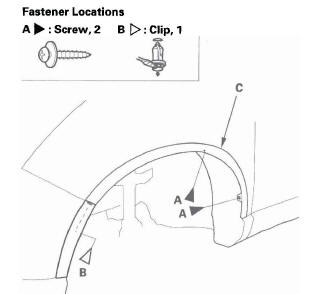
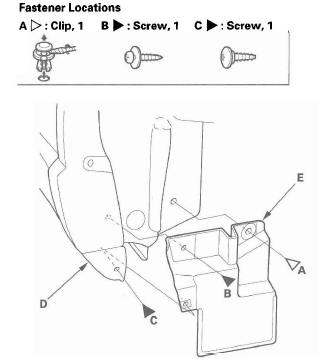
Rear Strake Replacement
1. Remove the clip (A) and screw (B) from the body, and remove the screw (C) from the side sill panel (D), then remove the rear strake (E) from the body.
2. Install the strake in the reverse order of removal, and note these items:
- Check if the clips are damaged or stress-whitened, and if necessary, replace them with new ones.
- Push the clips into place securely.
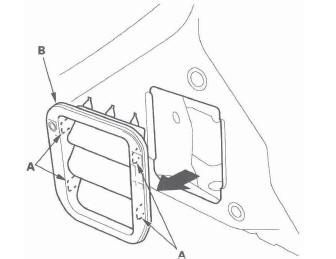
Rear Air Outlet Replacement
1. Remove the rear bumper.
2. Detach the hooks (A), then remove the rear air outlet (B). Take care not to scratch the body.
3. Install the air outlet by pushing on the hook portions until the hooks snap into place.
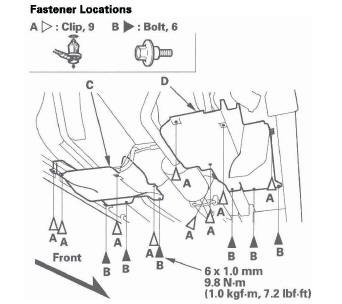
Middle Under-floor Cover Replacement
NOTE: Take care not to scratch the body.
1. Remove the clips (A) and bolts (B), then remove the left middle under-floor cover (C) and right middle under-floor cover (D).
2. Install the cover in the reverse order of removal, and note these items:
- Check if the clips are damaged or stress-whitened, and if necessary, replace them with new ones.
- Push the clips into place securely.
READ NEXT:
 Openers
Component Location Index
HOOD OPENER CABLE
Replacement
FUEL FILL DOOR OPENER
Replacement
TAILGATE LATCH
Replacement
FUEL FILL DOOR LATCH
Replacement
FUEL FILL DOOR OPENE
Frame
Under-cowl Panel Replacement
NOTE: Take care not to scratch the body.
1. Remove these items:
Windshield wiper arms
Front fender trim, both sides
Cowl covers
2. Remove the bolts and nuts, discon
HVAC (Heating, Ventilation, and Air Conditioning)
Special Tools
Backprobe set
Component Location Index
SERVICE VALVE (HIGH-PRESSURE SIDE)
SERVICE VALVE (LOW-PRESSURE SIDE)
EVAPORATOR CORE (Located-in the heater unit)
RECEIVER/DRYER DESIC
SEE MORE:
Connecting an iPod
1. Open the upper glove box.
2. Push the release button to release
the USB adapter cable.
3. Connect your dock connector to
the iPod correctly and securely.
4. Install the dock connector to the
USB adapter cable securely.
If the iPod indicator does not appear
in the audio display
Parking Brake
Parking Brake Inspection
CAUTION
Frequent inhalation of brake pad dust, regardless of material
composition, could be hazardous to your health.
Avoid breathing dust particles.
Never use an air hose or brush to clean brake assemblies. Use an OSHA-approved
vacuum cleaner.
1. Raise the rear of
