Honda CR-V: Openers
Component Location Index
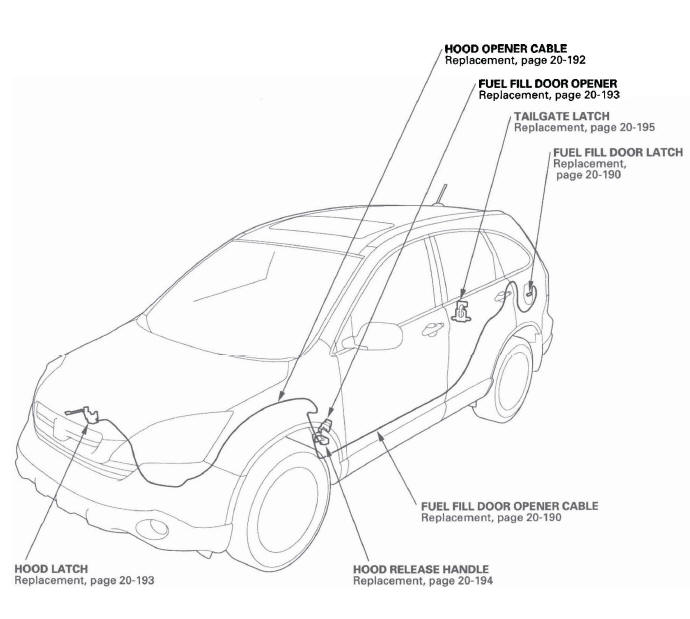
- HOOD OPENER CABLE
- Replacement
- FUEL FILL DOOR OPENER
- Replacement
- TAILGATE LATCH
- Replacement
- FUEL FILL DOOR LATCH
- Replacement
- FUEL FILL DOOR OPENER CABLE
- Replacement
- HOOD RELEASE HANDLE
- Replacement
- HOOD LATCH
- Replacement
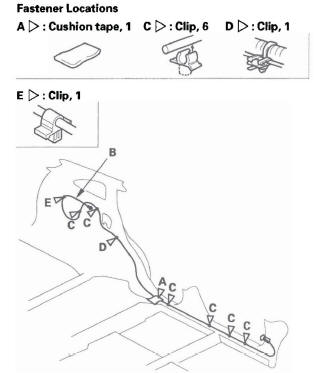
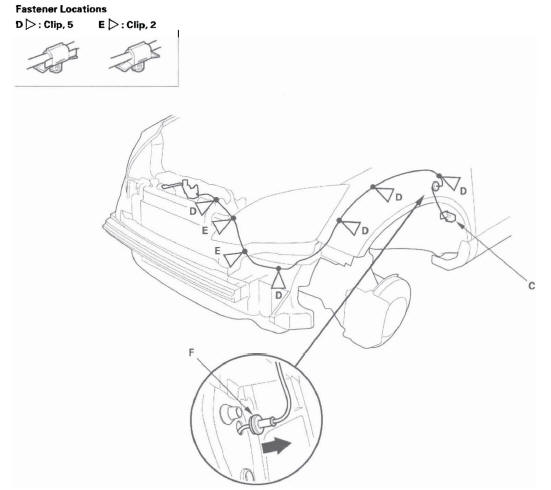
Fuel Fill Door Opener Cable Replacement
SRS components are located in this area. Review the SRS component locations and the precautions and procedures before doing repairs or service.
NOTE:
- Put on gloves to protect your hands.
- Take care not to scratch the body and related parts.
1. Remove these items from the vehicle:
- Rear seat
- Front door sill trim, driver's sides (see step 1)
- Kick panels, driver's sides
- Rear door sill trim, driver's side
- 8-pillar lower trim, driver's side
- Cargo area side trim panel, left side (see step 4)
- Fuel fill door opener
2. Pull the carpet back as needed.
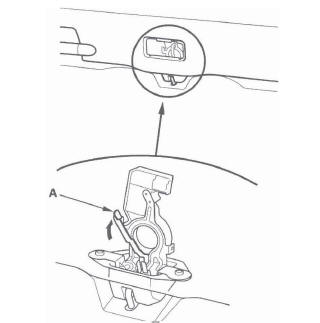
3. Disconnect the fuel fill door opener cable from the fuel fill door opener (see step 3).
4. Remove the cushion tape (A), and remove the fuel fill door opener cable (B) from the clips (C, D).
Using a clip remover, detach the clips (E).
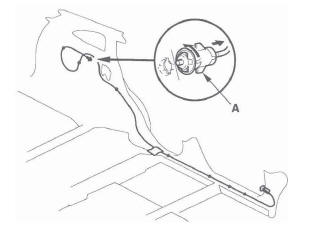
5. Remove the fuel fill door latch (A) from the body by turning it 90º.
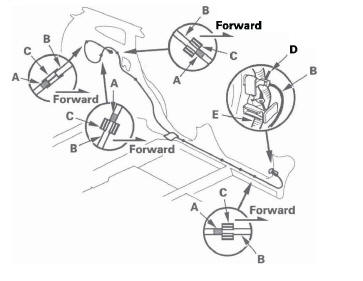
6. Install the opener cable in the reverse order of removal, and note these items:
- Align the marks (A) on the opener cable (B) with the cable clips (C) as shown.
- Route the opener cable under the hood opener cable (D) and floor wire harness (E).
- Replace any damaged clips, and replace the cushion tape.
- Make sure the fuel fill door opens properly and locks securely.
Hood Opener Cable Replacement
NOTE:
- Put on gloves to protect your hands.
- Take care not to scratch the body and related parts.
1. Remove these items:
- Front bulkhead cover
- Front inner fender
- Kick panel
- Front bumper, as needed
2. Disconnect the hood opener cable (A) from the hood latch (B), then remove the hood release handle (C). Take care not to kink the cable.
3. Using a clip remover, detach the clips (D, E) and remove the grommet (F) from the body, then remove the hood opener cable from the vehicle. Take care not to kink the cable.
4. Install the cable in the reverse order of removal, and note these items:
- Check if the clips are damaged or stress-whitened, and if necessary, replace them with new ones.
- Route the cable through the hole in the body.
- Make sure the hood opens properly and locks securely.
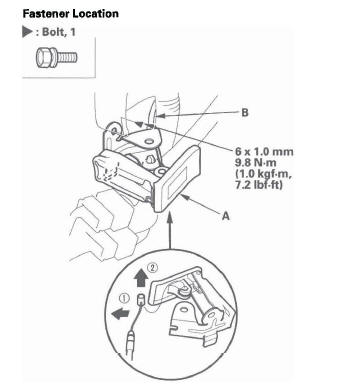
Fuel Fill Door Opener Replacement
1. Remove the kick panel, left side.
2. Remove the bolts, then remove the fuel fill door opener (A).
3. Disconnect the fuel fill door opener cable (B) from the fuel fill door opener. Take care not to kink the cable.
4. Install the fuel fill door opener in the reverse order of removal, and note these items:
- Make sure the fuel fill door opener cable is connected properly.
- Make sure the fuel fill door opens properly.
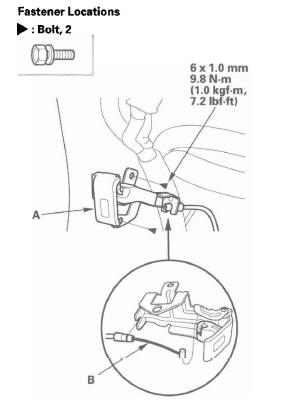
Hood Latch Replacement
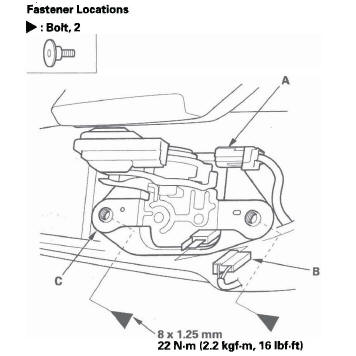
1. Remove the front bulkhead cover.
2. With hood latch switch: Remove the clip (A), then disconnect and detach the hood latch switch connector (B).
3. Remove the bolts, then remove the hood latch (C) from the body, and disconnect the hood opener cable (D) from the hood latch.
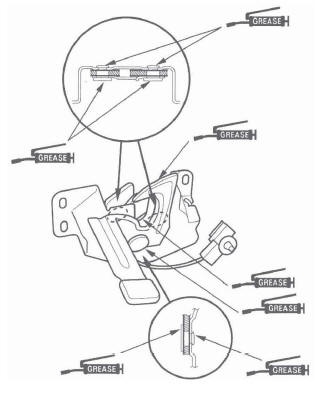
4. Install the latch in the reverse order of removal, and note these items:
- Apply multipurpose grease to each location of the hood latch indicated by the arrows.
- Make sure the hood opener cable is connected properly and hood latch switch connector is plugged in properly (for some models).
- Adjust the hood latch alignment (see step 4).
- Make sure the hood opens properly and locks securely.
Hood Release Handle Replacement
1. Remove the kick panel.
2. Remove the bolt, then remove the hood release handle (A).
3. Disconnect the hood opener cable (B) from the hood release handle. Take care not to kink the cable.
4. Install the hood release handle in the reverse order of removal, and note there items:
- Make sure the hood opener cable is connected properly.
- Make sure the hood opens properly.
Tailgate Latch Replacement
NOTE:
- Put on gloves to protect your hands.
- If the tailgate latch doesn't open by pulling the tailgate handle, remove the maintenance lid from the tailgate lower trim panel, then turn the emergency lever (A) clockwise as shown.
1. Remove the tailgate lower trim panel.
2. Disconnect the actuator connector (A) and latch switch connector (B), then remove the bolts.
3. Pull the tailgate latch (C) out, then remove the latch.
4. Install the latch in the reverse order of removal, and note these items:
- Make sure the connectors are plugged in properly.
- Make sure the tailgate opens properly and locks securely.
READ NEXT:
 Frame
Frame
Under-cowl Panel Replacement
NOTE: Take care not to scratch the body.
1. Remove these items:
Windshield wiper arms
Front fender trim, both sides
Cowl covers
2. Remove the bolts and nuts, discon
HVAC (Heating, Ventilation, and Air Conditioning)
Special Tools
Backprobe set
Component Location Index
SERVICE VALVE (HIGH-PRESSURE SIDE)
SERVICE VALVE (LOW-PRESSURE SIDE)
EVAPORATOR CORE (Located-in the heater unit)
RECEIVER/DRYER DESIC
A/C Service Tips and Precautions
WARNING
Compressed air mixed with the R-134a forms a
combustible vapor.
The vapor can burn or explode causing serious
injury.
Never use compressed air to pressure test
R-134a service equipment
SEE MORE:
ATF Temperature Sensor
ATF Temperature Sensor Test/Replacement
1. Raise the vehicle on a lift, or apply the parking
brake, block the rear wheels, and raise the front of
the vehicle. Make sure it is securely supported.
2. Remove the splash shield.
3. Disconnect the shift solenoid harness connector.
4. Measure the ATF te
Installing a Child Seat with a Tether
A child seat with a tether can be
installed in any seating position in
the back seat.
Each rear outside seating position
has an anchorage point on the seatback,
and the center seating position
has an anchorage point in the ceiling
near the tailgate.
Since a tether can provide additiona
