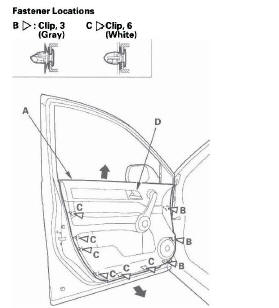
Honda CR-V: Front Door
Front Door Panel Removal/Installation
Special Tools Required
- KTC trim tool set SOJATP2014 *
- Trim pad remover, Snap-on A 177 A or equivalent, commercially available
* Available through the American Honda Tool and Equipment Program; call 888-424-6857
NOTE:
- Use the appropriate tool from the KTC trim tool set to avoid damage when prying components.
- Take care not to scratch the door and related parts.
1. Raise the glass fully.
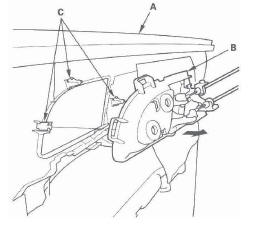
2. Using the appropriate trim tool, pry out on the under portion of the inner handle cap (A) to release the hooks (B, C).
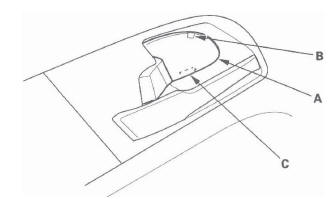
3. Remove the screws from the inner handle (A).
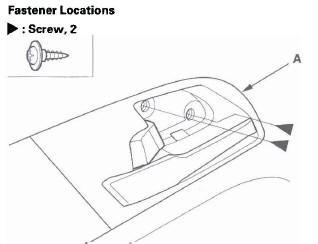
4. Using the appropriate trim tool, pry out on the upper cap (A) of the front door grip to release the hooks (B). Then remove the screw (C).
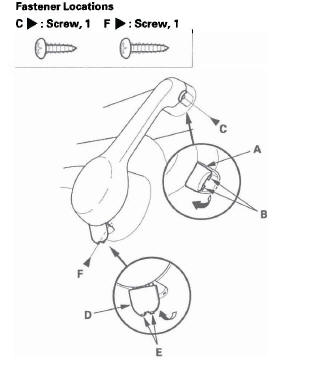
5. Using the appropriate trim tool, pry out on the lower cap (D) of the front door grip to release the hooks (E). Then remove the screw (F).
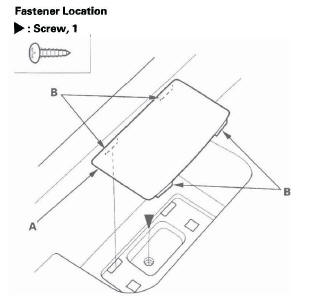
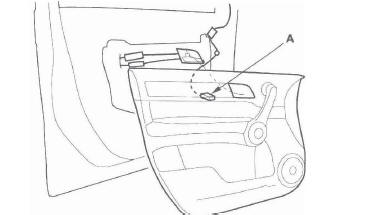
6. Using the appropriate trim tool, pry out on the cover (A) in the door pocket to release the hooks (B).
Then remove the cover, and screw.
7. Remove the mirror mount cover.
8. Remove the door panel (A) with as little bending as possible to avoid creasing or breaking it.
- Start at the bottom edge of the door panel, release the clips with a commercially available trim pad remover.
- Detach the upper clips (B, C).
- Starting at the rear, pull the door panel upward.
NOTE: The inner handle cable and latch cable are connected to the inner handle (D). Do not pull the door panel up too far, or these cables will be damaged.
9. While holding the door panel (A) away from the door, remove the inner handle (B) from the door panel by detaching the clips (C). Remove the door panel.
10. Disconnect the power window switch connector (A).
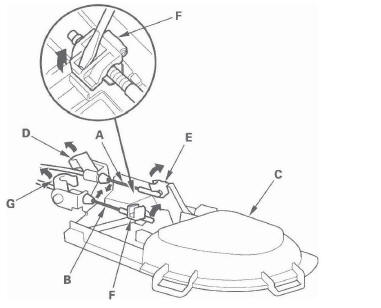
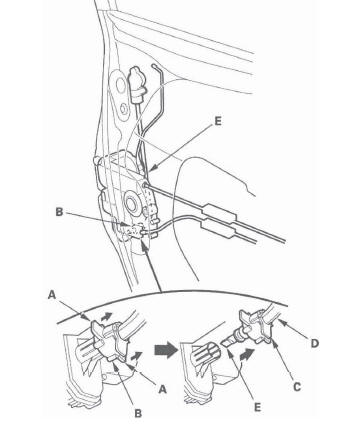
11. If necessary, disconnect the inner handle cable (A) and the latch cable (B) from the inner handle (C), then remove the handle.
- Detach the inner handle cable fastener (D), then disconnect the inner handle cable from the cable fastener (E).
- Detach the latch cable fastener (F) with a flat-tip screwdriver, then disconnect the latch cable from the cable fastener (G).
NOTE: Check for damaged or stress-whitened cable fasteners.
12. Install the door panel in the reverse order of removal. and note these items:
- Check if the clips are damaged or stress-whitened, and if necessary, replace them with new ones.
- Replace any damaged cable fasteners with new ones.
- The latch cable (A) should be fixed to the cable fastener (B) with the latch in lock position as shown.
- Make sure the power window switch connector is plugged in properly, and the cable is connected securely.
- Make sure the window and power door lock operate properly.
Front Door Outer Handle Replacement
NOTE: Put on gloves to protect your hands.
1. Raise the glass fully.
2. Remove the door panel.
3. Remove the plastic cover (A).
- Remove the plug caps (B), and detach the harness clips (C).
- Disconnect the power door lock actuator connector (D), and pass the harness (E) and cables (F) through the holes (G) in the plastic cover.
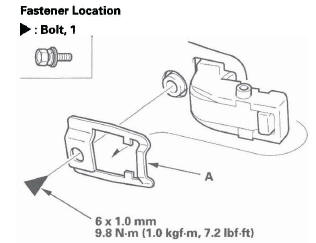
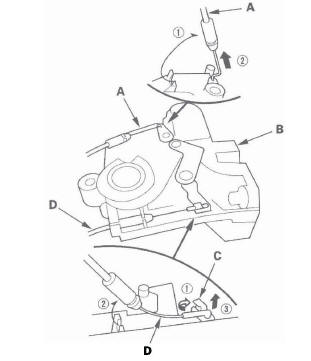
4. Detach the rod fastener (A).
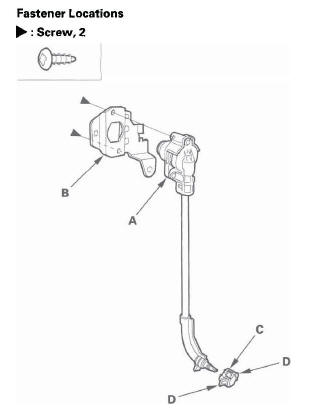
5. Remove the maintenance cap (A). With a clip remover, disconnect the outer handle rod (B).
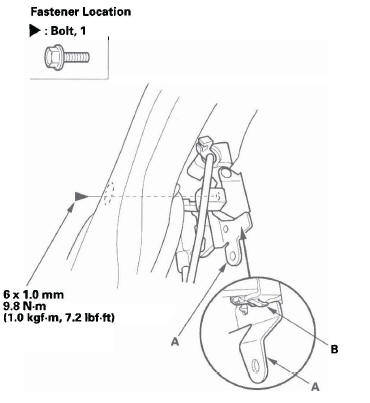
6. Pull both side flanges (A) of the retainer (B) outward, and pull the middle flange portion (C) of the outer casing cover (D) out, then disconnect the cylinder cable (E) from the latch (F).
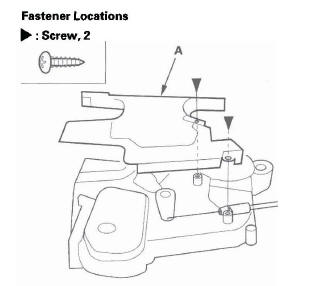
7. Remove the bolt, then remove the spacer (A).
8. Remove the bolt securing the outer handle protector (A), then remove the protector by releasing the hook (B).
9. While pulling the outer handle (A), remove the handle from the holes in the door panel. Take care not to scratch the door.
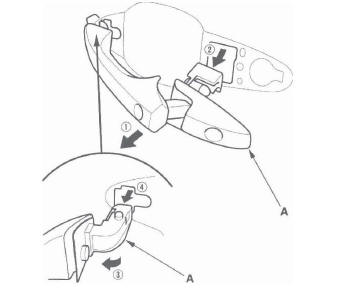
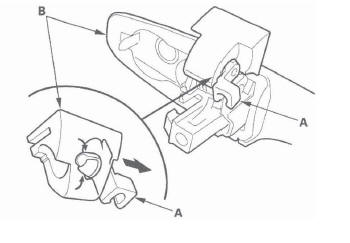
10. If necessary, remove the special screws, then separate the door cylinder (A) and outer handle protector (B). If the retainer (C) is damaged, release the hooks (D), and replace it.
NOTE: If removed, the special screws must be replaced.
11. Remove the rod fastener (A) from the outer handle (B), then replace it with a new one.
Front Door Latch Replacement
NOTE: Put on gloves to protect your hands.
1. Raise the glass fully.
2. Remove the door panel.
3. Remove the inner handle (see step 2 ).
4. Remove the plastic cover, as needed.
5. Detach the rod fastener (see step 4 ).
6. Disconnect the outer handle rod from the outer handle (see step 5).
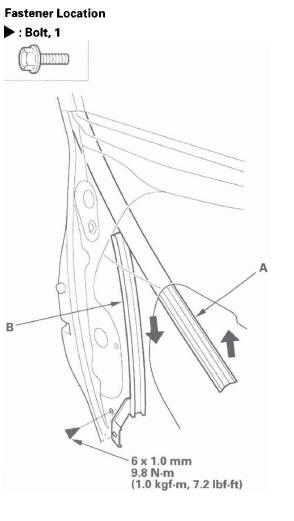
7. Pull the glass run channel (A) away as needed, and remove the bolt, then remove the center lower channel (B) by pulling it downward.
Take care not to bend, deform or damage the center lower channel.
8. Disconnect the cylinder cable from the latch (see step 6).
9. Remove the screws (A, B) securing the latch (C), then remove the latch through the hole in the door.
Take care not to bend the outer handle rod (D).
latch cable (E), and inner handle cable (F).
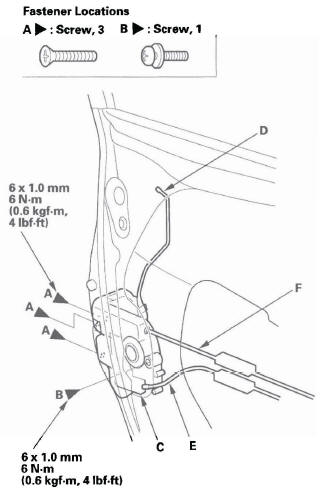
10. Remove the screws, then remove the latch protector (A).
11. Detach the latch cable (A) from the latch (B).
12. Detach the cable fastener (C), then disconnect the inner handle cable (D) from the cable fastener.
NOTE: Check for damaged or stress-whitened cable fasteners.
13. Install the latch in the reverse order of removal, and note these items:
- Make sure the actuator connector is plugged in properly and each rod is connected securely.
- Make sure the door locks and opens properly.
- When reinstalling the door panel, make sure the plastic cover is installed properly and sealed around its outside perimeter to seal out water.
- Check for water leaks.
Front Door Glass and Regulator Replacement
NOTE: Put on gloves to protect your hands.
1. Remove the door panel.
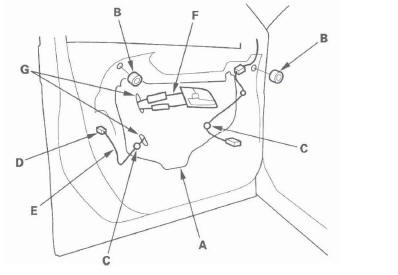
2. Remove the plastic cover (A).
- Remove the plug caps (B), and detach the harness clips (C).
- Disconnect the power door lock actuator connector (D), and pass the harness (E) and cables (F) through the holes (G) in the plastic cover.

3. Carefully raise the glass (A) until you can see the bolts, then remove them. Carefully pull the glass out through the window slot. Take care not to drop the glass inside the door.
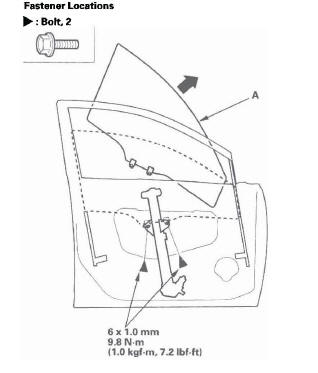
4. Disconnect the connector (A) from the regulator (B).
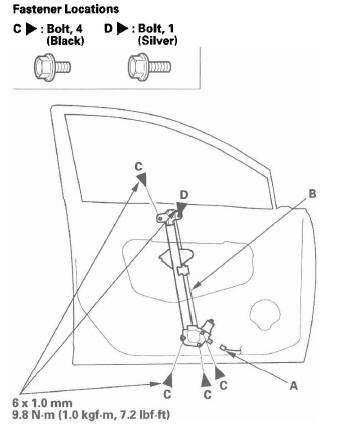
5. Remove the bolts (C), and loosen the bolt (D), then remove the regulator through the hole in the door.
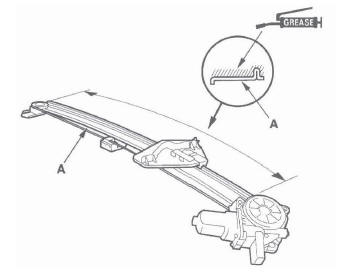
6. Apply multipurpose grease to all the sliding surfaces of the regulator (A) where shown.
7. Install the glass and regulator in the reverse order of removal and note these items:
- Raise and lower the glass to see if it moves freely without binding.
- Make sure that there is no clearance between the glass and glass run channel when the glass is closed.
- Adjust the position of the glass as necessary.
- Reset the power window control unit.
- When reinstalling the door panel, make sure the plastic cover is installed properly and sealed around its outside perimeter to seal out water.
- Make sure the power door locks, windows, and power mirror operate properly.
- Test-drive and check for wind noise and rattles.
- Check for water leaks (see step 7).
Front Door Glass Outer Weatherstrip Replacement
NOTE:
- Put on gloves to protect your hands.
- Take care not to scratch the door.
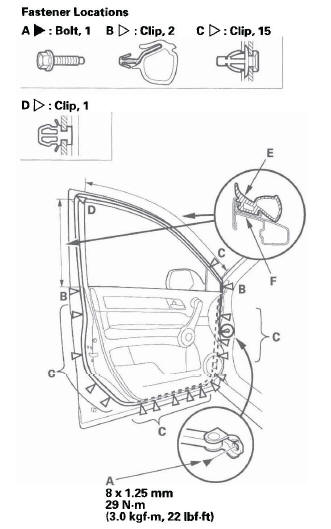
1. Remove these items:
Power mirror
- Door panel
- Plastic cover, as needed (see step 3)
2. Slide the clips (A) to release the hooks (B) from the flanges (C) of the door panel.
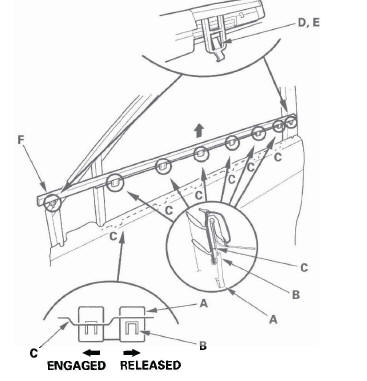
3. Release the front hook (D) and rear hook (E) from inside of the door, then remove the weatherstrip (F).
4. Install a new weatherstrip in the reverse order of removal, and note these items:
- Check if the clips are damaged or stress-whitened, and if necessary, replace them with new ones.
- The clips should be engaged with flanges (installation points) of the door panel.
- Push the clips, front hook, and rear hook into place securely.
Front Door Outer Molding Replacement
Special Tools Required
KTC trim tool set SOJATP2014 *
* Available through the American Honda Tool and Equipment Program; call 888-424-6857
NOTE:
- Once you remove the door outer molding, replace it with a new one because it will bend during removal.
- Put on gloves to protect your hands.
- Take care not to scratch the door.
- Use the appropriate tool from the KTC trim tool set to avoid damage when prying components.
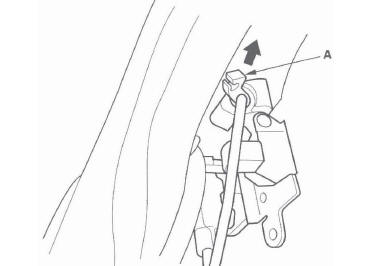
1. Remove the power mirror. To prevent scratching the power mirror and door, wrap the power mirror with a shop towel.
Disconnecting the power mirror connector is not required.
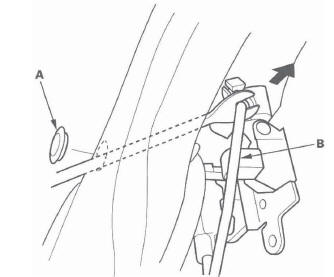
2. Remove the door outer molding (A).
- Pry the rear clip with a trim tool.
- While removing the upper edge of the door outer molding from the edge of the sash, cut the double-sided adhesive tapes (B) with a utility knife, then remove the molding.
3. Scrape off the remaining double-sided adhesive tape from the sash, then clean the sash surface with a sponge dampened in isopropyl alcohol.
4. Install a new door outer molding in the reverse order of removal. and note these items:
- Push the clip and the adhesive portions into place securely.
- Make sure the upper and lower sides of the molding are catching the edge of the sash properly.
Front Door Weatherstrip Replacement
NOTE:
- Put on gloves to protect your hands.
- Take care not to scratch the door.
- Use a clip remover to remove the clips.
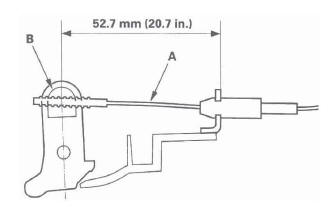
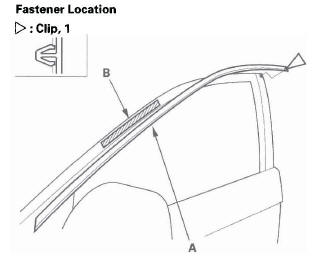
1. At the A-pillar, remove the door checker mounting bolt (A).
2. Detach the clips (B, C, D), then remove the door weatherstrip (E).
3. Install the weatherstrip in the reverse order of removal, and note these items:
- Check if the clips are damaged or stress-whitened, and if necessary, replace them with new ones.
- Make sure the weatherstrip is installed in the holder (F) securely.
- Apply medium strength type liquid thread lock to door checker mounting bolt before installation.
- Check for water leaks.
READ NEXT:
 Rear Door
Rear Door Panel Removal/Installation
Special Tools Required
KTC trim tool set SOJATP2014 *
Trim pad remover, Snap-on A 177 A or equivalent,
commercially available
* Available through the Americ
Mirrors
Component Location Index
POWER MIRROR ACTUATOR
Replacement
POWER MIRROR
Replacement
MIRROR HOLDER
Replacement
MOUNT
REARVIEW MIRROR
Replacement
Power Mirror Replac
Glass
Component Location Index
WINDSHIELD MOLDING
MOLDING UPPER SEAL
UPPER RUBBER DAM
CLIP, 2
WINDSHIELD SIDE TRIM
SIDE RUBBER DAM
WINDSHIELD
RETAINER,8
QUARTER GLASS MOLDING
CLIP, 1
CLIP,
SEE MORE:
Engine Compression Inspection
NOTE: After this inspection, you must reset the
powertrain control module (PCM), otherwise the PCM
will continue to stop the injectors from functioning.
Select PCM reset using the Honda Diagnostic System
(HDS).
1. Warm up the engine to normal operating
temperature (cooling fan comes on).
2. Turn t
Cooling System
Component Location Index
COOLANT SEPARATOR
EXHAUST GAS RECIRCULATION
(EGR) PASSAGE
THERMOSTAT
RADIATOR
ENGINE COOLANT TEMPERATURE
(ECT) SENSOR 2
RADIATOR FAN ASSEMBLY
A/C CONDENSER FAN ASSEMBLY
WATER PUMP
WATER PASSAGE
