Honda CR-V: Rear Door
Rear Door Panel Removal/Installation
Special Tools Required
- KTC trim tool set SOJATP2014 *
- Trim pad remover, Snap-on A 177 A or equivalent, commercially available
* Available through the American Honda Tool and Equipment Program; call 888-424-6857
NOTE:
- Use the appropriate tool from the KTC trim tool set to avoid damage when prying components.
- Take care not to scratch the door and related parts.
1. Raise the glass fully.
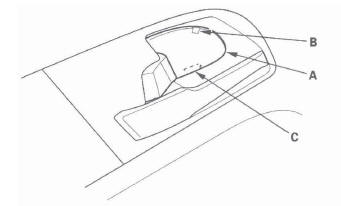
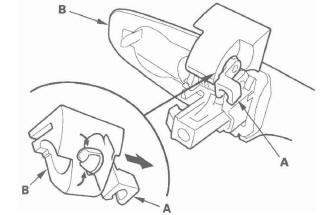
2. Using the appropriate trim tool, pry out on the under portion of the inner handle cap (A) to release the hooks (B, C).
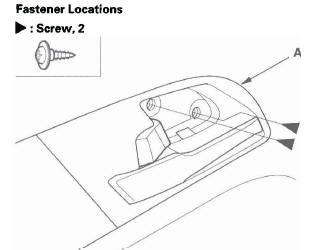
3. Remove the screws from the inner handle (A).
4. Using the appropriate trim tool, pry out on the upper cap (A) of the front door grip to release the hooks (B). Then remove the screw (C).
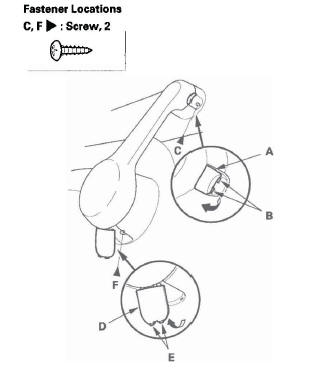
5. Using the appropriate trim tool, pry out on the lower cap (D) of the front door grip to release the hooks (E). Then remove the screw (F).
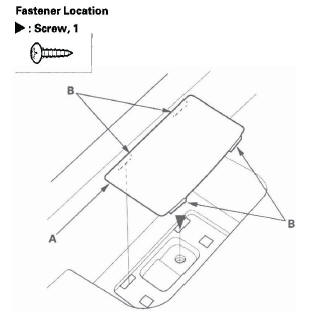
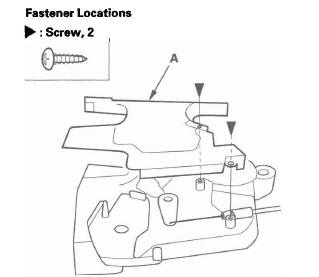
6. Using the appropriate trim tool, pry out on the cover (A) in the door pocket to release the hooks (B).
Then remove the cover, and screw.
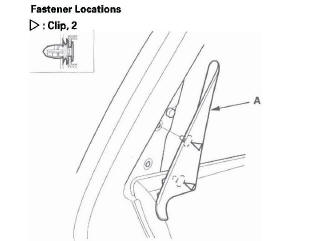
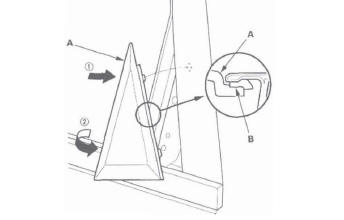
7. Carefully pry out the rear edge of the quarter inner trim (A) to detach the clips, then remove it.
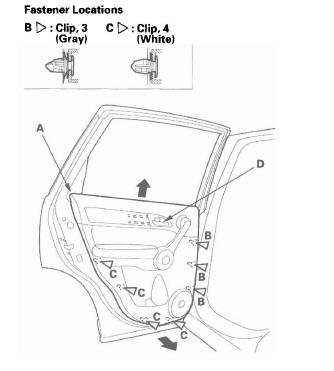
8. Remove the door panel (A) with as little bending as possible to avoid creasing or breaking it.
- Start at the bottom edge of the door panel, release the clips with a commercially available trim pad remover.
- Detach the upper clips (B, C).
- Starting at the rear, pull the door panel upward.
NOTE: The inner handle cable and latch cable are connected to the inner handle (D). Do not pull the door panel up too far, or these cables will be damaged.
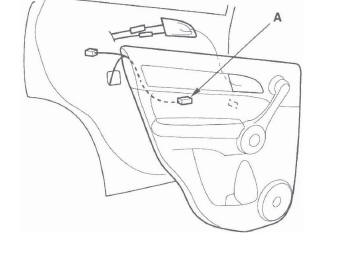
9. While holding the door panel (A) away from the door, remove the inner handle (B) from the door panel by detaching the hooks (C). Remove the door panel.
10. Disconnect the power window switch connector (A).
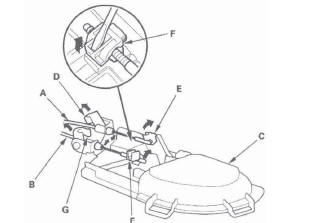
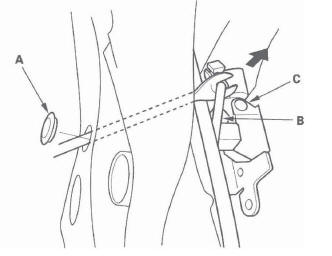
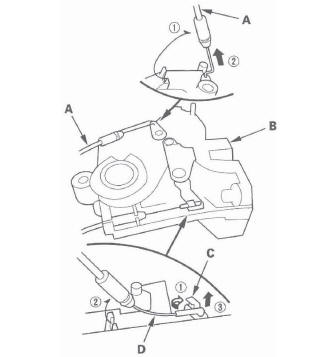
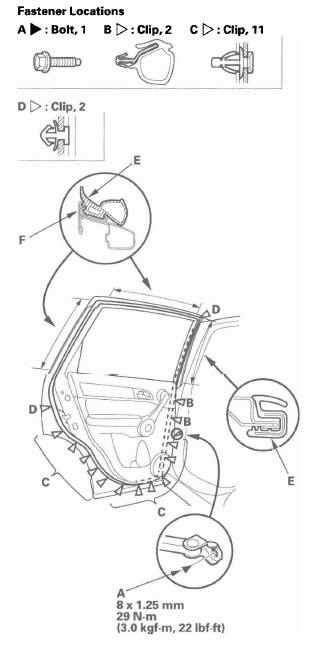
11. If necessary, disconnect the inner handle cable (A) and the latch cable (B) from the inner handle (C), then remove the handle.
- Detach the inner handle cable fastener (D), then disconnect the inner handle cable from the cable fastener (E).
- Detach the latch cable fastener (F) with a flat-tip screwdriver, then disconnect the latch cable from the cable fastener (G).
NOTE: Check for damaged or stress-whitened cable fasteners.
12. Install the door panel in the reverse order of removal, and note these items: Check if the clips are damaged or stress-whitened, and if necessary, replace them with new ones.
- Replace any damaged cable fasteners with new ones.
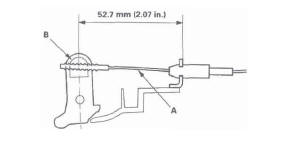
- The latch cable (A) should be fixed to the cable fastener (B) with the latch in lock position as shown.
- Make sure the power window switch connector is plugged in properly, and the cable is connected securely.
- Make sure the window and power door lock operate properly.
Rear Door Outer Handle Replacement
NOTE: Put on gloves to protect your hands.
1. Raise the glass fully.
2. Remove the door panel.
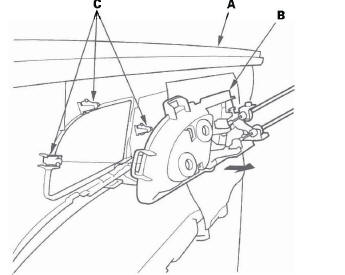
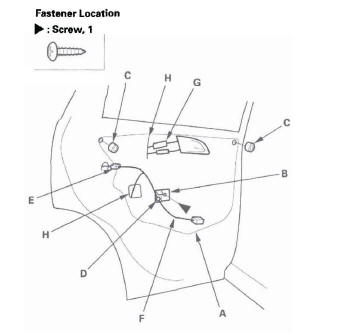
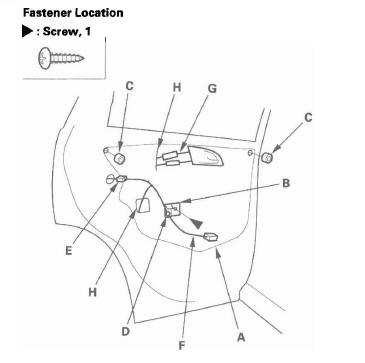
3. Remove the plastic cover (A).
- Remove the screw and the door pull pocket bracket (B).
- Remove the plug caps (C), and detach the harness clip (D).
- Disconnect the power door lock actuator connector (E), and pass the harness (F) and cables (G) through the holes (H) in the plastic cover.
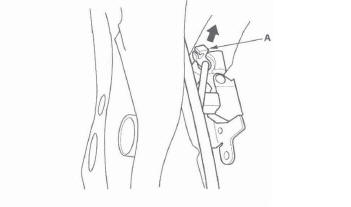
4. Detach the rod fastener (A).
5. Remove the maintenance seal (A). With a clip remover, disconnect the outer handle rod (B) from the outer handle (C).
6. Remove the bolt, then remove the spacer (A).
7. Remove the bolts securing the outer handle protector (A), then remove the protector by releasing the hook (B).
8. While pulling the outer handle (A), and remove the handle from the holes in the door panel. Take care not to scratch the door.
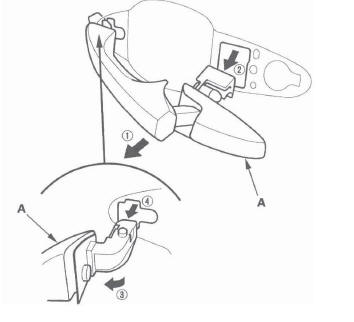
9. Remove the rod fastener (A) from the outer handle (B), then replace it with a new one.
10. Install the handle in the reverse order of removal, and note these items:
- Make sure the outer handle rod is connected securely.
- Make sure the door handle works properly.
- Make sure the door locks and opens properly.
- When installing the door panel, make sure the plastic cover is installed properly and sealed around its outside perimeter to seal out water.
- Check for water leaks.
Rear Door Latch Replacement
NOTE: Put on gloves to protect your hands.
1. Raise the glass fully.
2. Remove the rear door panel.
3. Remove the plastic cover, as needed (see step 3).
4. Disconnect the outer handle rod from the outer handle (see step 5).
5. Detach the rod fastener (see step 9).
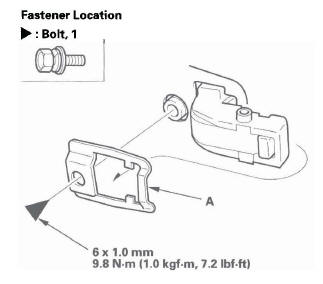
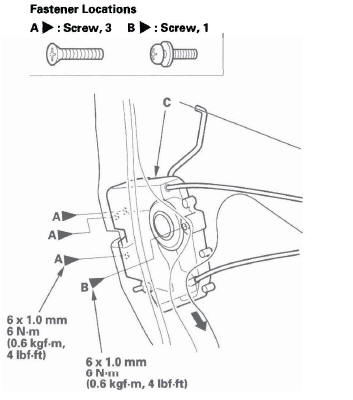
6. Remove the screws (A, B) securing the latch (C), then lower it.
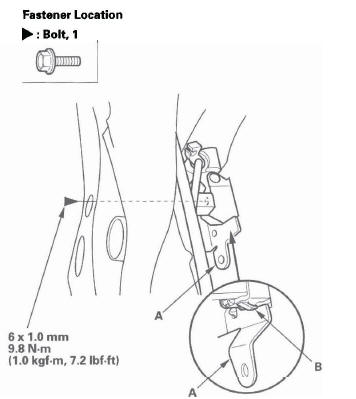
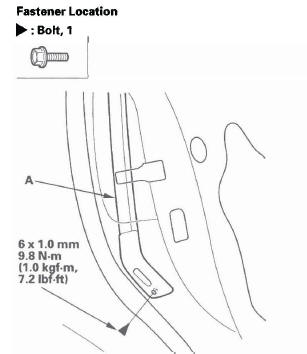
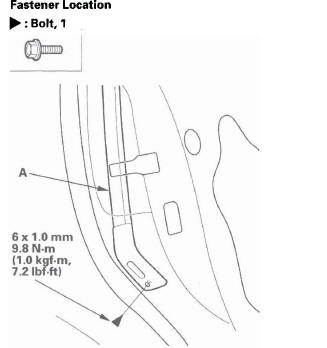
7. Remove the bolt from the lower end of the rear door lower channel (A).
8. Slant the latch (A) while inside the door.
9. Pass the latch through under the rear door lower channel (B) while pulling up the end (C) of the rear door lower channel lightly, and remove it from the inside of the door.
10. Remove the screws, then remove the latch protector (A).
11. Detach the latch cable (A) from the latch (B).
12. Detach the cable fastener (C), then disconnect the inner handle cable (D) from the cable fastener.
NOTE: Check for damaged or stress-whitened cable fasteners.
13. Install the latch in the reverse order of removal, and note these items:
- Make sure the actuator connector is plugged in properly and each rod is connected securely.
- Make sure the door locks and opens properly.
- When reinstalling the door panel, make sure the plastic cover is installed properly and sealed around its outside perimeter to seal out water.
- Check for water leaks.
Rear Door Glass and Regulator Replacement
NOTE: Put on gloves to protect your hands.
1. Remove the rear door panel.
2. Remove the plastic cover (A).
- Remove the screw and the door pull pocket bracket (B).
- Remove the plug caps (C), and detach the harness clip (D).
- Disconnect the power door lock actuator connector (E), and pass the harness (F) and cables (G) through the holes (H) in the plastic cover.
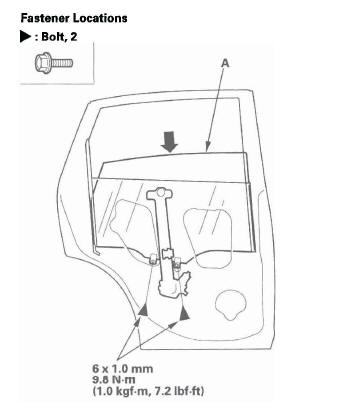
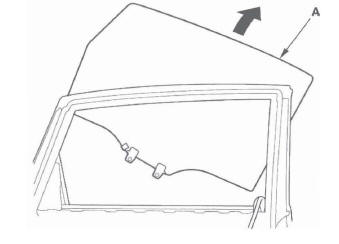
3. Carefully move the glass (A) until you can see the bolts, then remove them. Carefully lower the glass into the door: Take care not to drop the glass inside the door.
4. Remove the bolt from the lower end of the rear door lower channel (A).
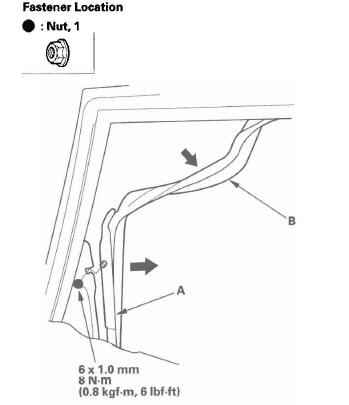
5. Remove the nut from the rear lower channel (A).
Pull the glass run channel (B) away as needed. Pull the rear lower channel forward from the door.
6. Release the rear lower channel (A) from the glass by pulling the channel up.
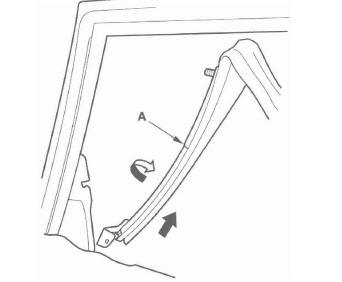
7. Twist the rear lower channel to pass it through the gap between the door panel and the rear sash, then pull the channel up to remove it.
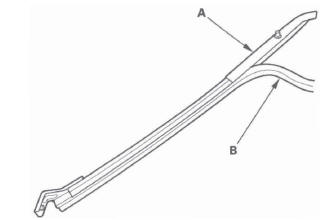
8. Remove the rear lower channel (A) from the glass run channel (B).
9. Carefully remove the glass (A) out through the window slot. Take care not to drop glass inside the door.
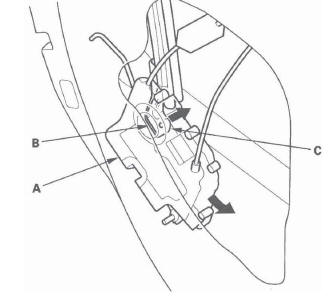
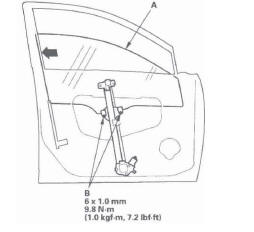
10. Disconnect the connector (A) from the regulator (B).
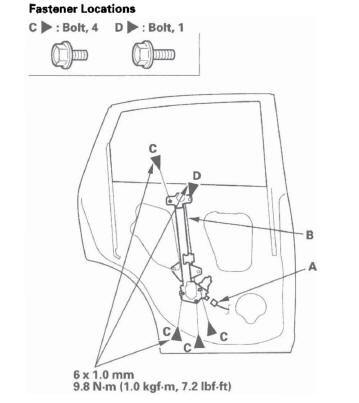
11. Remove the bolts (C). and loosen the bolt (D). then remove the regulator through the hole in the door.
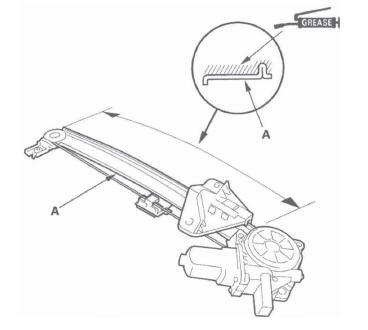
12. Apply multipurpose grease to all the sliding surfaces of the regulator (A) where shown.
13. Install the glass and regulator in the reverse order of removal, and note these items:
- Roll the glass up and down to see if it moves
freely without binding.
Make sure that there is no clearance between the glass and glass run channel when the glass is closed.
- Adjust the position of the glass as necessary.
- Check for water leaks.
- When reinstalling the door panel, make sure the plastic cover is installed properly and sealed around its outside perimeter to seal out water.
- Test-drive and check for wind noise and rattles.
- Make sure the power door locks and windows operate properly.
Rear Door Rear Sash Trim Replacement
NOTE: Put on gloves to protect your hands.
1. Lower the glass fully.
2. Remove the quarter inner trim (see step 7 ).
3. From inside the door, remove the screw (A).
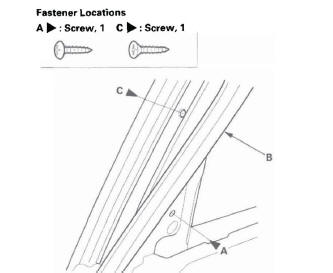
4. Pull up the rear of the door weatherstrip (B), and remove the screw (C) from the sash. Do not remove the weatherstrip at this time, and take care not to damage the weatherstrip.
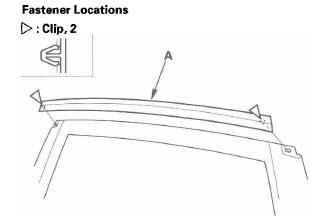
5. Carefully push and pry out the front edges of the rear door quarter outer trim (A) to release the rear edges (B) by hand in the sequence shown.
6. Install the quarter trim in the reverse order of removal.
Rear Door Glass Outer Weatherstrip Replacement
NOTE:
- Put on gloves to protect your hands.
- Take care not to scratch the door.
1. Remove these items:
- Rear door panel.
- Plastic cover.
- Rear door rear sash trim.
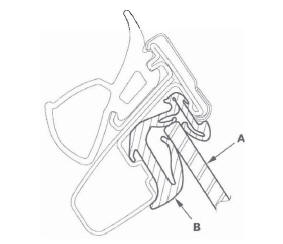
2. Slide the clips (A) to release the hooks (B) from the flanges (C) of the door panel.
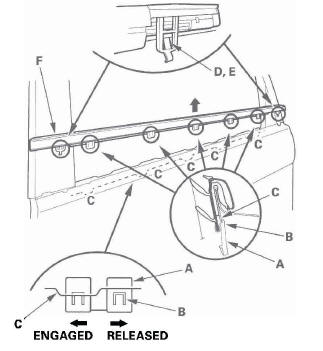
3. Release the front hook (D) and rear hook (E) from inside of the door, then remove the weatherstrip (F).
4. Install the weatherstrip in the reverse order of removal, and note these items:
- Check if the clips are damaged or stress-whitened, and if necessary, replace them with new ones.
- The clips should be engaged with flanges (installation points) of the door panel.
- Push the clips, front hook, and rear hook into place securely.
Rear Door Outer Molding Replacement
Special Tools Required
KTC trim tool set SOJATP2014 *
* Available through the American Honda Tool and Equipment Program; call 888-424-6857
NOTE:
- Once you remove the door outer molding, replace it with a new one because it will bend during removal.
- Put on gloves to protect your hands.
- Take care not to scratch the door.
- Use the appropriate tool from the KTC trim tool set to avoid damage when prying components.
1. Pry the rear clip with a trim tool, then remove the door outer molding (A).
2. Install a new door outer molding in the reverse order of removal, and note these items:
- Push the clip and the adhesive portions into place securely.
- Make sure the upper and lower sides of the molding are catching the edges of the sash properly.
Rear Door Weatherstrip Replacement
NOTE:
- Put on gloves to protect your hands.
- Take care not to scratch the door.
- Use a clip remover to remove the clips.
1. At the B-pillar, remove the door checker mounting bolt (A).
2. Detach the clips (B, C, D), then remove the door weatherstrip (E).
3. Install the weatherstrip in the reverse order of removal, and note these items:
- Check if the clips are damaged or stress-whitened, and if necessary, replace them with new ones.
- Make sure the weatherstrip is installed in the holder (F) securely.
- Apply medium strength type liquid thread lock to door checker mounting bolt before installation.
- Check for water leaks.
Front and Rear Door Glass Adjustment
NOTE: Check the weatherstrips and glass run channel for damage or deterioration, and replace them if necessary.
1. Place the vehicle on a firm, level surface.
2. Remove these items:
- Door panel, front door, rear door.
- Plastic cover, front door (see step 3), rear door (see step 3)
3. Carefully move the glass (A) until you can see the glass mounting bolts (B), then loosen them.
Front door
Rear door

4. Front: Push the glass against the rear lower channel (C), then tighten the glass mounting bolts.
Rear: Push the glass against the front lower channel (D), then tighten the glass mounting bolts.
5. Check that the glass moves smoothly.
6. Raise the glass fully, and check for gaps. Also check that the glass (A) contacts the glass run channel (B) evenly.
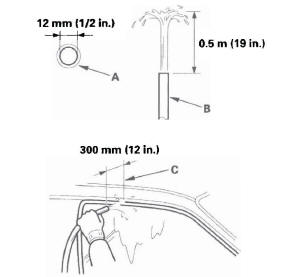
7. Check for water leaks. Run water over the roof and on the sealing area as shown, and note these items:
- Use a 12 mm (1/2 in.) diameter hose (A).
- Adjust the rate of water flow as shown (B).
- Do not use a nozzle.
- Hold the hose about 300 mm (12 in.) away from the door (C).
8. Attach the plastic cover making sure it is sealed around its outside perimeter to seal out water, then install the door panel:
- Front door
- Rear door
Front and Rear Door Position Adjustment
SRS components are located in the center pillar bottom area. Review the SRS component locations (see page 24-13) and the precautions and procedures (see page 24-15) before doing repairs or service.
NOTE: Check for a flush fit with the body, then check for equal gaps between the front, rear, and bottom door edges and the body. Check that the door and body edges are parallel. Before adjusting, replace the mounting bolts.
1. Place the vehicle on a firm, level surface when adjusting the doors.
2. Adjust at the hinges (A):
- Pad a floor jack (B) with shop towels (C), then use the jack to support the door to prevent damage to the door while adjusting it. If necessary, remove the door lower trim.
- On the front door: Remove the front inner fender (see page 20-181). Loosen the hinge mounting bolts (D) slightly, and move the door backward or forward, up or down as necessary to equalize the gaps.
- On the rear door: Remove the B-pillar lower trim
(see page 20-72), and the plug seal from the body.
Loosen the hinge mounting nuts (E) slightly, and move the door backward or forward, up or down as necessary to equalize the gaps.
Front door

Rear door
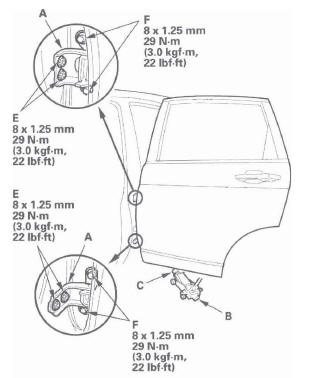
3. If necessary, replace the door mounting bolts with the adjusting bolts (P/N 90102-SFA-305) made specifically for door adjustment, then adjust at the door: Loosen the door mounting bolts (F) slightly, and move the door up or down as necessary to equalize the gaps, and move it in or out until it's flush with the body.
4. Check that the door and body edges are parallel. If necessary, adjust the door cushions (A) to make the rear of the doors flush with the body.
5. Apply touch-up paint to the hinge mounting bolts, and around the hinges.
6. Check for water leaks (see step 7).
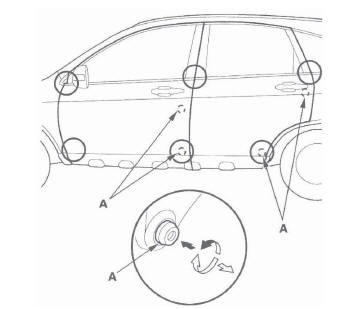
Front and Rear Door Striker Adjustment
Make sure the door latches securely without slamming it. If necessary, adjust the striker (A): The striker nuts are fixed, but the striker can be adjusted slightly up or down, and in or out.
1. Loosen the screws (B).
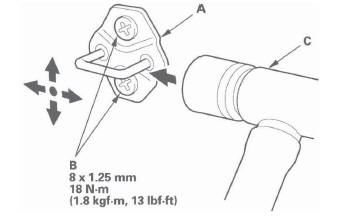
2. Wrap the striker with a shop towel, then adjust the striker by tapping it with a plastic hammer (C). Do not tap the striker too hard.
3. Lightly tighten the screws.
4. Hold the outer handle out, and push the door against the body to be sure the striker allows a flush fit. If the door latches properly, tighten the screws and recheck.
READ NEXT:
 Mirrors
Component Location Index
POWER MIRROR ACTUATOR
Replacement
POWER MIRROR
Replacement
MIRROR HOLDER
Replacement
MOUNT
REARVIEW MIRROR
Replacement
Power Mirror Replac
Glass
Component Location Index
WINDSHIELD MOLDING
MOLDING UPPER SEAL
UPPER RUBBER DAM
CLIP, 2
WINDSHIELD SIDE TRIM
SIDE RUBBER DAM
WINDSHIELD
RETAINER,8
QUARTER GLASS MOLDING
CLIP, 1
CLIP,
Windshield Replacement
NOTE:
Put on gloves to protect your hands.
Wear eye protection when removing the glass with
piano wire.
Use seat covers to avoid damaging the seat.
When replacing a broken windshield, a commerci
SEE MORE:
DTC P0325: Knock Sensor Circuit Malfunction
NOTE: Before you troubleshoot, record all freeze data and any on-board
snapshot, and review the general troubleshooting information.
1. Turn the ignition switch ON (II).
2. Clear the DTC with the HDS.
3. Start the engine. Hold the engine speed between
3,000 rpm without load (in Park or neutral) u
A/T Clutch Pressure Control Solenoid Valve
A/T Clutch Pressure Control Solenoid Valve A Test
1. Connect the HDS to the DLC (A).
2. Choose Clutch Pressure Control (Linear) Solenoid A
in the Miscellaneous Test Menu on the HDS.
NOTE: If the HDS does not communicate with, the
PCM, troubleshoot the DLC circuit.
3. Test A/T clutch pressure contr
