Honda CR-V: Steering Column
Steering Column Removal and Installation
SRS components are located in this area. Review the SRS component locations and the precautions and procedures before doing repairs or service.
Removal
NOTICE
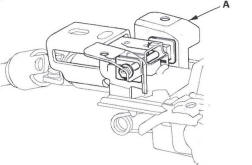
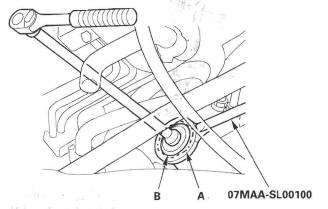
Be careful not to pull the bracket (A) on the front side of steering column out of its normal position.
If the bracket accidentally comes out, replace the steering column as an assembly.
Out of position
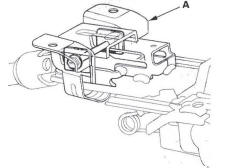
Normal position
1. Make sure you have the anti-theft code for the audio and the navigation system (if equipped), then write down the XM audio presets (if equipped).
2. Make sure the ignition switch is OFF, then disconnect the negative cable from the battery.
3. Remove the driver's airbag assembly and the steering wheel.
4. Remove the driver's dashboard undercover.
5. Remove the column covers.
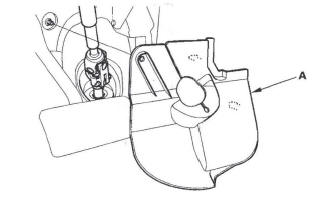
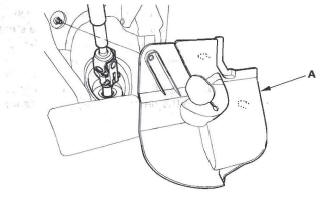
6. Remove the steering joint cover (A).
7. Release the lock lever, and adjust the steering column to the full tilt up position, and to the full telescopic in position.
8. Tighten the lock lever.
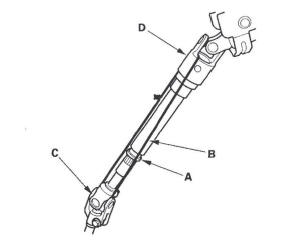
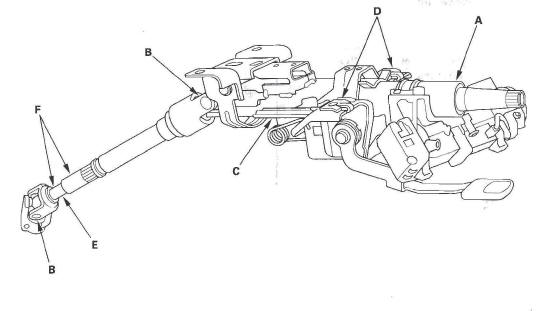
9. Hold the lower slide shaft (A) on the column with a piece of wire (B) between the joint yoke (C) of the lower slide shaft and joint yoke (D) of the upper shaft to prevent the slider shaft from pulling out.
10. Release the lock lever, and adjust the steering column to the full telescopic out position, then tighten the lock lever.
NOTE: Do not release the lock lever when removing the steering column from the frame.
11. Disconnect the wire harness connectors from the combination switch assembly and cable reel (A).
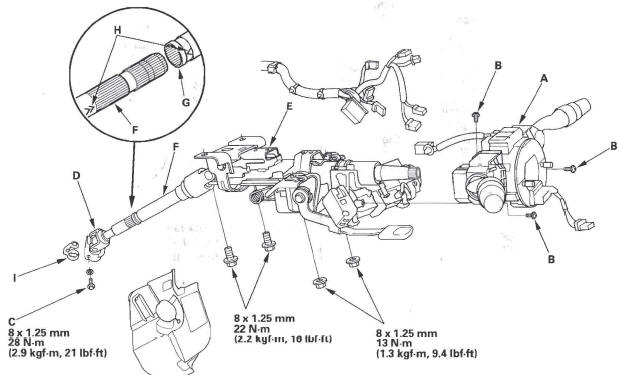
12. Remove the combination switch assembly from the steering column shaft by removing the three screws (B).
13. Disconnect the connectors from the ignition switch, and release the wire harness clips from the steering column.
14. Remove the steering joint bolt (C), then disconnect the steering joint (D) from the pinion shaft.
15. Remove the steering column (E) by removing the attaching nuts and bolts. If the lower slide shaft (F) is removed, slip it into the upper shaft (G) by aligning the paint or stamped marks (H).
16. Remove the center guide (I) (if equipped) and discard it. The center guide is for factory assembly only.
Installation
1. Install the steering column in the reverse order of removal, and note these items:
- Make sure the wires are not caught or pinched by any parts.
- Take care not to let the sliding capsules fall out of position during column installation.
2. Center the steering rack within its stroke in steering joint connection.
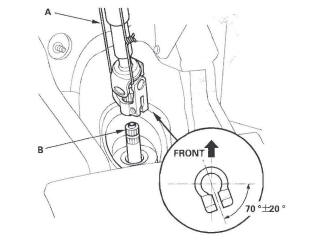
3. With the rack in the straight ahead driving position, cut the wire (A) and slip the lower end of the steering joint onto the pinion shaft (B) in the range shown.
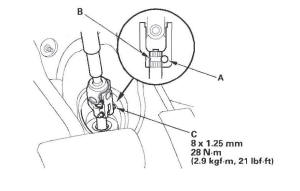
4. Align the bolt hole (A) on the steering joint with the groove (B) around the pinion shaft, and loosely install the joint bolt (C). Be sure that the joint bolt is securely in the groove in the pinion shaft. Pull on the steering joint to make sure that the steering joint is fully seated. Tighten the steering joint bolt to the specified torque.
5. Install the steering joint cover (A).
6. Install the steering wheel.
7. Install the column covers.
8. Install the driver's dashboard undercover.
9. Reconnect the negative cable to the battery, and do these tasks:
- Turn the ignition switch ON (II); the SRS indicator should come or for about 6 seconds and then go off.
- Enter the anti-theft code for the audio and the navigation system (if equipped), then enter the XM audio presets (if equipped).
- Make sure the horn and turn signal switches work properly.
- Make sure the steering wheel switches work properly.
- Make sure the steering wheel is centered.
- Set the clock (without Navi).
Steering Column/Tilt/Telescopic/Lock Lever Inspection
Steering Column Inspection
- Check the steering column ball bearing (A) and the steering joint bearings (B) for play and proper movement. If any bearing is noisy or has excessive play, replace the steering column as an assembly.
- Check the absorbing plates (C) and sliding capsules (D) for distortion or breakage. If there is distortion or breakage, replace the steering column as an assembly.
- Check the tilt mechanism and telescopic mechanism for movement and damage.
- Check the lower slide shaft (E) for smooth movement in and out. If the lower slide shaft is removed, slip it into the upper shaft by aligning the paint or stamped marks (F). If it sticks or binds, replace the steering column as an assembly.
Check of Tilting Load
1. Set the steering wheel in the straight driving position, and loosen the lock lever fully.
2. Attach the spring scale to the highest point of the steering wheel, and set the tilting position at the lowest.
3. Pull the spring scale straight up, and read the operation load during tilting.
4. Attach the spring scale to the lowest point of the steering wheel.
5. Pull the spring scale straight down, and read the operation load during tilting.
Tilting load (upward/downward):
Standard: 69 N (7.0 kgt, 15 lbt) max.
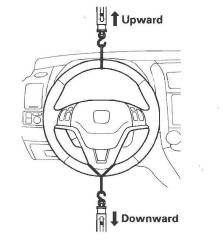
6. If the measurement is larger than the specification, replace the steering column as an assembly.
Check of Telescopic Load
1. Set the steering wheel in the straight ahead driving position, and loosen the lock lever fully.
2. Attach the spring scale to the center point of the steering wheel.
3. Pull the spring scale, and read the operation load during telescopic.
Telescopic load:
Standard: 100 N (10.2 kgf, 22.5 Ibt) max.
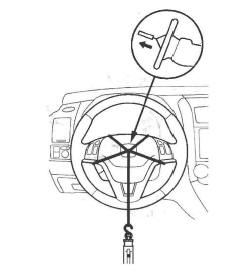
4. If the measurement is larger than the specification, replace the steering column as an assembly.
Check of Lock Lever Load
1. Move the lock lever (A) from the loosened position to the locked position three to five times, then release the lock lever. Adjust the steering column to the center tilt position and also to the full telescopic out position, and hold the steering wheel.
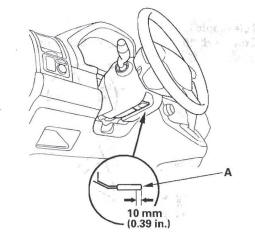
2. Using a push gauge, push up the lock lever at 10 mm (3/8 in.) from its end, and measure the lock lever load.
Lock lever load: 50-70 N (5.1-7.1 kgf, 11-16 Ibf) min.
3. If the measurement is larger than the specification, replace the steering column as an assembly.
Steering Lock Replacement
1. Remove the steering column.
2. Center-punch each of the two shear bolts, and drill the heads of the bolts off with a 5 mm (3/16 in.) drill bit. Be careful not to damage the switch body when removing the shear bolts.

3. Remove the shear bolts from the switch body.
4. Install the switch body without the key inserted.
5. Loosely tighten the new shear bolts.
6. Insert the ignition key, and check for proper operation of the steering wheel lock and that the ignition key turns freely.
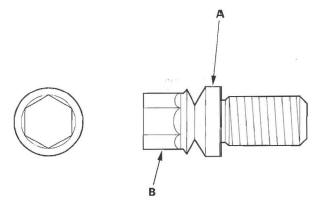
7. Tighten the shear bolts (A) until the hex heads (B) twist off.
8. Rewrite the new immobilizer control unit-receiver, and make sure the immobilizer system works properly.
Rack Guide Adjustment
Special Tools Required
Locknut wrench, 40 mm 07MAA-SL00100
1. Set the wheels in the straight ahead position.
2. Loosen the rack guide screw locknut (A) with the locknut wrench, then remove the rack guide screw (B).
NOTE: The illustration shows 2WD.
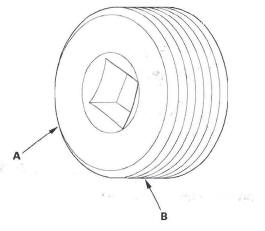
3. Remove the old sealant from the rack guide screw (A), and apply new sealant (Three Bond 1215 or Loctite 5699) to the middle of the threads (B).
Loosely install the rack guide screw on the steering gearbox.
4. Tighten the rack guide screw (A) to 25 N*m (2.5 kgf*m, 18 Ibf*ft), then loosen it.
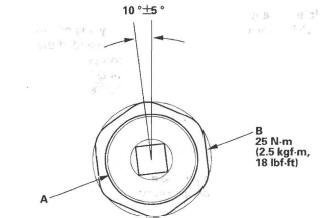
5. Retighten the rack guide screw to 7.8 N*m (0.8 kgf*m, 6 Ibf*ft), then back it off to the specified angle.
Specified return angle: 10º +-5 º
6. Hold the rack guide screw stationary with a wrench, and tighten the locknut (B) by hand until it's fully seated.
7. Install the locknut wrench on the locknut, and hold the rack guide screw stationary with a wrench.
Tighten the locknut an additional 30 º with the locknut wrench.
8. Check for unusual steering effort through the complete turning range.
9. Check the steering wheel rotational play and the power assist.
READ NEXT:
 Steering Gearbox Removal
Special Tools Required
Ball joint remover, 28 mm 07MAC-SL0A202
Note these items during removal:
Using solvent and a brush, wash any oil and dirt off
the valve body unit, it's lines, and the end of
Steering Gearbox Overhaul
Exploded View
Special Tools Required
Cylinder end seal remover attachment
070AF-S7S0100
Valve seal ring sizing tool 07NAG-SR3090A
Sleeve seal ring guide 07YAG-S2X0100
Sleeve seal ring sizing t
SEE MORE:
Radiator Cap Test
1. Remove the radiator cap (A), wet the seal with
engine coolant, then install it on the pressure tester
(B) (commercially available).
2. Apply a pressure of 93-123 kPa
(0.95-1.25 kgf/cm2, 14-18 psi).
3. Check for a drop in pressure.
4. If the pressure drops, replace the cap.
Radiator Test
1. W
Towing Equipment and Accessories
Towing can require a variety of
equipment, depending on the size of
your trailer, how it will be used, how
much load you are towing, and
where you tow.
Discuss your needs with your trailer
sales or rental agency, and follow the
guidelines in this section. Also make
sure that all equip
