Honda CR-V: Steering Gearbox Removal
Special Tools Required
Ball joint remover, 28 mm 07MAC-SL0A202
Note these items during removal:
- Using solvent and a brush, wash any oil and dirt off the valve body unit, it's lines, and the end of the steering gearbox. Blow dry with compressed air.
- Be sure to remove the steering wheel before disconnecting the steering joint. Damage to the cable reel can occur.
- The illustrations show 2WD.
1. Drain the power steering fluid.
2. Make sure you have the anti-theft code for the audio and the navigation system (if equipped), then write down the XM audio presets (if equipped).
3. Make sure the ignition switch is OFF, then disconnect the negative cable from the battery.
4. Raise the front of vehicle, and support it with safety stands in the proper locations.
5. Remove the front wheels.
6. Remove the steering wheel.
7. Remove the driver's dashboard undercover.
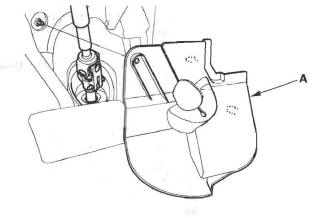
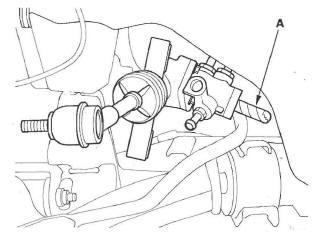
8. Remove the steering joint cover (A).
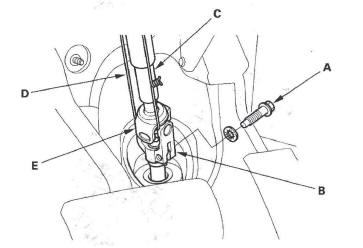
9. Remove the steering joint bolt (A), and disconnect the steering joint by moving the steering joint (B) toward the column. Hold the lower slide shaft (C) on the column with a piece of wire (D) between the joint yoke (E) on the lower slide shaft to the joint yoke on the upper shaft.
10. Remove the center guide (A) (if equipped), and discard it. The center guide is for factory assembly only.
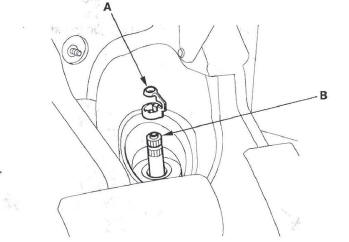
11. Apply vinyl tape to the splines on the pinion shaft (B).
12. Remove the cotter pin (A) from the 12 mm nut (B), and loosen the nut.
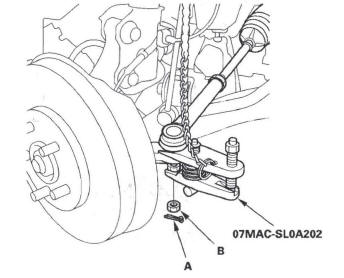
13. Separate the tie-rod ball joint and knuckle using the ball joint remover.
14. Remove the air cleaner housing.
15. Remove the P/S heat shield (A).
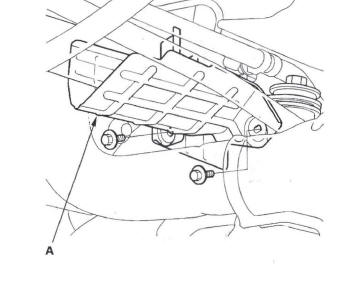
16. Loosen the adjustable hose clamp (A), and disconnect the return hose (B).
17. Remove the inlet line clamp bolt (C) and return hose clamp bolt (D).
18. Loosen the 18 mm flare nut (E), and disconnect the inlet line (F).
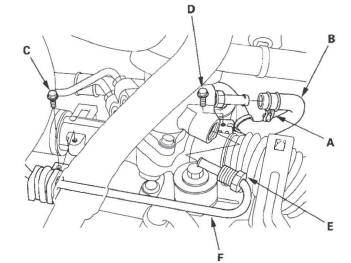
19. Remove the return hose clamp bolt (A), and open the return hose clamp (B).
20. Remove the pump outlet hose clamp bolt (A), then open the return line clamps (B).
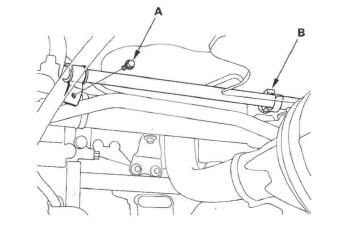
21. Remove the 10 mm flange bolts (A) and washers (B) from the driver's side of the steering gearbox.
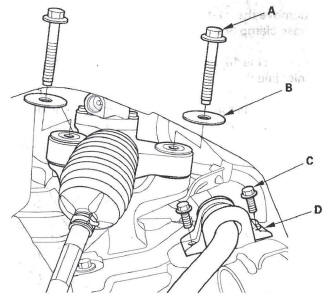
22. Remove the 8 mm flange bolts (C), then remove the stabilizer bar bushing holder (D).
23. Remove the 10 mm flange bolts (A) and washers (B) from the passenger's side of the steering gearbox.
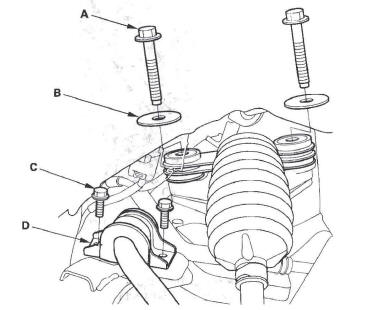
24. Remove the 8 mm flange bolts (C), then remove the stabilizer bar bushing holder (D).
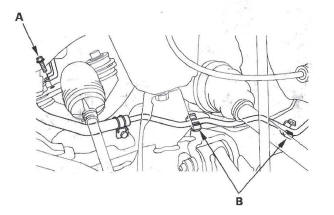
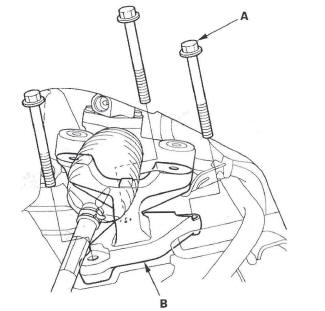
25. Remove the 10 mm flange bolts (A) from both of the gearbox brackets (B).
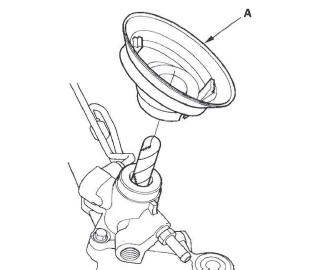
26. Move the steering gearbox toward the front, and remove the pinion shaft grommet (A) from the top of the valve housing.
27. Move the steering gearbox to the driver's side, and rotate it so the pinion shaft (A) points toward the rear of the vehicle.
28. Carefully move the steering gearbox (A) as an assembly toward the driver's side of the vehicle until the pinion shaft clears the wheelwell opening.
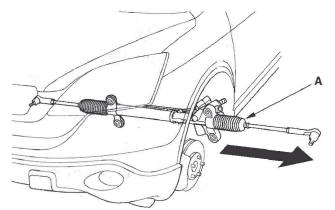
29. Remove the steering gearbox through the wheelwell opening on the driver's side.
30. After removing the steering gearbox, make sure that no power steering fluid gets on the gearbox mount cushions, gearbox housing, and the surface of the front subframe. Wipe off any spilled fluid at once.
READ NEXT:
 Steering Gearbox Overhaul
Exploded View
Special Tools Required
Cylinder end seal remover attachment
070AF-S7S0100
Valve seal ring sizing tool 07NAG-SR3090A
Sleeve seal ring guide 07YAG-S2X0100
Sleeve seal ring sizing t
Steering Gearbox Installation
NOTE: The illustrations show 2WD.
1. Before installing the steering gearbox, make sure
that no power steering fluid is on the mating
surface of the steering gearbox and the front
subframe. To prevent
SEE MORE:
DTC 11-1x/4x ("x" can be 0 thru 9 or A thru F) :
Open or Increased Resistance in Driver's
Airbag First/Second Inflator
DTC 11-1x ("x" can be 0 thru 9 or A thru F):
Open or Increased Resistance in Driver's
Airbag First Inflator
DTC 11-4x ("x" can be 0 thru 9 or A thru F):
Open or Increased Resistance in Driver's
Airbag Second Inflator
Special Tools Required
SRS inflator simulator 07SAZ-TB4011A
SRS simulator lead J
Driveline/Axle
Special Tools
Oil Seal Driver
Attachment, 52 x 55 mm
Half Shaft Base
Threaded Adapter, 24 x 1.5 mm
Threaded Adapter, 26 x 1.5 mm
Attachment, 35 mm I.D.
Driver
Inner Handle, 30 mm
Oil Seal Driver
Component Location Index
BOOT BAND
Removal
Installation
INTERMEDIATE SHAFT
Rem
