Honda CR-V: Steering Gearbox Installation
NOTE: The illustrations show 2WD.
1. Before installing the steering gearbox, make sure that no power steering fluid is on the mating surface of the steering gearbox and the front subframe. To prevent the gearbox mounting bolts from loosening after the installation, remove any power steering fluid from the mount cushions and bolt holes.
2. Apply vinyl tape to the splines on the pinion shaft (A).
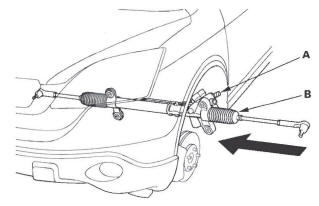
3. Slide the steering gearbox (B) between the front subframe and body from the driver's side.
4. Carefully move the steering gearbox toward the passenger's side until the pinion shaft clears the wheelwell opening on the body.
5. Rotate the steering gearbox so the pinion shaft (A) points upward.
6. Continue moving the steering gearbox toward the passenger's side until the steering gearbox is in position.
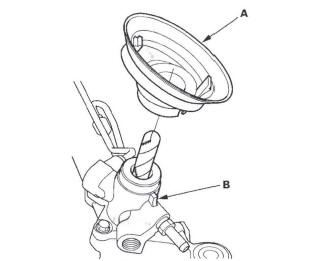
7. Install the pinion shaft grommet (A). Align the slot in the pinion shaft grommet with the lug portion (B) on the valve housing. The grommet must not have a gap at the mating surface of the grommet and valve housing.
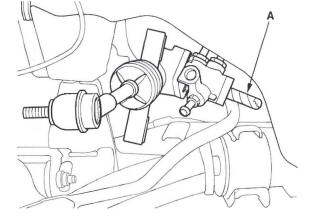
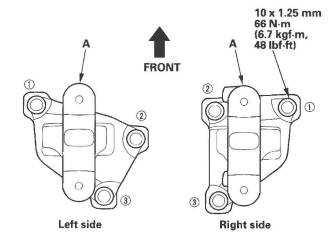
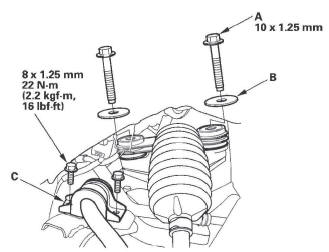
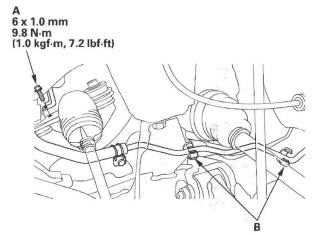
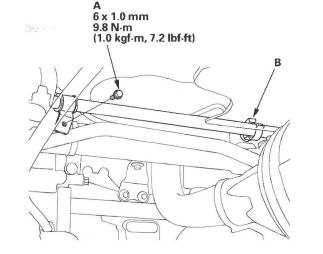
8. Install the gearbox brackets (A), and loosely install the steering gearbox bracket mounting bolts (B).
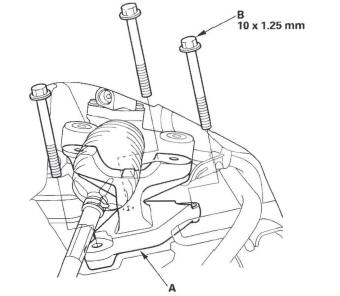
9. Install the gearbox brackets (A) with the 10 mm flange bolts to the specified torque in the sequence shown.
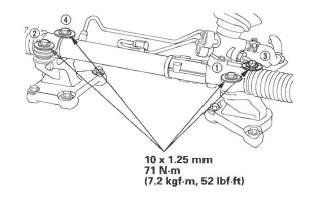
10. Loosely install the 10 mm flange bolts (A) and washers (B) on the driver's side of the steering gearbox.
11. Install the stabilizer bar bushing holder (C).
12. Loosely install the 10 mm flange bolts (A) and washers (B) on the passenger's side of the steering gearbox.
13. Install the stabilizer bar bushing holder (C).
14. Tighten the 10 mm flange bolts to the specified torque in the sequence shown.
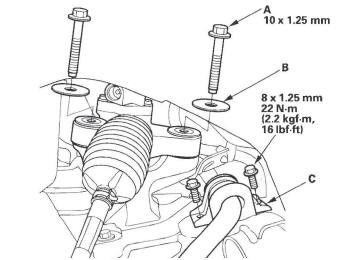
15. Install the pump outlet hose clamp bolt (A), then clamp the return line with the clamps (B).
16. Install the return hose clamp bolt (A), then clamp the return hose with the clamp (B).
17. Connect the inlet line (A), and tighten the 18 mm flare nut (B) to the specified torque.
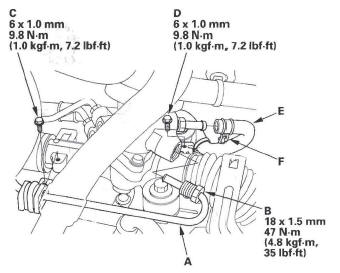
18. Install the inlet line clamp bolt (C) and return hose clamp bolt (D).
19. Connect the return hose (E) securely, and tighten the adjustable hose clamp (F).
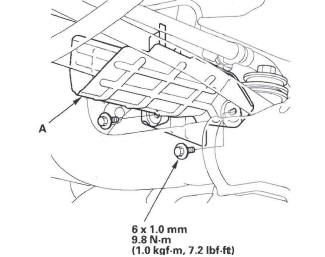
20. Install the P/S heat shield (A).
21. Install the air cleaner housing.
22. Wipe off any grease contamination from the ball joint tapered section and threads. Reconnect the tie-rod ends (A) to the steering knuckles. Install the 12 mm nut (B), and tighten it.
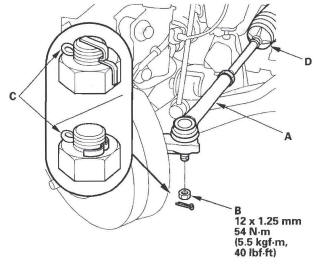
23. Install the new cotter pin (C), and bend it as shown.
NOTE: Check the boot (D) for damage and deterioration. If there is damage or deterioration, replace the boot.
24. Center the steering rack within its stroke in steering joint connection, then remove the vinyl tape from the pinion shaft.
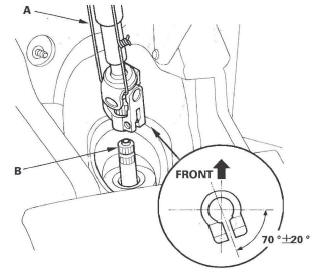
25. With the rack in the straight ahead driving position.
cut the wire (A) and slip the lower end of the steering joint onto the pinion shaft (B) in the range shown.
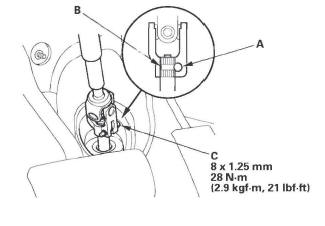
26. Align the bolt hole (A) on the steering joint with the groove (B) around the pinion shaft, and loosely install the joint bolt (C). Be sure that the joint bolt is securely in the groove in the pinion shaft. Pull on the steering joint to make sure that the steering joint is fully seated. Tighten the steering joint bolt to the specified torque.
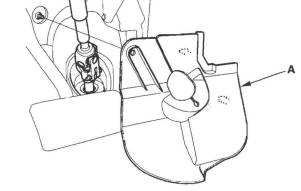
27. Install the steering joint cover (A).
28. Install the driver's dashboard undercover.
29. Install the front wheel, then set the wheels in the straight ahead position.
30. Install the steering wheel.
31. Reconnect the negative cable to the battery.
32. Fill the system with power steering fluid, and bleed air from the system.
33. After installation, do these tasks and checks.
- Turn the ignition switch ON (II); the SRS indicator should come on for about 6 seconds and then go off.
- Enter the anti-theft code for the audio and the navigation system (if equipped), then enter the XM audio presets (if equipped).
- Make sure the horn and turn signal switches work properly.
- Make sure the steering wheel switches work properly.
- Start the engine, allow it to idle, and turn the steering wheel from lock-to-lock several times to warm up to the fluid. Check the steering gearbox for leaks.
- Check the steering wheel spoke angle. If steering spoke angles to the right and left are not equal (steering wheel and rack are not centered), correct the engagement of the joint/pinion shaft serrations, then adjust the front toe by turning the tie-rod ends, if necessary.
- Check the wheel alignment, and adjust it if necessary.
- Set the clock (without Navi).
Tie-rod Ball Joint Boot Replacement
Special Tools Required
Bushing base 07JAF-SH20330
1. Remove the tie-rod ball joint from the knuckle (see step 12).
2. Remove the tie -rod end from the rack end.
3. Remove the boot from the tie-rod end, and wipe the old grease off the ball pin.
4. Pack the lower area of the ball pin (A) with fresh multipurpose grease.
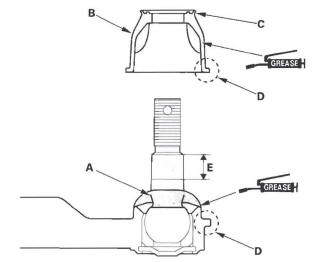
5. Pack the interior of the new boot (B) and lip (C) with fresh multipurpose grease.
Note these items when installing new grease:
- Keep grease off the boot mounting area (D) and the tapered section (E) of the ball pin.
- Do not allow dust, dirt, or other foreign materials to enter the boot.
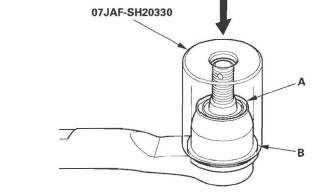
6. Install the new boot (A) using the bushing base.
The boot must not have a gap at the boot installation sections (B). After installing the boot, check the ball pin tapered section for grease contamination, and wipe it if necessary.
7. Install the tie-rod end to the rack end.
8. Install the tie-rod ball joint to the knuckle (see step 22).
9. Check the wheel alignment, and adjust it if necessary.
Gearbox Mount Cushion Replacement
1. Remove the steering gearbox.
2. Position the 34 mm socket wrench (A) on the flange part of the gearbox housing with a washer (B), a 10 x 105 mm flange bolt (C), an appropriate size socket wrench (D), a washer (E), and a 10 mm nut (F) as shown.
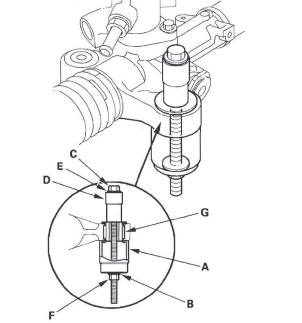
3. Hold the nut with a wrench, and tighten the flange bolt with another wrench. Remove the gearbox mount cushion (G).
4. Apply a mild soap and water solution to the new gearbox mount cushion surface (A), then place it on the gearbox mounting cushion hole.
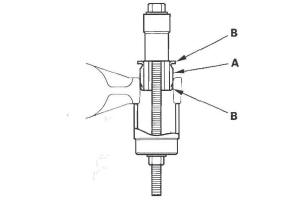
5. Position the 34 mm socket wrench on the flange part of the gearbox housing with a washer, a flange bolt, an appropriate size socket wrench, a washer, and a nut as shown.
6. Install the gearbox mount cushion by tightening the flange bolt until the mount cushion edges (B) contact the gearbox flange surface.
7. Install the steering gearbox.
READ NEXT:
 Front and Rear Suspension
Special Tools
Strut Nut Adapter
Universal Eyelet
Hub Dis/Assembly Tool
Attachment, 40 mm
Ball Joint Remover, 32 mm
Ball Joint Remover, 28 mm
Ball Joint Thread Protector, 14 mm
Attachment, 72
SEE MORE:
Lower Ball Joint Replacement
Special Tools Required
Ball joint remover, 32 mm 07MAC-SL0A 102
Ball joint thread protector, 14 mm 071AF-S3VA000
1. Remove the front wheel.
2. Remove the flange bolt and flange nuts from the
lower arm (A).
NOTE: During installation, install a new flange bolt
and new flange nuts. After lightly
If a Child Requires Close Attention
Many parents say they prefer to put
an infant or a small child in the front
passenger seat so they can watch the
child, or because the child requires
attention.
Placing a child in the front seat
exposes the child to hazards in a
frontal collision, and paying close
attention to a child
