Honda CR-V: EVAP Canister Replacement
1. Lift the vehicle, and support it with jackstands.
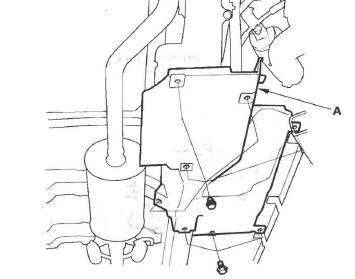
2. Remove the cover (A).
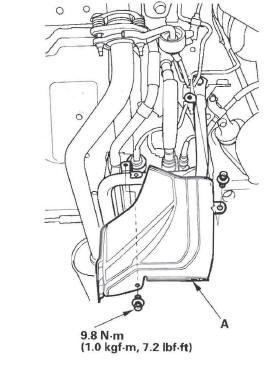
3. Remove the EVAP canister baffle cover (A).
4. Disconnect the hoses (A) and the fuel subharness 6P connector (B).

5. Remove the bolts (C) and the EVAP canister bracket (D).
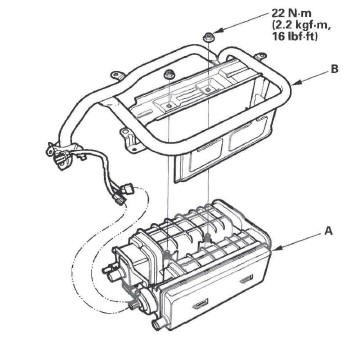
6. Remove the EVAP canister (A) from the EVAP canister bracket (B).
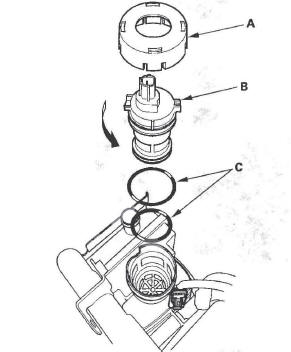
7. Remove the cap (A).
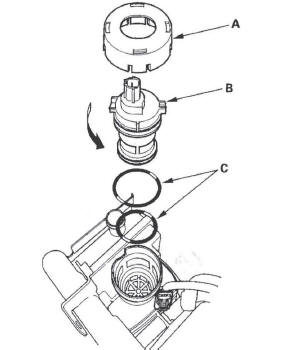
8. Remove the EVAP canister vent shut valve (B).
9. Install the EVAP canister vent shut valve in the new EVAP canister with new O-rings (C).
NOTE: Do not coat the O-rings with oil.
10. Install the parts in the reverse order of removal.
FTP Sensor Replacement
1. Lift the vehicle, and support it with jackstands.
2. Remove the cover (see step 2).
3. Remove the EVAP canister baffle cover (see step 3 ).
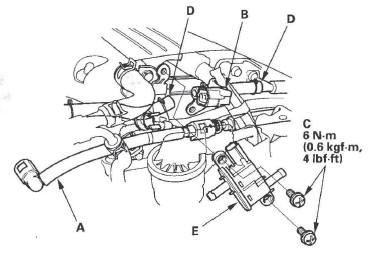
4. Disconnect the FTP sensor connector (A).
5. Disconnect the hose (B), remove the retainer (C) and remove the FTP sensor (D).
6. Install the parts in the reverse order of removal with a new O-ring (E) and a new retainer.
EVAP Canister Vent Shut Valve Replacement
1. Remove the EVAP canister.
2. Remove the cap (A).
3. Remove the EVAP canister vent shut valve (B).
4. Install the parts in the reverse order of removal with new O-rings (C) and a new cap.
NOTE: Do not coat the O-rings with oil.
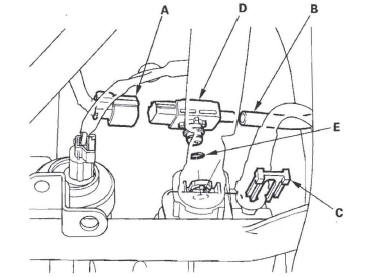
EVAP Canister Purge Valve Replacement
1. Remove the intake manifold cover (see step 5).
2. Remove the air cleaner.
3. Relieve the fuel pressure.
4. Remove the fuel line (A).
5. Disconnect the EVAP canister purge valve 2P connector (B).
6. Remove the screws (C) and the hoses (D), then remove the EVAP canister purge valve (E).
7. Install the parts in the reverse order of removal.
READ NEXT:
 Automatic Transmission
Special Tools
07HAE-PL50101 may also be used to substitute one of 07LAE-PX40100.
Mainshaft Holder
Attachment, 78 x 90 mm
Clutch Spring Compressor Bolt Assembly
Holder Handle
Oil Seal Driver At
General Troubleshooting Information
How to Check for DTCs with the Honda
Diagnostic System (HDS)
When the powertrain control module (PCM) senses an
abnormality in the input or output system, the D
indicator (A) in the gauge control modu
SEE MORE:
Compass Operation
Next to the outside temperature
indicator of the information display,
a compass indicates which direction
your vehicle is pointed. It indicates
eight directions.
N: North
S: South
E: East
W: West
NE: Northeast
NW: Northwest
SE: Southeast
SW: Southwest
For example, when your vehicl
Knuckle/Hub/Wheel Bearing Replacement
Exploded View
Special Tools Required
Hub dis/assembly tool 07GAF-SD40100
Ball joint remover, 32 mm 07MAC-SL0A102
Ball joint remover, 28 mm 07MAC-SL0A202
Ball joint thread protector, 14 mm 071AF-S3VA000
Attachment, 72 x 75 mm 077 46-0010600
Driver 077 49-0010000
Attachment, 96 mm 07948-SB001
