Honda CR-V: EVAP System
Honda CR-V (2006–2011) Service Manual / Fuel and Emissions / EVAP System
Component Location Index
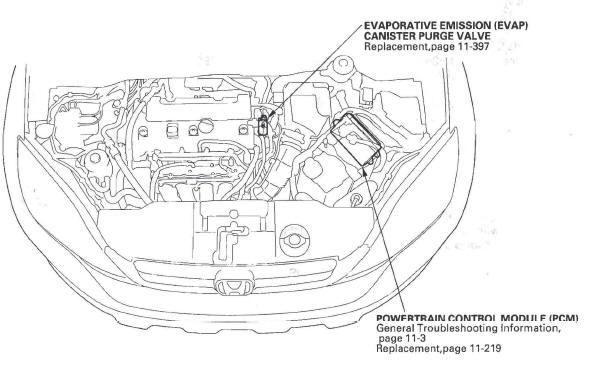
- EVAPORATIVE EMISSION (EVAP)
CANISTER PURGE VALVE
- Replacement
- POWERTRAIN CONTROL MODULE (PCM)
- General Troubleshooting Information
- Replacement
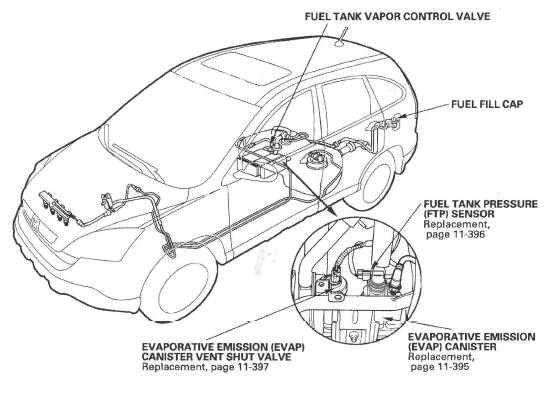
- FUEL TANK VAPOR CONTROL VALVE
- FUEL FILL CAP
- FUEL TANK PRESSURE
(FTP) SENSOR
- Replacement
- EVAPORATIVE EMISSION
(EVAP) CANISTER
- Replacement
- EVAPORATIVE EMISSION (EVAP)
CANISTER VENT SHUT VALVE
- Replacement
READ NEXT:
 DTC P0443: EVAP Canister Purge Valve
Circuit Malfunction
DTC P0443: EVAP Canister Purge Valve
Circuit Malfunction
Special Tools Required
Vacuum pump/gauge, 0-30 in.Hg, Snap-on YA4000A
or equivalent, commercially available.
NOTE: Before you troubleshoot, record all freeze data
and any on-board snapshot, and revie
DTC P0451: FTP Sensor Range/Performance
Problem
NOTE:
Before you troubleshoot, record all freeze data and any on-board
snapshot, and review the general troubleshooting information.
If DTC P2422 is stored at the same time as DTC P0451,
trouble
SEE MORE:
Connecting an iPod
1. Open the upper glove box.
2. Push the release button to release
the USB adapter cable.
3. Connect your dock connector to
the iPod correctly and securely.
4. Install the dock connector to the
USB adapter cable securely.
If the iPod indicator does not appear
in the audio display
Power Windows
Component Location Index
POWER WINDOW MASTER SWITCH
(With built-in control unit)
FRONT PASSENGER'S POWER WINDOW SWITCH
FRONT PASSENGER'S POWER WINDOW MOTOR
RIGHT REAR POWER WINDOW SWITCH
RIGHT REAR POWER WINDOW MOTOR
LEFT REAR POWER WINDOW SWITCH
LEFT REAR POWER WINDOW MOTOR
POWER WINDOW
© 2016-2026 Copyright www.hcrv.net
