Honda CR-V: Adjust the Front Seats
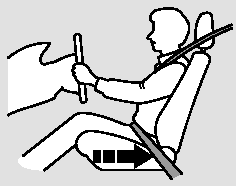
Adjust the driver’s seat as far to the rear as possible while allowing you to maintain full control of the vehicle.
Have a front passenger adjust their seat as far to the rear as possible.
If you sit too close to the steering wheel or dashboard, you can be seriously injured by an inflating front airbag, or by striking the steering wheel or dashboard.
The National Highway Traffic Safety Administration and Transport Canada recommend that drivers allow at least 10 inches (25 cm) between the center of the steering wheel and the chest. In addition to adjusting the seat, you can adjust the steering wheel up and down, and in and out.
If you cannot get far enough away from the steering wheel and still reach the controls, we recommend that you investigate whether some type of adaptive equipment may help.

Sitting too close to a front airbag can result in serious injury or death if the front airbags inflate.
Always sit as far back from the front airbags as possible.
On vehicles with manual adjustable seats
Once your seat is adjusted correctly, rock it back and forth to make sure the seat is locked in position.
See page for how to adjust a front seat (power adjustment) and page for a manual adjustment.
READ NEXT:
 Adjust the Seat-Backs
Adjust the driver’s seat-back to a
comfortable, upright position,
leaving ample space between your
chest and the airbag cover in the
center of the steering wheel.
Passengers with adjust
Adjust the Head Restraints
Adjust the driver’s head restraint so
the center of the back of your head
rests against the center of the
restraint.
Have passengers adjust their head
restraints properly as well. Talle
Fasten and Position the Seat Belts
Insert the latch plate into the buckle,
then tug on the belt to make sure the
belt is securely latched. Check that
the belt is not twisted, because a
twisted belt can cause serious
injuries
SEE MORE:
DTC 51: Motor Locked
1. Turn the ignition switch ON (II).
2. Clear the DTC with the HDS.
3. Test-drive the vehicle. Drive the vehicle at 10 mph
(15 km/h) or more, with the engine speed at
2,500 rpm or more.
4. Check for DTCs with the HDS.
Is DTC 51 indicated?
YES-Replace the VSA modulator-control unit.
NO-Intermitt
DTC P0137: Secondary HO2S (Sensor 2)
Circuit Low Voltage
NOTE: Before you troubleshoot, record all freeze data
and any on-board snapshot, and review the general
troubleshooting information.
1. Turn the ignition switch ON (II).
2. Clear the DTC with the HDS.
3. Start the engine. Hold the engine speed at
3,000 rpm without load (in Park or neutral) until t
