Honda CR-V: Mirrors
Component Location Index
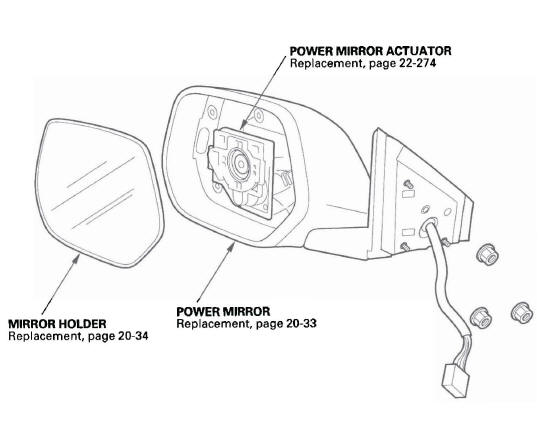
- POWER MIRROR ACTUATOR
- Replacement
- POWER MIRROR
- Replacement
- MIRROR HOLDER
- Replacement

- MOUNT
- REARVIEW MIRROR
- Replacement
Power Mirror Replacement
Special Tools Required
KTC trim tool set SOJATP2014 *
* Available through the American Honda Tool and Equipment Program; call 888-424-6857
NOTE:
- Use the appropriate tool from the KTC trim tool set to avoid damage when prying components.
- Take care not to scratch the door and related parts.
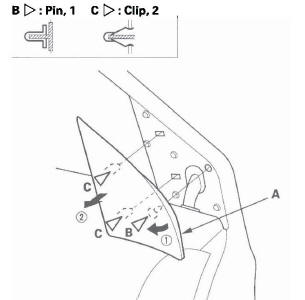
1. Raise the door glass fully.
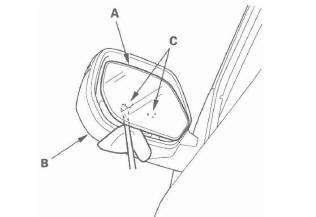
2. Pry up on the edge of the mirror mount cover (A) with a trim tool to detach the pin (B), and gently pull out the cover to detach the clips (C) from the door.
Fastener Locations
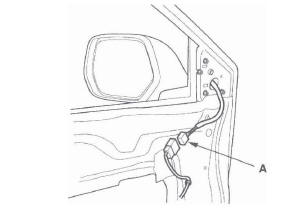
3. Remove the front door panel.
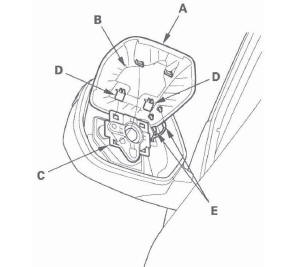
4. Disconnect the connector (A).
5. Remove the nuts.
Fastener Locations
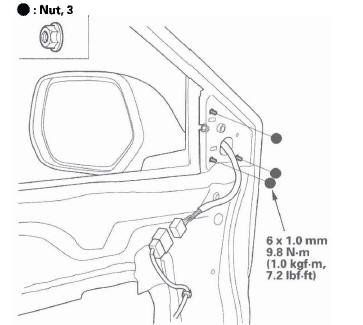
6. While holding the mirror (A), pull the harness (B) out through the hole in the door. Take care not to scratch the door.

7. Install the mirror in the reverse order of removal, and note these items:
- Make sure the connector is plugged in properly.
- Check if the clips are damaged or stress-whitened, and if necessary, replace them with new ones.
- Push the clips and hooks into place securely.
Mirror Holder Replacement
NOTE: Put on gloves to protect your hands.
1. Carefully push on the top edge of the mirror holder (A) by hand.
2. Put a shop towel in the opening between the lower edge of the mirror holder and the mirror housing (B) to prevent scratches, and detach the bottom clips (C) with a flat-tip screwdriver wrapped with protective tape.
3. Carefully pull out the bottom edge of the mirror holder (A) to separate the adhesive (B).
4. Separate the mirror holder from the actuator (C) by releasing the hooks (D). If equipped, disconnect the mirror defogger connectors (E).
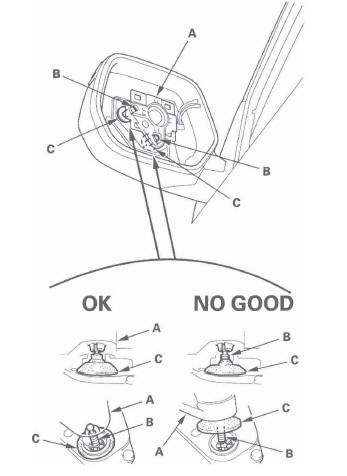
5. Before reinstalling the mirror holder to the inner holder (A) of the actuator, check the actuator rods (B) and the actuator boots (C):
- If a rod is out of the actuator hole, insert it securely.
- Each rod should be covered with a boot. If not, adjust the boot into the proper position.
6. If equipped, reconnect the mirror defogger connectors.
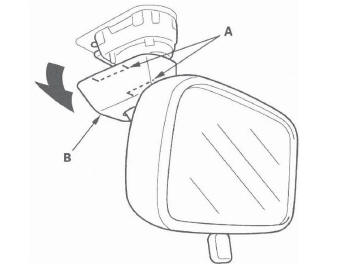
7. Reattach the hooks of the mirror holder to the actuator, then position the mirror holder on the actuator. Carefully push on the clip portions of the mirror holder until the mirror holder locks into place.
8. Check the actuator operation.
Rearview Mirror Replacement
1. Release the hooks (A), then pull the mirror base cover (B) down.
READ NEXT:
 Glass
Glass
Component Location Index
WINDSHIELD MOLDING
MOLDING UPPER SEAL
UPPER RUBBER DAM
CLIP, 2
WINDSHIELD SIDE TRIM
SIDE RUBBER DAM
WINDSHIELD
RETAINER,8
QUARTER GLASS MOLDING
CLIP, 1
CLIP,
Windshield Replacement
NOTE:
Put on gloves to protect your hands.
Wear eye protection when removing the glass with
piano wire.
Use seat covers to avoid damaging the seat.
When replacing a broken windshield, a commerci
Rear Window Replacement
NOTE:
Put on gloves to protect your hands.
Wear eye protection when removing the glass with
piano wire.
Use seat covers to avoid damaging any surfaces.
Do not damage the rear window defogger gri
SEE MORE:
Crossing a Stream
Avoid driving through deep water. If
you encounter water in your route (a
small stream or large puddle, for
example), evaluate it carefully before
going ahead. Make sure it is shallow,
flowing slowly, and has firm ground
underneath. If you are not sure of
the depth or the ground, turn
General Troubleshooting Information
How to Check for DTCs with the Honda
Diagnostic System (HDS)
When the powertrain control module (PCM) senses an
abnormality in the input or output system, the D
indicator (A) in the gauge control module (tach) (B) will
usually blink.
When the Honda Diagnostic System (HDS) is connected
to the data l
