Honda CR-V: Side Windshield Trim Replacement
Special Tools Required
KTC trim tool set SOJATP2014 *
* Available through the American Honda Tool and Equipment Program; call 888-424-6857
NOTE:
- Put on gloves to protect your hands.
- Take care not to damage the windshield,
- Do not use any metallic tools to remove the roof molding, or you may chip the edge of the windshield and cause cracks in the windshield to occur.
- Use the appropriate tool from the KTC trim tool set to avoid damage when prying components.
- Take care not to bend the roof molding.
Molding Replacement
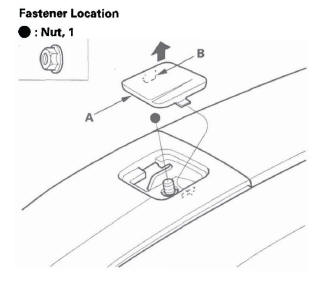
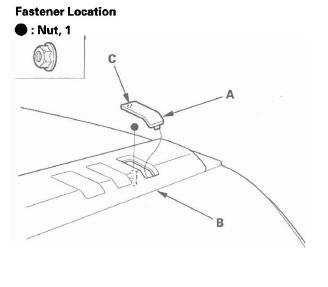
1. Using a trim tool, pry up on the front lid (A) of the front roof side trim to detach the hook (B), and remove the nut.
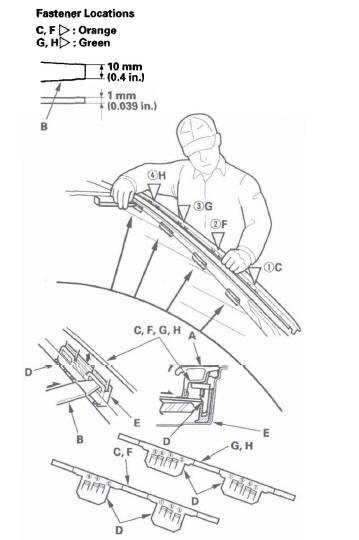
2. Remove the windshield portion of the roof molding (A).
- Carefully insert a plastic trim tool (B) under the molding next to the clip (C).
- While pulling the clip portion of the molding up
by hand, push each of the six or eight small
hooks (D) in the numbered sequence shown to
release the clip from the retainer (E).
Do not try to pry up the clip even if it is hard to release from the retainer.
- Gradually work your way up to release each of the upper clips (F, G, H).
3. Install the molding in the reverse order of removal, and note these items:
- Check if the clips are damaged or stress-whitened, and if necessary, replace them with new ones.
- Make sure the trim ;s installed securely.
Retainer Replacement
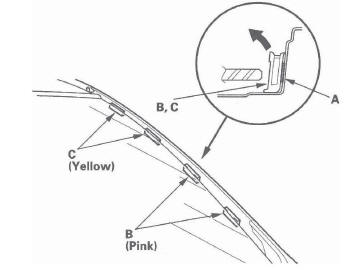
1. Carefully scrape off the adhesive tape (A) under the retainers (B, C) while heating it with a heat gun.
NOTE:
- Do not heat the painted body surface around the retainers too much.
- To keep the exterior resin parts near the A-pillar from being overheated by the heat gun, wrap them with aluminum foil.
2. Clean the body bonding surface with a sponge dampened in isopropyl alcohol. After cleaning, keep oil, grease, and water from getting on the surface.
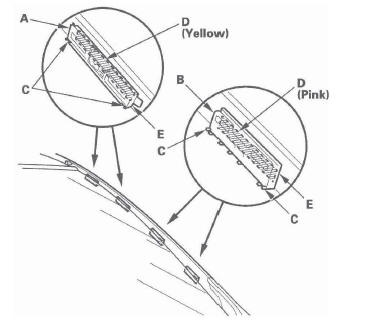
3. Install the upper retainers (A) and the lower retainers (B).
- Peel the adhesive backing away from the upper and lower retainers.
- Line up the retainers with the alignment marks (C) on the body, and attach the retainers with adhesive tape (D) (3M 9259, or equivalent).
- Apply epoxy two-part adhesive (E) around the edge of the retainers as shown.
Front Roof Side Trim Replacement
Special Tools Required
KTC trim tool set SOJATP2014 *
* Available through the American Honda Tool and Equipment Program; call 888-424-6857
NOTE:
- Put on gloves to protect your hands.
- Use the appropriate tool from the KTC trim tool set to avoid damage when prying components.
- Take care not to bend the roof side trim.
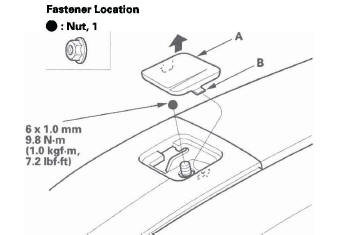
1. Using a trim tool, pry up on the front lid (A) of the front roof side trim to detach the hook (B), and remove the nut.
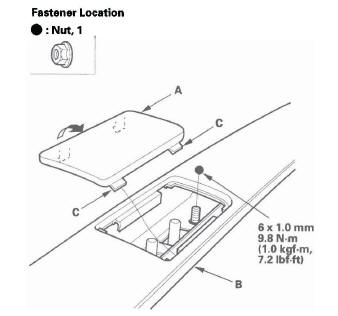
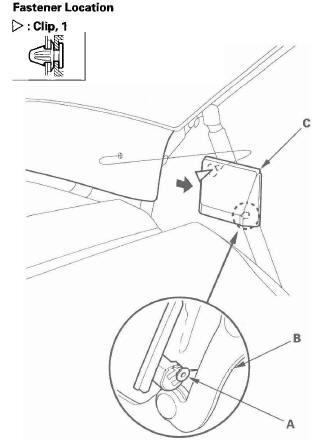
2. Using a trim tool, pry up on the middle lid (A) of the front roof side trim (B) to detach the hooks (C), and remove the nut.
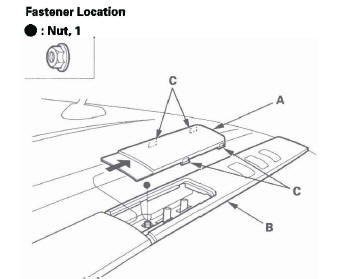
3. Using a trim tool, pry up on the rear lid (A) of the rear roof side trim (B) to detach the hooks (C), and remove the bolt.
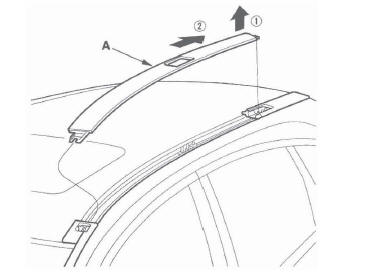
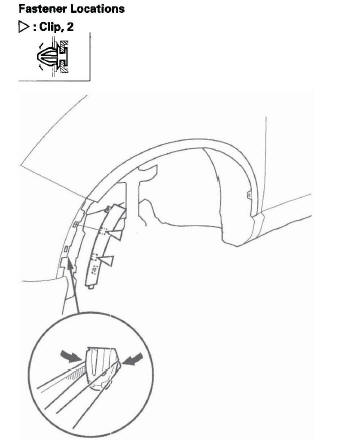
4. Pull up on the rear end of the front roof side trim (A), and remove the trim by pulling it rearward. Take care not to scratch the rear trim and/or body.
5. Install the trim in the reverse order of removal.
Rear Roof Side Trim Replacement
Special Tools Required
KTC trim tool set SOJATP2014 *
* Available through the American Honda Tool and Equipment Program; call 888-424-6857
NOTE:
- Put on gloves to protect your hands.
- Use the appropriate tool from the KTC trim tool set to avoid damage when prying components.
- Take care not to bend the roof side trim.
1. Remove the front roof side trim.
2. Using a trim tool, pry up on the rear lid (A) of the rear roof side trim (B) to detach the hooks (C), and remove the nut.
3. Pull up the rear roof side trim (A) and remove it.
Take care not to scratch the body.

4. Install the trim in the reverse order of removal.
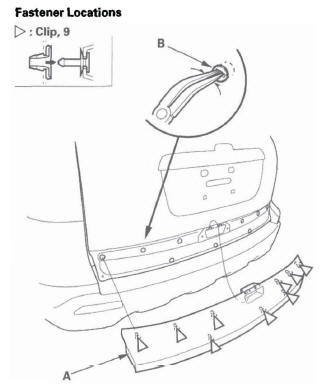
Upper Tailgate Trim Replacement
NOTE:
- Put on gloves to protect your hands.
- Take care not to scratch the tailgate.
1. Using a trim tool, detach the clip, then release the grommet (A) from the tailgate (B), and remove the tailgate upper trim (C).
2. Install the trim in the reverse order of removal, and note these items:
- Check if the clip is damaged or stress-whitened, and if necessary, replace them with new ones.
- Push the clip into place securely.
Front Bumper Side Trim Replacement
NOTE:
- Take care not to scratch the body.
- Put on gloves to protect your hands.
1. Remove the screws (A) and clip (B) securing the front bumper side trim (C).
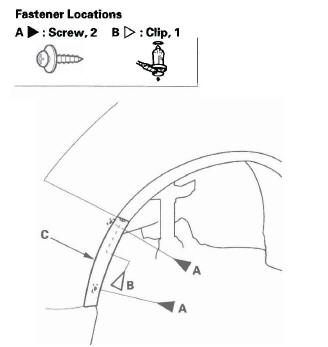
2. Pull out the front inner fender as needed. Take care not to bend the front inner fender excessively. Then push out the clips and remove the front bumper side trim.
3. Install the trim in the reverse order of removal, and note these items:
- Check if the clips are damaged or stress-whitened, and if necessary, replace them with new ones.
- Push the clips and hooks into place securely.
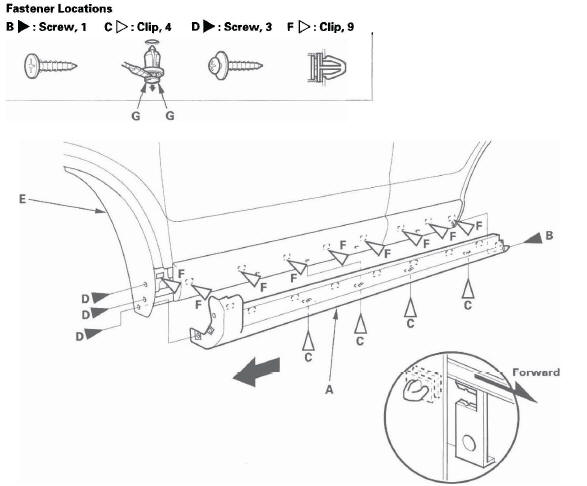
Side Sill Panel Replacement
NOTE: Take care not to scratch the body.
1. Remove these items:
- Front wheel arch protector, as needed
- Rear wheel arch protector, as needed
2. Remove the side sill panel (A).
- Remove the screw (B) and the clips (C).
- Remove the screws (D), and pull the inner fender (E) back as necessary.
- Slide the side sill panel forward and remove it. The side clips (F) will stay in the body.
NOTE: To remove the clip C, pry the inner pin up at the edge near the line (G) on its head.
3. Check if the clips are damaged or stress-whitened, and if necessary, replace them with new ones.
4. Install the side clips on the side sill panel.
5. Hold the panel up, and fit all the side clips into the holes in the body, then push on the panel until the side clips snap into place.
6. Reinstall the front wheel arch protector and the rear wheel arch protector.
Rear License Trim Replacement
Special Tools Required
KTC trim tool set SOJATP2014 *
* Available through the American Honda Tool and Equipment Program; call 888-424-6857
NOTE:
- Put on gloves to protect your hands.
- Take care not to bend or scratch the trim and panels.
- Use the appropriate tool from the KTC trim tool set to avoid damage when prying components.
1. Remove the tailgate lower trim panel.
2. From inside the tailgate, remove the bolt (A) and nuts (B) securing the rear license trim (C).
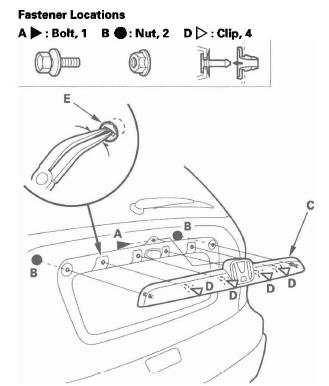
3. Pull out the rear license trim to release the clips (D), then remove the rear license trim from the tailgate.
4. Check if the clips are damaged or stress-whitened, and if necessary, replace them with new ones.
5. Remove the grommets (E) from the tailgate, then insert the grommets into the clips on the rear license trim.
6. Hold the trim up, and fit all the clips into the holes in the tailgate, then push on the trim until the clips snap into place.
7. Reinstall the bolts and nuts, then reinstall the rear license trim.
Tailgate Lower Trim Replacement
NOTE:
- Put on gloves to protect your hands.
- Take care not to scratch the tailgate.
1. Remove the tailgate lower trim panel.
2. Remove the bolts (A) and nuts (B) securing the tailgate lower trim (C).
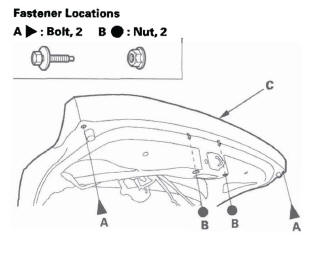
3. Pull out along the upper and lower edges on the tailgate lower trim (A) to release the clips, then remove the tailgate lower trim from the tailgate.
4. Check if the clips are damaged or stress-whitened, and if necessary, replace them with new ones.
5. Remove the grommets (B) from the tailgate, then insert the grommets into the clips on the tailgate lower trim.
6. Hold the trim up, and fit all the clips into the holes in the tailgate, then push on the trim until the clips snap into place.
7. Reinstall the bolts and nuts, then reinstall the tailgate lower trim panel.
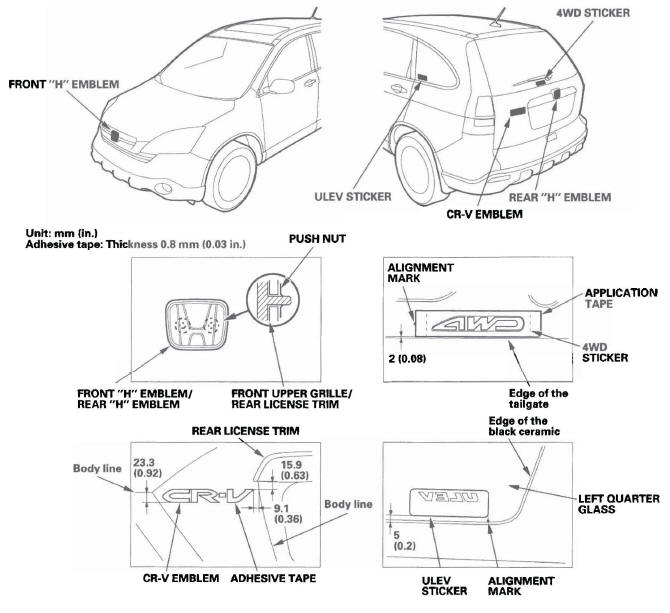
Emblem/Sticker Replacement
NOTE: When removing the emblem/sticker, take care not to scratch the body.
1. To remove the front "H" emblem, remove the front upper grille.
2. To remove the rear "H" emblem, remove the rear license trim.
3. Clean the body surface with a sponge dampened in isopropyl alcohol. After cleaning, keep oil, grease, and water from getting on the surface.
4. Apply the emblems/sticker where shown. When installing the ULEV sticker on the inside surface of the left quarter glass, align the sticker with the edge of the black ceramic as shown, then press the sticker into place, and remove the application tape.
5. After installing the front "H" emblem, reinstall the front upper grille.
6. After installing the rear "H" emblem, reinstall the rear license trim.
READ NEXT:
 Fenderwell
Front Inner Fender Replacement
NOTE: Take care not to scratch the body.
1. Remove the front wheel arch protector, as needed.
2. Remove the front inner fender (A).
Remove the screws (B, C), and remo
Openers
Component Location Index
HOOD OPENER CABLE
Replacement
FUEL FILL DOOR OPENER
Replacement
TAILGATE LATCH
Replacement
FUEL FILL DOOR LATCH
Replacement
FUEL FILL DOOR OPENE
Frame
Under-cowl Panel Replacement
NOTE: Take care not to scratch the body.
1. Remove these items:
Windshield wiper arms
Front fender trim, both sides
Cowl covers
2. Remove the bolts and nuts, discon
SEE MORE:
Cruise Control
Cruise control allows you to maintain
a set speed above 25 mph (40 km/h)
without keeping your foot on the
accelerator pedal. It should be used
for cruising on straight, open
highways. It is not recommended for
city driving, winding roads, slippery
roads, heavy rain, or bad weather.
Self-diagnostic Function
Without Navigation
The audio system has a self-diagnostic function. To run the self-diagnostic
function, do the following:
How to check for audio system condition
NOTE: The audio unit must be in the code enter screen before doing the
self-diagnostic function.
1. Turn the ignition switch to the AC
