Honda CR-V: Self-diagnostic Function
Without Navigation
The audio system has a self-diagnostic function. To run the self-diagnostic function, do the following:
How to check for audio system condition
NOTE: The audio unit must be in the code enter screen before doing the self-diagnostic function.
1. Turn the ignition switch to the ACC (I) or ON (II) position.
2. Turn on the audio unit.
3. Push and hold the "No.1" and "No.6" buttons. While holding the buttons, push the "VOL push PWR" knob (A) to ON. Release the buttons and the self-diagnostic function begins.
Except LX model
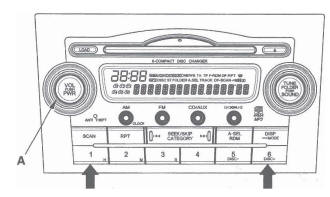
LX model
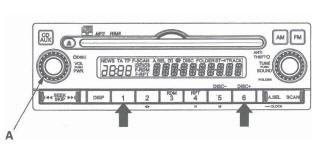
4. By pressing a preset button, the input triggers the diagnostic mode that is assigned to that preset switch.
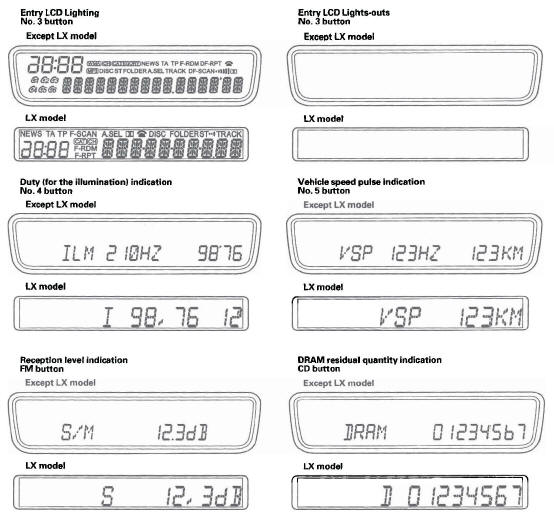
"No. 3" button
Entire LCD lighting/light-out mode: Turns on/off the entire LCD to show the presence or absence of an LCD segment failure.
"No. 4" button
Duty (for the Illumination dim) indication mode: Indicates the duty for the Illumination dim.
"No. 5" button
Vehicle speed pulse indication mode: Indicates the vehicle speed pulse.
"FM" button (Push and hold 5 sec.)
Reception level check mode: Indicates the FM signal reception level. When entering the reception level check mode.
"CD" button (Push and hold 5 sec.)
DRAM residual quantity indication mode: Indicates the DRAM residual quantity.
5. The self-diagnostic function ends when the audio unit is turned off, or the ignition switch is turned off.
Display Specifications
Speaker check mode
6. Turn off the audio unit.
7. Push and hold the "No. 1" and "No. 3" buttons. While holding the buttons, push the "VOL push PWR" knob to ON.
Release the buttons and the speaker check mode begins. Low-Frequency hum should sound for one speaker.
Change the test speaker by push the "SKIP" button. If you find a speaker(s) with no sound, check the speaker and harness connections. It the connections are good, replace the speaker and retest.
8. The self-diagnostic function ends when you turn the audio unit off, or turn the ignition switch off.
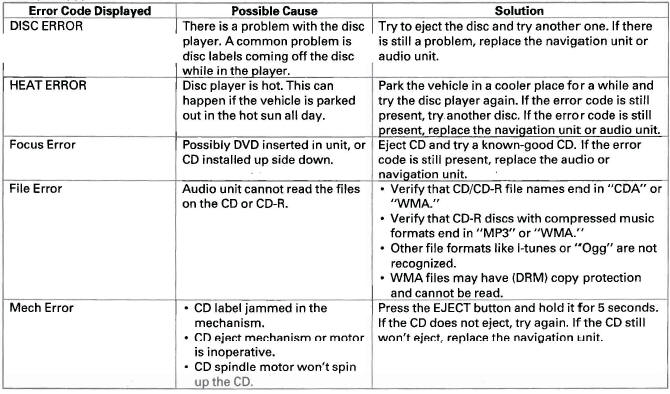
Error Codes
The audio system displays error codes when a problem is detected with the audio disc changer, the audio disc, the XM radio, or the anti-theft code.
CD Error Codes
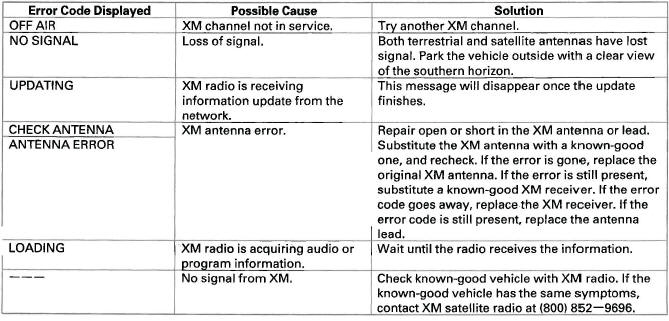
XM Error Codes
Audio Unit Error Codes

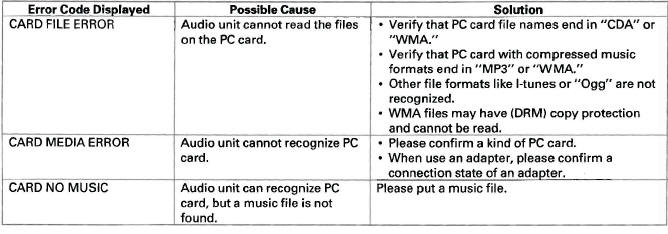
PC Card Error Codes
READ NEXT:
 Poor AM or FM radio reception or
interference (with navigation)
Poor AM or FM radio reception or
interference (with navigation)
NOTE:
Check the radio reception in an open area.
Compare it to a known-good vehicle of the same
model, year, and trim level whenever possible.
If necessary, have the customer demonstrate the
sym
Power switch will not turn ON (No
information display and no sound)
(with navigation)
1. With the ignition switch ON (II), push the power
switch ON to see if navigation unit turns ON.
Does the navigation unit display operate properly, and does the audio sound
normal? YES-Intermittent
SEE MORE:
Disc Player Error Messages (LX model)
If you see an error message in the
display while playing a disc, find the
cause in the chart to the right. If you
cannot clear the error message, take
your vehicle to your dealer.
The chart on the right explains the
error messages you may see in the
display while playing a disc.
If you
Song Search Function
When you select ‘‘Song Search’’ from
the track list display, the song search
menu appears.
You can then select any of three
modes to search a file: Title by
Keyword, Artist, and Album.
Searching for a Song Title by Keyword
In Title by Keyword mode, enter the
title na
