Honda CR-V: Poor AM or FM radio reception or interference (with navigation)
NOTE:
- Check the radio reception in an open area.
- Compare it to a known-good vehicle of the same model, year, and trim level whenever possible.
- If necessary, have the customer demonstrate the symptom.
- Poor reception/interference can be caused by the following.
- The radio station is far away.
- Atmospheric conditions are unfavorable.
- Tall buildings, mountains, or high-voltage power lines are nearby.
- Aftermarket window tinting or electronic accessories.
- Non-standard antenna mast.
1. Do the seek stop test.
Does the test vehicle receive 90 % of the same status as the known-good vehicle? YES-Multi path interference or weak station.
Operation is normal at this time.
NO-Go to step 2.
2. Check if the radio reception/interference is the same as the known-good vehicle in several locations.
Is the reception/interference the same? YES-Go to step 3.
NO-Multipath interference or weak station.
Operation is normal.
3. Check the reception/interference while the engine is running, and compare it to the known-good vehicle.
Is there noise (static or whine) only with the engine running? YES-Check the antenna and radio grounds. If OK, check the charging system, fuel injection system (fuel pump), HVAC (blower motor), and the ignition system.
NO-Go to step 4.
4. Check the antenna mast for cracks, or other damage. Make sure that the AM/FM/XM antenna is not loose.
NOTE: Do not use any tools to tighten the antenna mast.
Is there any damage? YES-Replace the AM/FM/XM antenna.
NO-Go to step 5.
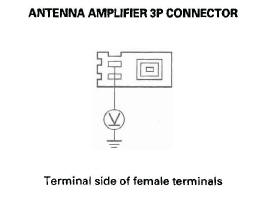
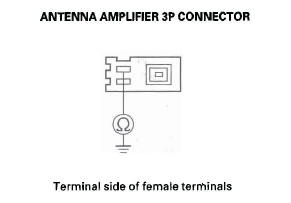
5. Disconnect the antenna cable 3P connector from the AM/FM/XM antenna.
6. Measure the voltage between the antenna amplifier connector No.3 terminal at the antenna amplifier lead and body ground.
Is there battery voltage? YES-Go to step 11.
NO-Go to step 7.
7. Remove the navigation unit.
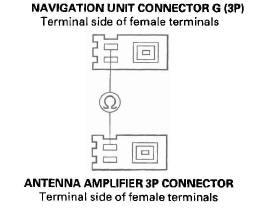
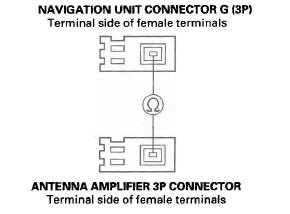
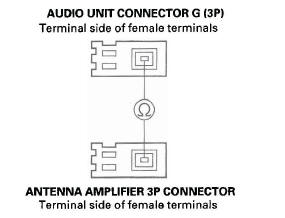
8. Disconnect navigation unit connector G (3P).
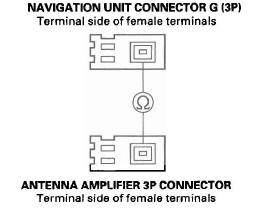
9. Check for continuity between navigation unit connector G (3P) No.3 terminal and the antenna amplifier 3P connector No.3 terminal.
Is there continuity? YES-Go to step 10.
NO-Repair open in the wire between the navigation unit and the antenna amplifier.
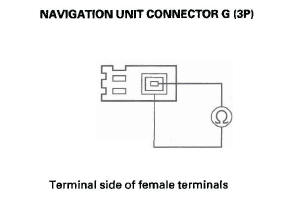
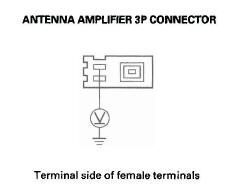
10. Check for continuity between the antenna amplifier connector (3P) No.3 terminal and body ground.

Is there continuity? YES-Repair short in the wire between the navigation unit and the antenna amplifier.
NO-Substitute a known-good navigation unit, and recheck.
11. Remove the navigation unit.
12. Check for continuity between navigation unit connector G (3P) No.1 terminal and the antenna amplifier 3P connector No.1 terminal.
Is there continuity? YES-Go to step 13.
NO-Replace the antenna lead and/or sublead.
13. Check for continuity between navigation unit connector G (3P) No.1 terminal and body ground.
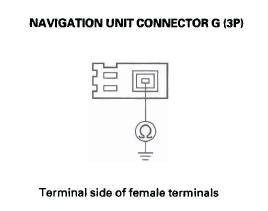
Is there continuity? YES-Replace the antenna lead and/or sublead.
NO-Go to step 14.
14. Check for continuity between navigation unit connector G (3P) No.2 terminal and the antenna amplifier 3P connector No.2 terminal.
Is there continuity? YES-Go to step 15.
NO-Replace the antenna lead and/or sublead.
15. Check for continuity between navigation unit connector G (3P) No.1 and No.2 terminals.
Is there continuity? YES-Replace the antenna lead and/or sublead.
NO-Replace the antenna amplifier, and recheck. If the reception is still poor, replace the navigation unit.
Poor AM or FM radio reception or interference (without navigation)
NOTE:
- Check the radio reception in an open area.
- Compare it to a known-good vehicle of the same model, year, and trim level whenever possible.
- If necessary, have the customer demonstrate the symptom.
- Poor reception/interference can be caused by the following:
- The radio station is far away.
- Atmospheric conditions are unfavorable.
- Tall buildings, mountains, or high-voltage power lines are nearby.
- Aftermarket window tinting or electronic accessories.
- Non-standard antenna mast.
1. Do the seek stop test.
Does the test vehicle receive 90 % of the same stations as the known-good vehicle? YES-Multipath interference or weak station.
Operation is normal at this time.
NO-Go to step 2.
2. Check if the radio reception/interference is the same as the known-good vehicle in several locations.
Is the reception/interference the same? YES-Go to step 3.
NO-Multipath interference or weak station.
Operation is normal.
3. Check the reception/interference while the engine is running and compare it to the known-good vehicle.
Is there noise (static or whine) only with the engine running? YES-Check the antenna and radio grounds. If OK, check the charging system, fuel injection system (fuel pump), HVAC (blower motor), and the ignition system.
NO-Go to step 4.
4. Check the antenna mast for cracks, or other damage. Make sure that the AM/FM/XM antenna is not loose.
NOTE: Do not use any tools to tighten the antenna mast.
Is there any damage? YES-Replace the AM/FM/XM antenna.
NO-Go to step 5.
5. Disconnect the antenna cable 3P connector from the AM/FM/XM antenna.
6. Measure the voltage between the antenna cable connector No.3 terminal at the antenna amplifier lead and body ground.
Is there battery voltage? YES-Go to step 11.
NO-Go to step 7.
7. Remove the audio unit.
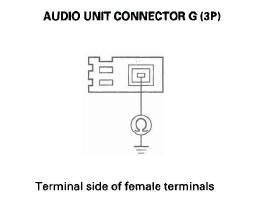
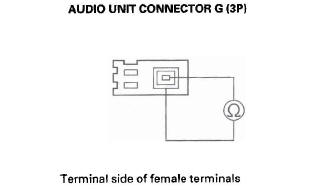
8. Disconnect audio unit connector G (3P).
9. Check for continuity between audio unit connector G (3P) No.3 terminal and the antenna amplifier 3P connector No.3 terminal.
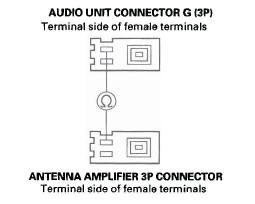
Is there continuity? YES-Go to step 10.
NO-Repair open in the wire between the audio unit and the antenna amplifier.
10. Check for continuity between the antenna amplifier connector (3P) No.3 terminal and body ground.
Is there continuity? YES-Repair short in the wire between the audio unit and the antenna amplifier.
NO-Substitute a known-good audio unit, and recheck.
11. Remove the audio unit.
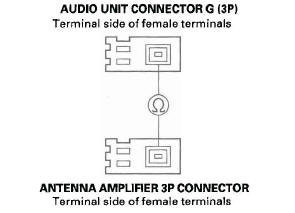
12. Check for continuity between audio unit connector G (3P) No.1 terminal and the antenna amplifier 3P connector No.1 terminal.
Is there continuity? YES-Go to step 13.
NO-Replace the antenna lead and/or sublead.
13. Check for continuity between audio unit connector G (3P) No.1 terminal and body ground.
Is there continuity? YES-Replace the antenna lead and/or sublead.
NO-Go to step 14.
14. Check for continuity between audio unit connector G (3P) No.2 terminal and the antenna amplifier 3P connector No.2 terminal.
Is there continuity? YES-Replace the antenna lead and/or sublead.
NO-Go to step 15.
15. Check for continuity between audio unit connector G (3P) No.1 and No.2 terminals.
Is there continuity? YES-Replace the antenna lead and/or sublead.
NO-Replace the antenna amplifier, and recheck. If the reception is still poor, replace the audio unit.
READ NEXT:
 Power switch will not turn ON (No
information display and no sound)
(with navigation)
Power switch will not turn ON (No
information display and no sound)
(with navigation)
1. With the ignition switch ON (II), push the power
switch ON to see if navigation unit turns ON.
Does the navigation unit display operate properly, and does the audio sound
normal? YES-Intermittent
No sound is heard from speaker(s) (display is
normal) (with navigation)
NOTE:
Set the fader and balance positions to the center.
Before doing symptom troubleshooting, do the
power switch will not turn ON troubleshooting.
1. Check that the volume button is not set to
Audio system sound is weak or distorted
(display is normal)
1. Check for sound in each mode (AM, FM, XM, and
disc).
Is there sound from the speakers, and is the sound quality normal in each mode?
YES-Intermittent failure. The system is OK at this time. Check
SEE MORE:
Driveshaft Inspection
1. Check the inboard boot (A) and the outboard boot
(B) on the driveshaft (C) for cracks, damage, leaking
grease, and loose boot bands (D). If any damage is
found, replace the boot and boot bands.
2. Turn the driveshaft by hand, and make sure the
splines (E) and joint are not excessively loose.
3.
Braking System
Your vehicle is equipped with disc
brakes at all four wheels. A power
assist helps reduce the effort needed
on the brake pedal. The anti-lock
brake system (ABS) helps you retain
steering control when braking very
hard.
Resting your foot on the pedal keeps
the brakes applied lightly, b
