Honda CR-V: Audio system sound is weak or distorted (display is normal)
1. Check for sound in each mode (AM, FM, XM, and disc).
Is there sound from the speakers, and is the sound quality normal in each mode? YES-Intermittent failure. The system is OK at this time. Check for loose connections at the navigation unit, audio unit, amplifier, and each speaker.
NO-Speakers all work, sound quality is poor.
- If the sound quality is poor only with the XM radio, or the XM radio does not function, go to poor or no sound with XM radio.
- If the sound quality is poor only with the audio disc charger, or the audio disc charger does not function, go to poor or no sound with audio disc charger.
- If the sound quality is poor only with AM or FM radio, go to poor radio reception or interference.
- If sound is poor in all modes, go to sound quality diagnosis.
Radio preset memory is lost
NOTE: If only the XM stations are lost, go to XM radio preset memory is lost.
1. Set each of the radio station preset buttons.
Do each of the buttons set properly? YES-Go to step 2.
NO-
- With navigation: Replace the navigation unit.
- Without navigation: Replace the audio unit.
2. Turn the ignition switch OFF for 1 minute, then turn it back to ON (II).
3. Test the preset buttons for proper recall operation.
Do the preset buttons recall the set radio stations? YES-System is normal at this time. Check the connections at the navigation unit or audio unit.
NO-
- With navigation: Replace the navigation unit.
- Without navigation: Replace the audio unit.
Volume does not change
NOTE:
- Set the fader and balance positions to the center.
- On vehicles with navigation, audio button operation can be checked by doing the hard key status test in the navigation unit check screen. See navigation diagnosis mode.
1. Turn on the audio unit, and listen for sound from the speakers.
Is the sound normal? YES-Go to step 2.
NO-Go to audio system sound is weak or distorted, or no sound is heard from speakers.
2. Operate the volume knob to see if the volume changes.
Does the volume change? YES-Operation is normal at this time.
NO-
- With navigation: Replace navigation unit.
- Without navigation: Replace audio unit.
Volume does not increase with speed
1. Verify the (SVC) mode setting in the navigation or audio unit sound set-up.
Is the (SVC) set to off? YES-Change the setting to "Mid" and reset.
NO-Go to step 2.
2. Do the self-diagnostic function for the vehicle speed pulse indication.
Does the self-diagnostic function indicate a VSP signal? YES-Substitute a known-good navigation or audio unit and retest. If the symptom/indication goes away, replace the original navigation or audio unit.
NO-Go to step 3,
3. Test-drive the vehicle at highway speeds, and monitor if the volume increases with speed.
Do the volume increase? YES-Intermittent failure, the system is OK at this time.
NO-Go to step 4.
4. Remove the navigation unit, or audio unit, and disconnect the navigation, or audio unit connector A (17P).
5. Raise the vehicle on a lift.
6. Turn the ignition switch ON (II).
7. Press the brake pedal, and shift the transmission to D.
8. Slowly spin one of the front wheels by hand, and have an assistant measure voltage at navigation or audio unit connector A (17P) terminal No. 13.
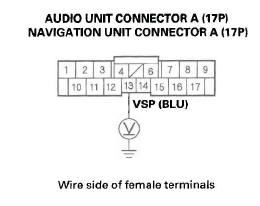
Is the 0-5 V pulse? YES-
- With navigation: Replace the navigation unit.
- Without navigation: Replace the audio unit.
NO-Repair open or shorts in the wire between the navigation, or audio unit connector A (17P) No. 13 terminal and the PCM connector A (44P) No. 29 terminal. If no opens or shorts are found, substitute a known-good PCM and recheck. If he symptom/ indicated goes away, replace the original PCM.
Volume is too high or too low when driving at freeway speeds
1. Test-drive the vehicle at highway speeds and monitor volume level.
Is the volume level too high or too low? YES-Go to step 2.
NO-Internal failure, the system is OK at this time.
2. Try the (SVC) mode setting in sound set-up on "Low", "Mid", and "High".
Is the volume level still too high, or too low? YES-
- With navigation: Replace the navigation unit.
- Without navigation: Replace the audio unit.
NO-Improper (SVC) setting for the customer's sound preference. Advise the customer to try different SVC settings.
Radio tuner does not change stations
NOTE: On vehicles with navigation, audio button operation can be checked by doing the hard key status test in the navigation unit check screen. See navigation diagnosis mode.
1. Check the audio information on the display panel.
Does the audio information display properly? YES-Go to step 2.
NO-Go to power switch will not turn ON.
2. Operate the tuning knob to see if the radio station changes.
Does the radio station change? YES-Intermittent failure: the tuning knob is OK at this time.
No-
- With navigation: Replace navigation unit.
- Without navigation: Replace audio unit.
Display does not dim or brighten with dimmer (without navigation)
1. Turn the ignition switch ON (II).
2. Turn the combination light switch ON and OFF to see if the symptom can be duplicated.
Is the symptom duplicated? YES-Go to step 3.
NO-Operation is normal at this time.
3. Turn the combination light switch OFF.
4. Operate the illumination control dial.
Is it normal? YES-Operation is normal at this time.
NO-Go to step 5.
5. Turn the ignition switch OFF.
6. Disconnect and check audio unit connector A (17P) for loose or a poor connection.
7. Reconnect audio unit connector A (20P), and recheck the symptom.
Does the display dim normally? YES-Go to step 8.
NO-Operation is normal at this time.
8. Turn the ignition switch to ON (II).
9. Measure the voltage between audio unit connector A (17P) No. 10 terminal and body ground.
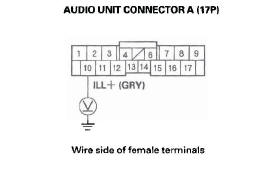
Is there battery voltage? YES-Go to step 10.
NO-Check the No. 14 (7.5 A) fuse in the under-dash fuse/relay box. If the fuse is OK, repair open in the wire between the fuse and audio unit connector A (17P).
10. Measure the voltage between audio unit connector A (17P) No.1 and No. 10 terminals. Operate the dash brightness controller dial to see if the voltage changes.
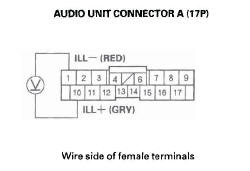
Does the voltage change? YES-Substitute a known-good audio unit, and recheck. If the symptom/indication goes away, replace the original audio unit. If symptom is still present, substitute a known-good center panel display and recheck. If the symptom/indication goes away, replace the original center panel display.
NO-Repair open in the wire between the under-dash fuse/relay box and the gauge control module.
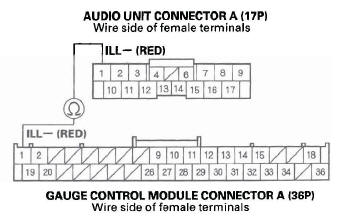
Navigation unit button illumination does not work (with navigation)
1. Turn the ignition switch to ON (II).
2. Turn the combination lighting switch to the parking light position.
3. Check the illumination of the navigation unit buttons.
Are the buttons illuminated? YES-Intermittent problem: The navigation unit is OK at this time. Check for loose or poor connections at the navigation unit connector A (17P).
NO-Go to step 4.
4. Check the illumination of several other buttons not related to the navigation system.
Are the buttons illuminated? YES-Go to step 5.
NO-Troubleshoot the dashboard illumination circuit. Check the No. 14 (7.5 A) fuse in the under-dash fuse/relay box.
5. Turn the ignition switch OFF.
6. Disconnect navigation unit connector A (17P).
7. Disconnect gauge control module connector A (36P).
8. Check for continuity between navigation unit connector A (17P) No.1 terminal and gauge control module connector A (36P) No.1 terminal.

Is there continuity? YES-Go to step 9.
NO-Repair open in the wire between the gauge control module and the navigation unit.
9. Turn the ignition switch to ON (II).
10. With the headlight switch still on, measure the voltage between navigation unit connector A (17P) No.10 terminal and body ground.
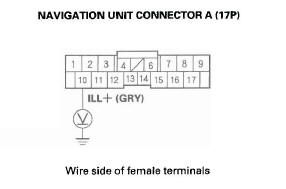
Is there battery voltage? YES-Check the connections at navigation unit connector A (17P). If all connections are OK, replace the navigation unit.
NO-Check the No. 14 (7.5 A) fuse in the under-dash fuse/relay box. If the fuse OK, repair open in the wire between the under-dash fuse/relay box and the navigation unit.
Audio unit button illumination does not work (without navigation)
1. Turn the ignition switch to ON (II).
2. Turn the combination lighting switch to the parking light position.
3. Check the illumination of the audio unit buttons.
Are the buttons illuminated? YES-Intermittent problem: The audio unit is OK at this time. Check for loose or poor connections at the audio unit connector A (17P).
NO-Go to step 4.
4. Check the illumination of several other buttons not related to the audio system.
Are the buttons illuminated? YES-Go to step 5.
NO-Troubleshoot the dashboard illumination circuit.
5. Turn the ignition switch OFF.
6. Disconnect audio unit connector A (17P).
7. Disconnect gauge control module connector A (36P).
8. Check for continuity between audio unit connector A (17P) No.1 terminal and gauge control module connector A (36P) No.1 terminal.
Is there continuity? YES-Go to step 9.
NO-Repair open in the wire between the gauge control module and the audio unit.
9. Turn the ignition switch to ON (II).
10. With the headlight switch still on, check for voltage between audio unit connector A (17P) No. 10 terminal and body ground.
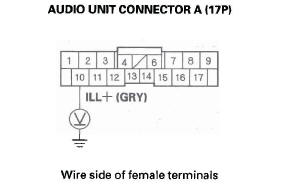
Is there battery voltage? YES-Check the connections at audio unit connector A (17P). If all the connections are OK, replace the audio unit.
NO-Check the No. 14 (7.5 A) fuse in the under-dash fuse/relay box. If the fuse is OK, repair open in the wire between the under-dash fuse/relay box and the audio unit.
Audio remote switch does not work properly
NOTE: On vehicles with navigation, audio button operation can be checked by doing the hard key status test in the navigation unit check screen. See navigation diagnosis mode.
1. Test the audio remote switch.
Is the audio remote switch OK? YES-Go to step 2.
NO-Replace the audio remote switch.
2. Check the audio unit operation (volume up, volume down, CH (-), CH (+), MODE).
Is the audio unit operation OK? YES-
- With navigation: Go to step 3.
- Without navigation: Go to step 6.
NO-
- With navigation:' Replace the navigation unit.
- Without navigation: Replace the audio unit.
3. Remove the navigation unit.
4. Measure the resistance between navigation unit connector B (22P) No.6 and No.7 terminals as specified in the table.
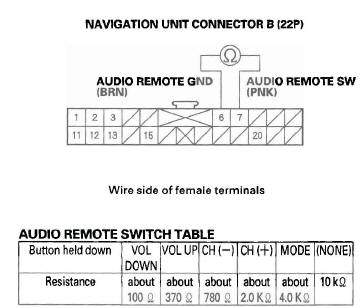
Is the resistance OK? YES-Go to step 5.
NO-Repair open or high resistance in the circuit between the navigation unit and the audio remote switch. If the wires are OK, replace the cable reel.
5. Check for continuity between the No.6 and No.7 terminals of navigation unit connector B (22P) and body ground.

Is there continuity? YES-Repair short to body ground in the circuit between the navigation unit and the audio remote switch. If the wires are OK, replace the cable reel.
NO-Replace the navigation unit.
6. Remove the audio unit.
7. Measure the resistance between audio unit connector B (20P) No.6 and No.7 terminals as specified in the table.
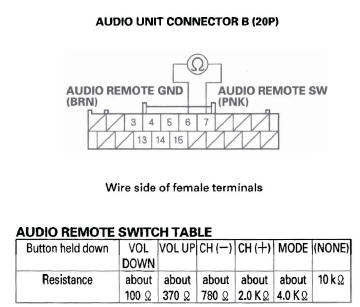
Is the resistance OK? YES-Go to step 8.
NO-Repair open or high resistance in the circuit between the audio unit and the audio remote switch. If the wires are OK, replace the cable reel.
8. Check for continuity between the No.6 and No.7 terminals of the audio unit connector B (20P) and body ground.
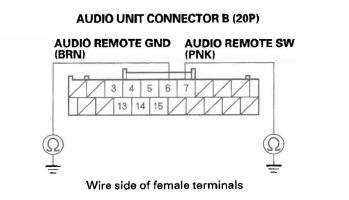
Is there continuity? YES-Repair short to body ground in the circuit between audio unit and the audio remote switch. If the wires are OK, replace the cable reel.
NO-Replace the audio unit.
Audio disc does not load
NOTE:
- Disc labels should not be used in the navigation unit or audio unit. They may damage the player mechanism.
- Make sure the CD is compatible with the system (see the owner's manual for more information).
1. Insert a known-good disc to see if the symptom can be duplicated.
Does the disc load? YES-Operation is normal. If the disc loads normally, but will not play, go to audio disc does not play.
NO-Go to step 2.
2. Insert another disc.
Does the disc load? YES-The original disc is faulty.
NO-
- With navigation: Replace navigation unit.
- Without navigation: Replace audio unit.
Audio disc does not eject
NOTE: Disc labels should not be used in the navigation unit or audio unit. They may damage the player mechanism.
1. Turn on the audio system.
Does the system turn on? YES-Go to step 2.
NO-Go to power switch will not turn ON.
2. Check to see if the disc ejects correctly with no binding by pushing the EJECT button.
Does the disc eject normally? YES-Operation is normal.
NO
- With navigation: Replace navigation unit.
- Without navigation: Replace audio unit.
Audio disk cannot be inserted and/or ejected (with navigation)
NOTE:
- Disc labels should not be used in the navigation unit or audio unit. They may damage the player mechanism.
- Make sure the CD is compatible with the system (see the owner's manual for more information).
1. Press the OPEN/CLOSE button to open the navigation display.
2. Check the disc indicator.
Does the disc indicator light on? YES-Go to step 4.
NO-Go to step 3.
3. Try inserting an audio CD.
Does the player accept the CD? YES-The system is OK at this time.
NO-Go to step 4.
4. Press the CD eject button.
Does the player eject the CD? YES-The system is OK at this time.
NO-Replace the navigation unit.
Special Tools Required
Diagnostics CD 07AAZ-SDBA100
Audio disc does not play
1. Try loading a known-good disc.
Does the disc load? YES-Go to step 2.
NO-Go to audio disc does not load.
2. Insert another known-good disc to see if the symptom can be duplicated.
Does the disc play? YES-Operation is normal.
NO-Go to step 3.
3. Insert the audio diagnostic CD (T/N: 07 AAZ-SDBA100) in the navigation unit or audio unit.
Does the disc play? YES-The original disc is faulty, or has an unreadable format.
NO-
- With navigation: Replace navigation unit.
- Without navigation: Replace audio unit.
Special Tools Required
Diagnostics CD 07AAZ-SDBA100
Audio disc skips
1. Confirm the vehicle's tires are properly inflated with no cupping or flat spots.
2. Check the customer's CD for scratches, fingerprints, and marks.
NOTE: The following test should be done with audio unit bass and treble set to customers listening performance. When comparing to known-good vehicles, the comparison should be done on same model and trim level.
3. Test drive to identify when the customer's CD skips.
The audio diagnostic CD (T/N: 07AAZ-SDBA100) can be used if customer's CD is not available. Use tracks 10-12.
Does the CD skip? YES-Go to step 4.
NO-Operation is normal.
4. Compare the customer's CD that is skipping in a known-good vehicle under the same conditions.
Does the CD skip in the known-good vehicle under the same conditions? YES-Operation is normal.
NO-Go to step 5.
NOTE: Do the following test with vehicle parked and engine running.
5. Insert the diagnostic skip test CD (T/N: 07 AAZ-SDBA300) (ABEX TCD 721). Play tracks 2-11 and note the track number(s) where the CD starts skipping. Do the same test on a known-good vehicle.
Does the CD skip on same track number(s) as the known-good vehicle? YES-Operation is normal at this time.
NO-Go to step 6.
6. Insert the diagnostic skip test CD (T/N: 07 AAZ-SDBA200) (ABEX TCD 725B) play tracks 7-11 and tracks 13-15 and note the track number(s) where the CD starts skipping. Do the same test on a known-good vehicle.
Does the CD skip on same track number(s) as known-good vehicle? YES-Operation is normal.
NO-
- With navigation: Replace navigation unit.
- Without navigation: Replace audio unit.
Poor or no sound with audio disc changer
1. Go into the Diagnostic Menu and use the "Navi System Link" test (see page 23-122) to check the audio disc changer.
Is "CD-C" icon green? YES-Go to step 2.
NO-Go to step 5.
2. Disconnect navigation unit connector E (14P), audio disc changer 13P connector, and XM receiver connector A (14P) (if equipped).
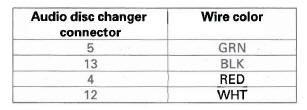
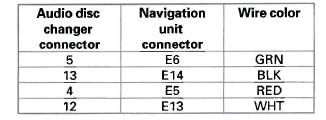
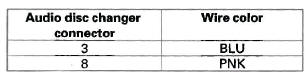
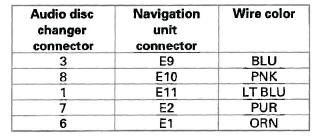
3. Check for continuity between audio disc changer 13P connector and body ground according to the table. Then check for continuity between the same terminals' listed in the table and navigation unit connector E (14P) No.4 terminal. (the harness shield).
Is there continuity? YES-Replace the appropriate shielded harness.
NO-Go to step 4.
4. Check for continuity between audio disc changer 13P connector and navigation unit connector E (14P) according to the table.
Is there continuity? YES-Substitute a known-good audio disc changer, then reconnect the all connectors and recheck. If the symptom/indication goes away, replace the original audio disc changer. If the symptom/ indication is still present, disconnect the XM receiver (if equipped). If the symptom/indication goes away, replace the XM receiver. If the symptom/indication is still present, replace the navigation unit.
NO-Repair open in the wire between the navigation unit and the audio disc changer.
5. Disconnect navigation unit connector E (14P), audio disc changer 13P connector, and XM receiver connector A (14P) (if equipped).
6. Check for continuity between audio disc changer 13P connector and body ground according to the table. Then check for continuity between the same terminals listed in the table and navigation unit connector E (14P) No.3 terminal (the harness shield).
Is there continuity? YES-Replace the appropriate shielded harness.
NO-Go to step 7.
7. Check for continuity between audio disc changer 13P connector and navigation unit connector E (14P) according to the table.
Is there continuity? YES-Substitute a known-good audio disc changer, then reconnect the all connectors and recheck. If the symptom/indication goes away, replace the original audio disc changer. If the symptom/ indication is still present, disconnect the XM receiver (if equipped). If the symptom/indication goes away, replace the XM receiver. If the symptom/indication is still present, replace the navigation unit.
NO-Repair open in the wire between the navigation unit and the audio disc changer.
PC card will not play/card icon on audio screen cannot be selected (with navigation)
- The card may not be fully inserted into the slot. Eject
the card, and inspect for warping or damage to the
edge connector. Never use excessive force to insert a
card. This can result in damage to the pins in the rear
of the slot.
The customer's card may contain audio files that are not recognized by the system. Only MP3 and WMA music files are played.
- The flash card type may not be accepted by the system. Only compact flash and ATA cards have been tested.
- The card's PCMCIA adaptor may be preventing a known-good card from playing. New PCMCIA adaptors are constantly being released, and have not been tested.
- The card's capacity may exceed 2 GB. Only cards with capacities of up to 2 GB (2000 MB) have been tested.
- There may not be any files on the card. If the card has "write protection," make sure it is turned off before putting files on the card.
- Although flash memory chips are reliable,
occasionally they develop bad sectors or other
formatting errors that prevents them from playing.
The customer should reformat the card using the FAT or FAT32 format.
- The card may have been damaged by heat. Suggest that the customer remove their card when exiting the vehicle.
- The customer may have formatted the card using the format "NTFS". Only the FAT and FAT32 formats are accepted by the system.
- Hard disc drive (HDD) cards may not work properly in the system and can overheat and quit functioning, particularly in a hot vehicle. They are not recommended.
- The filing structure of the card may exceed the specification of 8 folder levels deep, 99 folders maximum, and 999 total tracks maximum. If any of these limitations is exceeded, the system may not properly display or play the tracks.
NOTE: A delay when first inserting a card is normal.
The system is reading the "File Tag" information for Album names, Artist, and Song titles and there is no "hour glass." The delay length depends on the number of tracks, and the complexity of the folder structure. See the audio section glossary for explanation of the terms used above.
Error code: XM NO SIGNAL or XM ANTENNA is displayed
NOTE: Check XM radio reception in an open area. Poor reception/interference can be caused by tall buildings, mountains, or high-voltage power lines.
1. Park vehicle outside with a clear view of the southern horizon.
Does XM radio receive a signal? YES-Reception interference operation is normal at this time.
NO-Go to step 2.
2. Check XM antenna connector B (2P) at the XM receiver.
Is XM antenna connector B connected? YES-Go to step 3.
NO-Reconnect XM connector B, and recheck the XM radio operation. If signals are restored, operation is normal. If signals are not restored, go to step 3.
3. Turn the ignition switch to accessory (I).
4. Check the voltage between XM receiver connector A (14P) No.1 terminal and body ground.
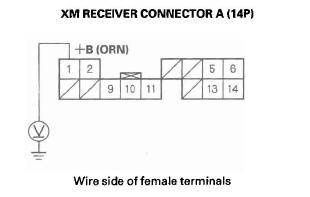
Is there battery voltage? YES-Go to step 5.
NO-Check the No. 23 (10 A) fuse (and the No. 17 (15 A) fuse, if equipped with navigation) in the under-hood fuse/relay box. If the fuse(s) are OK, and the audio system works normally in all other ways, repair open in the wire between the navigation unit (with navigation) or audio unit (without navigation) and XM receiver connector A (14P) No.1 terminal.
5. Measure the voltage between XM receiver connector A (14P) No. 11 terminal and body ground.
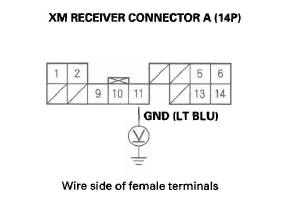
Is there less than 0.1 V? YES-Go to step 6.
NO-Repair open in the wire between XM receiver connector A (14P) No. 11 terminal and body ground (G504).
6. Substitute a known-good XM antenna.
Does the XM radio receiver a signal? YES-Replace XM antenna.
NO-Substitute a known-good XM antenna subharness. If the XM radio receives signals, replace the original XM antenna subharness. If the XM radio does not receive signals, substitute a known-good XM receiver unit. If the XM radio receives signals, replace the XM receiver unit. If the XM radio does not receive signals, replace the XM antenna lead.
READ NEXT:
 XM radio display is blank and no station
information is displayed
XM radio display is blank and no station
information is displayed
1. Disconnect audio disc changer 13P connector.
2. Turn the ignition switch to ACC (I).
3. Operate the XM radio, and check the display.
Is XM information displayed? YES-Replace the audio disc chang
Sound Quality Diagnosis
Special Tools Required
Diagnostics CD 07AAZ-SDBA100
Use the following tests to check sound quality.
NOTE: Before beginning the following tests, write down
the customer's bass, treble, fader and balan
Audio Unit Removal/Installation
Without navigation
SRS components are located in this area. Review the
SRS component location.
Also review the precautions and procedures in the SRS section before doing repairs or
service.
NOTE:
P
SEE MORE:
Disconnecting an iPod
You can disconnect the iPod at any
time when you see ‘‘OK to
disconnect’’ message* in the iPod
display. Always make sure you see
‘‘OK to disconnect’’ message in the
iPod display before you disconnect it.
Make sure to follow the iPod’s
instructions on how to disconnect
Upper Arm Replacement
1. Raise the rear of the vehicle, and support it with safety stands in the
proper locations.
2. Remove the rear wheel.
3. Place a floor jack under the trailing arm, and
support the suspension.
4. Remove the wheel sensor harness bracket (A) from
the upper arm (B).
5. Remove the flange bolts (A),
