Honda CR-V: XM radio display is blank and no station information is displayed
1. Disconnect audio disc changer 13P connector.
2. Turn the ignition switch to ACC (I).
3. Operate the XM radio, and check the display.
Is XM information displayed? YES-Replace the audio disc changer.
NO-Go to step 4.
4. Check the No. 34 (7.5 A) fuse in the under-dash fuse/relay box and the No. 23 (10 A) fuse (and the No. 17 (15 A) fuse, with navigation) in the under-hood fuse/relay box.
Are the fuse OK? YES-Go to step 5.
NO-Replace the fuse.
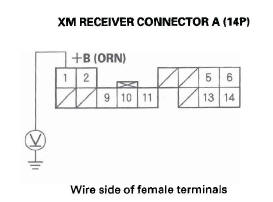
5. Measure the voltage between XM receiver connector A (14P) No.1 terminal and body ground.
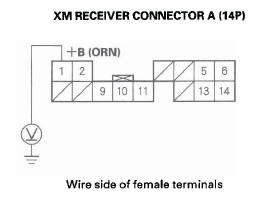
Is there battery voltage? YES-Go to step 6.
NO-Repair open in the wire between fuse No. 17 (15 A) under-hood fuse/relay box and XM receiver connector A (14P) No.1 terminal.
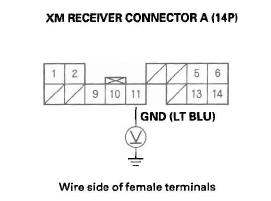
6. Check the voltage between XM receiver connector A (14P) No. 11 terminal and body ground.
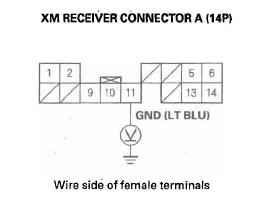
Is there less than 0.2 V? YES-Go to step 7.
NO-Repair open or high resistance in the wire between the XM receiver connector A (14P) No. 11 terminal and navigation unit connector E (14P) No. 11 terminal (with navigation) or audio unit connector E (14P) No. 11 terminal (without navigation) and navigation unit connector A (17P) terminal NO.9 and G504 (with navigation) or audio unit connector A (17P) terminal No.9 and G504 (without navigation).
7. Turn the ignition switch OFF.
8. Measure the voltage between navigation unit connector E (14P) No.2 terminal (with navigation) or audio unit connector E (14P) No.2 terminal and body ground.
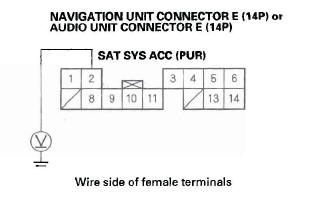
Is there 10 V or more? YES-Go to step 9.
NO-Substitute a known-good XM receiver and recheck. If there is now 10 V or more are present, replace the original XM receiver.
9. Turn the ignition switch ON (II).
10. Measure the voltage between the navigation unit connector E (14P) No.2 terminal (with navigation) or audio unit connector E (14P) No.2 terminal (without navigation) and body ground.
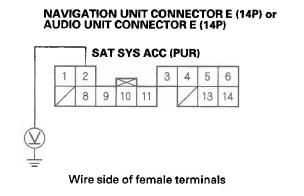
Is there less than 0.5 V? YES-Go to step 11 NO-Substitute a known-good navigation unit (with navigation) or audio unit (without navigation) and recheck. If there is now 0.5 V or less, replace the original navigation unit (with navigation) or audio unit (without navigation).
11. Turn the ignition switch OFF.
12. Disconnect navigation unit connector E (14P) (with navigation) or audio unit connector E (14P) (without navigation) and XM receiver connector A (14P).
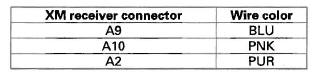
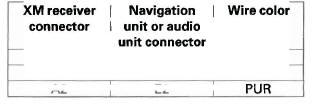
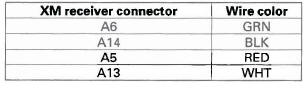
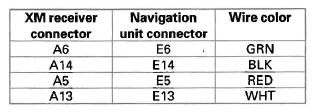
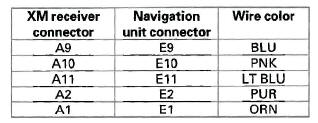
13. Check for continuity between XM receiver connector A (14P) and body ground according to the table. Then check for continuity between the same terminals listed in the table and navigation unit connector E (14P) No.3 terminal (with navigation) or audio unit connector E (14P) No.3 terminal (without navigation) (the harness shield).
Is there continuity? YES-Repair a short in the wire between the navigation unit (with navigation) or audio unit (without navigation) and the XM receiver, or replace the appropriate shielded harness.
NO-Go to step 14.
14. Check for continuity between XM receiver connector A (14P) and navigation unit connector E (14P) (with navigation) or audio unit connector E (14P) (without navigation) according to the table.
Is there continuity?
YES-Substitute a known-good XM receiver, then reconnect all connector and recheck. If the symptom/indication goes away, replace the original XM receiver. If symptom/indication is still present, replace the navigation unit (see page 23-140) (with navigation) or audio unit (without navigation). If the symptom/ indication is still present, replace the audio disc changer.
NO-Replace the affected shield harness between navigation unit (with navigation) or audio unit (without navigation) and XM receiver.
XM radio preset memory is lost
NOTE: If you can only tune to channels 000, 001,174, and 247, make sure the audio unit is set to the channel mode (see owner's manual). If it is set to channel mode, call XM satellite radio customer support, and check the account activation status.
1. Set each of the XM radio channel preset buttons.
Do each of the XM radio channel preset buttons set properly? YES-Go to step 2.
NO-Go to step 4.
2. Turn the ignition switch OFF for 1 minute, then turn it back to ON (II).
3. Test all of the XM radio channel preset buttons for proper recall operation.
Do the preset buttons recall the set radio stations? YES-System is normal at this time. Check the connections at the navigation unit or audio unit.
NO-Go to step 4.
4. Turn the ignition switch OFF.
5. Measure the voltage between XM receiver connector A (14P) No.1 terminal and body ground.
Is there battery voltage? YES-Go to step 6.
NO-Repair open in the wire between the under-dash fuse/relay box and XM receiver connector A (14P) No.1 terminal.
6. Turn the ignition switch ON (II).
7. Measure the voltage between XM receiver connector A (14P) No. 11 terminal and body ground.
Is there less than 0.2 V? YES-Replace the XM receiver.
NO-Repair open in the wire between XM receiver connector A (14P) No. 11 terminal and body ground (G504).
Poor or no sound with XM radio (navigation unit can display XM channels) (with navigation)
1. Disconnect the audio disc changer.
2. Turn the ignition switch ON (II).
3. Check the XM radio sound quality.
Is the symptom still present? YES-Go to step 4.
NO-Replace the audio disc changer.
4. Go into the Diagnostic Menu, and use the "Navi System Link" test (see page 23-122) to check the audio disc changer.
Is "XM" icon green? YES-Go to step 5.
NO-Go to step 8.
5. Disconnect navigation unit connector E (14P) and XM receiver connector A (14P).
6. Check for continuity between XM receiver connector A (14P) and body ground according to the table. Then check for continuity between the same terminals listed in the table and navigation unit connector E (14P) No.4 terminal (the harness shield).
Is there continuity? YES-There is a short in the wire between the navigation unit and the XM receiver. Replace the appropriate shielded harness.
NO-Go to step 7.
7. Check for continuity between XM receiver connector A (14P) and navigation unit connector E (14P) according to the table.
Is there continuity? YES-Substitute a known-good XM receiver, then reconnect the all connectors and recheck. If the symptom/indication goes away, replace the original XM receiver. If the symptom/indication is still present, replace the navigation unit.
NO-There is an open in the wire between the navigation unit and the XM receiver. Replace the appropriate shielded harness.
8. Check for continuity between XM receiver connector A (14P) and body ground according to the table. Then check for continuity between the same terminals listed in the table and navigation unit connector E (14P) No.3 terminal (the harness shield).

Is there continuity? YES-There is a short in the wire between the navigation unit and the XM receiver. Replace the appropriate shielded harness.
NO-Go to step 9.
9. Check for continuity between XM receiver connector A (14P) and navigation unit connector E (14P) according to the table.
Is there continuity? YES-Substitute a known-good XM receiver, then reconnect the all connectors and recheck. If the symptom/indication goes away, replace the original XM receiver. If the symptom/indication is still present, replace the navigation unit.
NO-If there is an open in the BLU or PNK wire, replace the appropriate shielded harness. For the remaining wires, repair open in the wire between the navigation unit and the XM receiver.
READ NEXT:
 Sound Quality Diagnosis
Special Tools Required
Diagnostics CD 07AAZ-SDBA100
Use the following tests to check sound quality.
NOTE: Before beginning the following tests, write down
the customer's bass, treble, fader and balan
Audio Unit Removal/Installation
Without navigation
SRS components are located in this area. Review the
SRS component location.
Also review the precautions and procedures in the SRS section before doing repairs or
service.
NOTE:
P
Navigation System
Component Location Index
GPS ANTENNA
Removal/Installation
NAVIGATION
MICROPHONE
(Inside the map light)
Replacement
NAVIGATION UNIT
Removal/Installation
REARVIEW CAMERA
Re
SEE MORE:
Headlight Adjustment
CAUTION
Headlights become very hot during use; do not
touch them or any attaching hardware immediately
after they have been turned off.
Before adjusting the headlights:
Park the vehicle on a level surface.
Make sure the tire pressures are correct.
The driver or someone who weighs the same should
DTC 11, 13, 15, 17: Wheel Sensor (Open/Short
to Body Ground/Short to Power)
1. Turn the ignition switch ON (II).
2. Check for DTCs with the HDS.
Is DTC 87 indicated with DTC 11,13,15, and/or 17
at the same time?
YES-Go to step 9.
NO-Go to step 3.
3. Clear the DTC with the HDS.
4. Turn the ignition switch OFF, then turn it ON (II)
again.
5. Check for DTCs with the HDS.
