Honda CR-V: Under-hood/dash Fuse/Relay Box
Under-hood Fuse/Relay Box
Removal and Installation
Removal
1. Make sure you have the anti-theft codes for the audio and navigation system. If equipped with XM radio, write down the XM radio presets.
2. Make sure the ignition switch is OFF.
3. Disconnect the negative battery cable, then disconnect the positive cable, and wait at least 3 minutes.
4. Remove the screws (A) for the alternator and battery cable terminals from the under-hood fuse/ relay box.
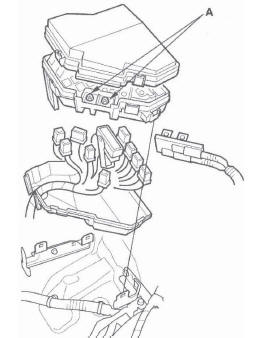
5. Remove the bottom cover from the under-hood fuse/relay box.
6. Disconnect the connectors from the under-hood fuse/relay box.
7. Carefully remove the relays by prying under the base of the relay.
NOTE: Do not use pliers. Pliers will damage the relays, which could cause the engine to stall or not start.
Installation
1. Install the relays and connect the connectors to the under-hood fuse/relay box, then install the under-hood fuse/relay box in the reverse order of removal.
2. Install the removed parts in the reverse order of removal.
3. Connect the positive cable to the battery, then connect the negative cable to the battery.
4. Enter the audio and navigation system anti-theft codes, and set the clock. If equipped with XM radio, enter the XM radio presets.
5. Confirm that all systems work properly.
Under-dash Fuse/Relay Box
Removal and Installation
SRS components are located in this area. Review the SRS component locations and precautions and procedures before doing repairs or servicing.
Removal
1. Make sure you have anti-theft codes for the audio and navigation system. If equipped with XM radio, write down the XM radio presets.
2. Make sure the ignition switch is OFF.
3. Disconnect the negative battery cable, then disconnect the positive cable, and wait at least 3 minutes.
4. Remove the driver's dashboard lower cover.
5. Disconnect the connectors from the fuse side of the under-dash fuse/relay box (A).
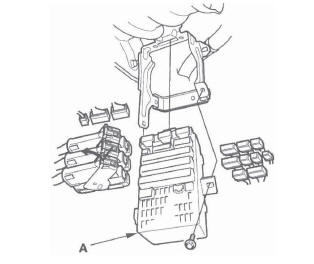
6. Remove the mounting bolt, and pull the fuse/relay box away from the body.
7. Disconnect the connectors from the back side of the under-dash fuse/relay box, then remove the under-dash fuse/relay box.
8. Carefully remove the relays by prying under the base of the relay.
NOTE: Do not use pliers. Pliers will damage the relays, which could cause the engine to stall or not start.
Installation
1. Install the relays and connect the connectors to the under-dash fuse/relay box, then install the under-dash fuse/relay box in the reverse order of removal.
2. Install the removed parts in the reverse order of removal.
3. Connect the positive cable to the battery, then connect the negative cable to the battery.
4. Register the immobilizer system with the HDS.
NOTE: The imoes unit is built into the MICU which is part of the under-dash fuse/relay box. Because of this construction, the imoes must be registered, or the vehicle will not start.
5. Enter the audio and navigation system anti-theft codes, and set the clock. If equipped with XM radio, enter the XM radio presets.
6. Confirm that all systems work properly.
READ NEXT:
 Battery
WARNING
A battery can explode if you do not follow the
proper procedure, causing serious injury to anyone
nearby. Follow all procedures carefully and keep
sparks and open flames away from the battery.
Multiplex Integrated Control System
Component Location Index
GAUGE CONTROL MODULE
Input Test
Replacement
IMMOBILIZER-KEYLESS CONTROL UNIT
(Built in receiver)
MICU (Built into the under-dash fuse/relay box)
Input Test
R
System Description
MICU Control Functions Index
The MICU (built into the under-dash fuse/relay box) is one of the B-CAN
components. The MICU controls many
systems related to the body controller area network, and also w
SEE MORE:
Ceiling Light
The ceiling light has a three-position
switch: ON, Door Activated, and
OFF. In the Door Activated (center)
position, the light comes on when
you:
Open any door.
Unlock the doors and the tailgate
with the key or remote transmitter.
After all doors and the tailgate are
closed tightl
Rear Differential
Special Tools
Holder Handle
Oil Seal Driver
Attachment, 78 x 80 mm
Attachment, 52 x 55 mm
Companion Flange Holder
Driver
Component Location Index
REAR DIFFERENTIAL MOUNT
Replacement
REAR DIFFERENTIAL ASSEMBLY
Removal
Disassembly
Reassembly
Installation
REAR DIFFERENT
