Honda CR-V: Battery
WARNING
A battery can explode if you do not follow the proper procedure, causing serious injury to anyone nearby. Follow all procedures carefully and keep sparks and open flames away from the battery.
Use an ED-18 Battery Tester, and follow the manufacturer's procedures. If you don't have one of these computerized testers, follow this conventional test procedure:
1. Be sure the temperature of the electrolyte is between 70 ºF (21 ºC) and 100 ºF (38 ºC).
2. Inspect the battery case for cracks or leaks.
- If the case is damaged, replace the battery.
- If the case looks OK, go to step 3.
3. Check the test indicator window.
- If the test indicator window indicates the battery is charged, go to step 4.
- If the test indicator window indicates a low charge, go to step 7.
4. Apply a 300 amp load for 15 seconds to remove the surface charge.
5. Wait 15 seconds, then apply-a test load of 280 amps for 15 seconds.
6. Record battery voltage.
- If voltage is above 9.6 V, the battery is OK.
- If voltage is below 9.6 V, go to step 7.
7. Charge the battery on High (40 amps) until the test indicator window shows the battery is charged, plus an additional 30 minutes. If the battery charge is very low, it may be necessary to bypass the charger's polarity protection circuitry.
- If the test indicator window indicates the battery is charged within three hours, repeat steps 4 through 6. If the battery is still below 9.6 V, replace the battery.
- If the test indicator window indicates the battery is not charged within three hours, replace the battery.
Relays
Power Relay Test
Use this chart to identify the type of relay, then do the test listed for it.
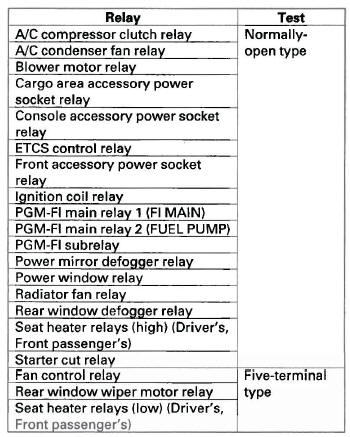
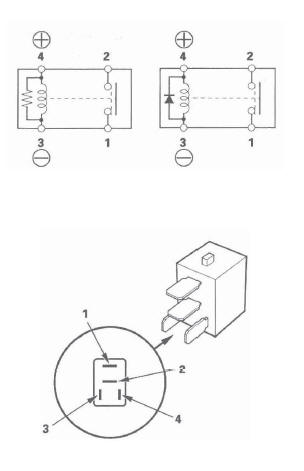
Normally-open type
Check for continuity between the terminals.
- There should be continuity between the No.1 and No.2 terminals when battery positive terminal is connected to the No.4 terminal, and battery negative terminal is connected to the No.3 terminal.
- There should be no continuity between the No.1 and No.2 terminals when power is disconnected.
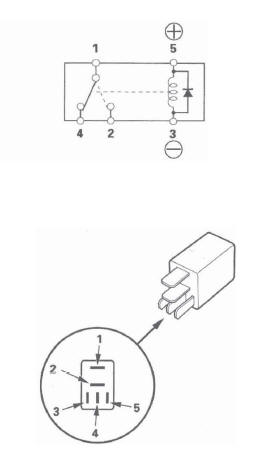
Five-terminal type B
Check for continuity between the terminals.
- There should be continuity between the No.1 and No.2 terminals when battery positive terminal is connected to the No.5 terminal, and battery negative terminal is connected to the No.3 terminal.
- There should be continuity between the No.1 and No.4 terminals when power is disconnected.
Ignition Switch
Test
SRS components are located in this area. Review the SRS component locations and precautions and procedures before performing repairs or servicing.
1. Make sure you have anti-theft codes for the audio and navigation system. If equipped with XM radio, write down the XM radio presets.
2. Turn the ignition switch OFF, and disconnect the negative battery cable.
3. Remove the driver's dashboard lower cover and the steering column covers.
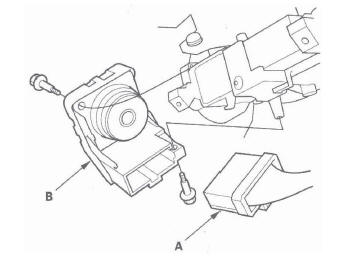
4. Disconnect the 7P connector (A) from the ignition switch (B).
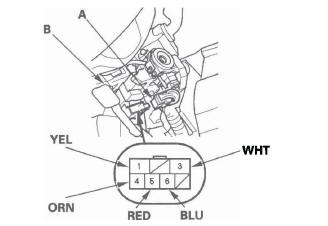
5. Check for continuity between the terminals in each switch position according to the table.
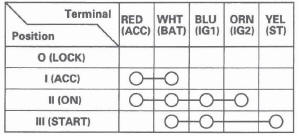
6. If the continuity checks do not agree with the table, replace the ignition switch.
7. After reconnecting the battery, enter the audio and navigation system anti-theft codes, and set the clock. If equipped with XM radio, enter the XM radio presets.
Replacement
SRS components are located in this area. Review the SRS component locations and precautions and procedures before performing repairs or servicing.
1. Make sure you have anti-theft codes for the audio and navigation system. If equipped with XM radio, write down the XM radio presets.
2. Turn the ignition switch OFF, and disconnect the negative battery cable.
3. Remove the driver's dashboard lower cover and the steering column covers.
4. Disconnect the 7P connector (A) from the ignition switch (B).
5. Remove the two screws and the ignition switch.
6. Install the ignition switch in the reverse order of removal.
7. After reconnecting the battery, enter the audio and navigation system anti-theft codes, and set the clock. If equipped with XM radio, enter the XM radio presets.
READ NEXT:
 Multiplex Integrated Control System
Component Location Index
GAUGE CONTROL MODULE
Input Test
Replacement
IMMOBILIZER-KEYLESS CONTROL UNIT
(Built in receiver)
MICU (Built into the under-dash fuse/relay box)
Input Test
R
System Description
MICU Control Functions Index
The MICU (built into the under-dash fuse/relay box) is one of the B-CAN
components. The MICU controls many
systems related to the body controller area network, and also w
Troubleshooting
Troubleshooting - B-CAN System
Diagnosis Test Mode A
Check the PCM for DTCs, and troubleshoot PCM or F-CAN loss of communication errors
first, then do this diagnosis if the symptom is related to
the B
SEE MORE:
DTC P0335: CKP Sensor No Signal
NOTE: Before you troubleshoot, record all freeze data and any on-board
snapshot, and review the general troubleshooting information.
1. Turn the ignition switch ON (II).
2. Clear the DTC with the HDS.
3. Start the engine.
4. Check for Temporary DTCs or DTCs with the HDS.
Is DTC P0335 indicated
Important Maintenance Precautions
If you have the required service
done but do not reset the display, or
reset the display without doing the
service, the system will not show the
correct maintenance intervals. This
can lead to seriousmechanical
problems because you will no longer
have an accurate record of when
maint
