Honda CR-V: DTC P0335: CKP Sensor No Signal
NOTE: Before you troubleshoot, record all freeze data and any on-board snapshot, and review the general troubleshooting information.
1. Turn the ignition switch ON (II).
2. Clear the DTC with the HDS.
3. Start the engine.
4. Check for Temporary DTCs or DTCs with the HDS.
Is DTC P0335 indicated? YES-Go to step 5.
NO-Intermittent failure, the system is OK at this time. Check for poor connections or loose terminals at the CKP sensor and the PCM.
5. Turn the ignition switch OFF.
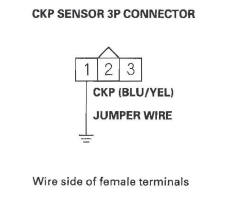
6. Disconnect the CKP sensor 3P connector.
7. Turn the ignition switch ON (II).
8. Measure voltage between CKP sensor 3P connector terminal No.3 and body ground.
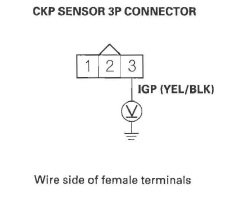
Is there battery voltage? YES-Go to step 9.
NO-Repair open in the wire between the CKP sensor and PGM-FI main relay 1, then go to step 19.
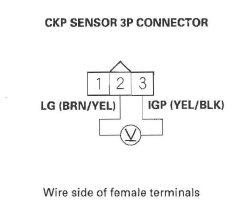
9. Measure voltage between CKP sensor 3P connector terminal No. 1 and body ground.
Is there about 5 V? YES-Go to step 10.
NO-Go to step 11.
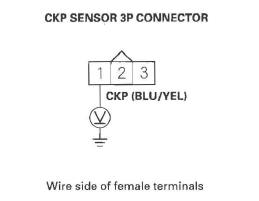
10. Measure voltage between CKP sensor 3P connector terminals No.2 and No. 3.
Is there battery voltage? YES-Go to step 17.
NO-Repair open in the wire between the CKP sensor and G101, then go to step 19.
11. Turn the ignition switch OFF.
12. Jump the SCS line with the HDS.
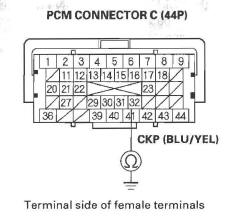
13. Disconnect PCM connector C (44P).
14. Check for continuity between PCM connector terminal C32 and body ground.
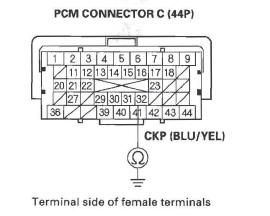
Is there continuity? YES-Repair short in the wire between the PCM (C32) and the CKP sensor, then go to step 19.
NO-Go to step 15.
15. Connect CKP sensor 3P connector terminal No.1 to body ground with a jumper wire.
16. Check for continuity between PCM connector terminal C32 and body ground.
Is there continuity? YES-Go to step 26.
NO-Repair open in the wire between the PCM (C32) and the CKP sensor, then go to step 19.
17. Turn the ignition switch OFF.
18. Replace the CKP sensor.
19. Reconnect all connectors.
20. Turn the ignition switch ON (II).
21. Reset the PCM with the HDS.
22. Clear the CKP pattern with the HDS.
23. Do the PCM idle learn procedure.
24. Do the CKP pattern learn procedure.
25. Check for Temporary DTCs or DTCs with the HDS.
Is DTC P0335 indicated? YES-Check for poor connections or loose terminals at the CKP sensor and the PCM, then go to step 1.
NO-Troubleshooting is complete. If any other Temporary DTCs or DTCs are indicated, go to the indicated DTC's troubleshooting.
26. Reconnect all connectors.
27. Update the PCM if it does not have the latest software, or substitute a known-good PCM.
28. Check for Temporary DTCs or DTCs with the HDS.
Is DTC P0335 indicated? YES-Check for poor connections or loose terminals at the CKP sensor and the PCM. If the PCM was updated, substitute a known-good PCM , then recheck. If the PCM was substituted, go to step 1.
NO-If the PCM was updated, troubleshooting is complete. If the PCM was substituted, replace the original PCM. If any other Temporary DTCs or DTCs are indicated, go to the indicated DTC's troubleshooting.
DTC P0339: CKP Sensor Intermittent Interruption
NOTE: Before you troubleshoot, record all freeze data and any on-board snapshot, and review the general troubleshooting information.
1. Turn the ignition switch ON (II).
2. Clear the DTC with the HDS.
3. Start the engine, and let it idle for 10 seconds.
4. Check the CKP NOISE COUNT in the DATA LIST with the HDS.
Are 0 counts indicated? YES-Go to step 7.
NO-Go to step 5.
5. Test-drive the vehicle for several minutes in the range of these recorded freeze data parameters:
- ENGINE SPEED
- VSS
6. Check the CKP NOISE COUNT in the DATA LIST with the HDS.
Are 0 counts indicated? YES-Go to step 7.
NO-Intermittent failure, the system is OK at this time. Check for poor connections or loose terminals at the CKP sensor and the PCM.
7. Check for poor or loose connections and terminals at these locations:
- CKP sensor
- PCM
- Engine ground
- Body ground
Are the connections and terminals OK? YES-Go to step 8.
NO-Repair the connectors or terminals, then go to step 11.
8. Remove the cam chain case (see step 13), and check for damage on the CKP sensor pulser plate.
Is the pulser plate damaged? YES-Replace the CKP sensor pulser plate, then go to step 11.
NO-Go to step 9.
9. Turn the ignition switch OFF.
10. Replace the CKP sensor.
11. Turn the ignition switch ON (II).
12. Reset the PCM with the HDS.
13. Clear the CKP pattern with the HDS.
14. Do the PCM idle learn procedure.
15. Do the CKP pattern learn procedure.
16. Start the engine, and let it idle for 10 seconds.
17. Check for Temporary DTCs or DTCs with the HDS.
Is DTC P0339 indicated? YES-Check for poor connections or loose terminals at the CKP sensor and the PCM, then go to step 1.
NO-Troubleshooting is complete. If any other Temporary DTCs or DTCs are indicated, go to the indicated DTC's troubleshooting.
DTC P0365: CMP Sensor B No Signal
NOTE: Before you troubleshoot, record all freeze data and any on-board snapshot, and review the general troubleshooting information.
1. Turn the ignition switch ON (II).
2. Clear the DTC with the HDS.
3. Start the engine.
4. Check for Temporary DTCs or DTCs with the HDS.
Is DTC P0365 indicated? YES-Go to step 5.
NO-Intermittent failure, the system is OK at this time. Check for poor connections or loose terminals at CMP sensor B and the PCM.
5. Turn the ignition switch OFF.
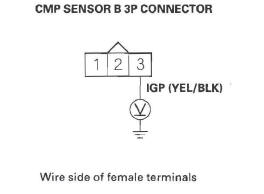
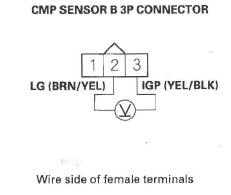
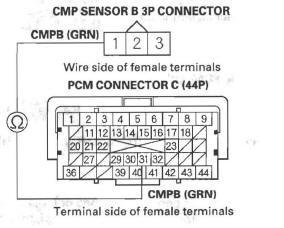
6. Disconnect the CMP sensor B 3P connector.
7. Turn the ignition switch ON (II).
8. Measure voltage between CMP sensor B 3P connector terminal No. 3 and body ground.
Is there battery voltage? YES-Go to step 9.
NO-Repair open in the wire between CMP sensor B and PGM-FI main relay 1, then go to step 18.
9. Measure voltage between CMP sensor B 3P connector terminal No.1 and body ground.
Is there about 5 V? YES-Go to step 10.
NO-Go to step 11.
10. Measure voltage between CMP sensor 3P connector terminals No.2 and No.3.
Is there battery voltage? YES-Go to step 16.
NO-Repair open in the wire between CMP sensor B and G101, then go to step 18.
11. Turn the ignition switch OFF.
12. Jump the SCS line with the HDS.
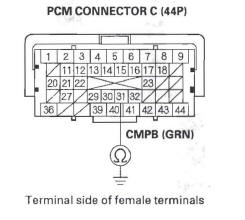
13. Disconnect PCM connector C (44P).
14. Check for continuity between PCM connector terminal C31 and body ground.
Is there continuity? YES-Repair short in the wire between the PCM (C31) and CMP sensor B, then go to step 18.
NO-Go to step 15.
15. Check for continuity between CMP sensor B 3P connector terminal No.1 and PCM connector terminal C31.
Is there continuity? YES-Go to step 23.
NO-Repair open in the wire between the PCM (C31) and CMP sensor B, then go to step 18.
16. Turn the ignition switch OFF.
17. Replace CMP sensor B.
18. Reconnect all connectors.
19. Turn the ignition switch ON (II).
20. Reset the PCM with the HDS.
21. Do the PCM idle learn procedure.
22. Check for Temporary DTCs or DTCs with the HDS.
Is DTC P0365 indicated? YES-Check for poor connections or loose terminals at CMP sensor B and the PCM, then go to step 1.
NO-Troubleshooting is complete. If any other Temporary DTCs or DTCs are indicated, go to the indicated DTC's troubleshooting.
23. Reconnect all connectors.
24. Update the PCM if it does not have the latest software, or substitute a known-good PCM.
25. Check for Temporary DTCs or DTCs with the HDS.
Is DTC P0365 indicated? YES-Check for poor connections or loose terminals at CMP sensor B and the PCM. If the PCM was updated, substitute a known-good PCM, then recheck. If the PCM was substituted, go to step 1.
NO-If the PCM was updated, troubleshooting is complete. If the PCM was substituted, replace the original PCM. If any other Temporary DTCs or DTCs are indicated, go to the indicated DTC's troubleshooting.
DTC P0369: CMP Sensor B Intermittent Interruption
NOTE: Before you troubleshoot, record all freeze data and any on-board snapshot, and review the general troubleshooting information.
1. Turn the ignition switch ON (II).
2. Clear the DTC with the HDS.
3. Start the engine, and let it idle for 10 seconds.
4. Check the CMP NOISE B COUNT in the DATA LIST with the HDS.
Are 0 counts indicated? YES-Go to step 7.
NO-Go to step 5.
5. Test-drive the vehicle for several minutes in the range of these recorded freeze data parameters:
- ENGINE SPEED
- VSS
6. Check the CMP NOISE B COUNT in the DATA LIST with the HDS.
Are 0 counts indicated? YES-Go to step 7.
NO-Intermittent failure, the system is OK at this time. Check for poor connections or loose terminals at CMP sensor B and the PCM.
7. Check for poor or loose connections and terminals at these locations:
- CMP sensor B
- PCM
- Engine ground
- Body ground
Are the connections and terminals OK? YES-Go to step 8.
NO-Repair the connectors or terminals, then go to step 11.
8. Check for damage on the CMP sensor B pulser plate.
Is the pulser plate damaged? YES-Replace the CMP sensor B pulser plate, then go to step 11.
NO-Go to step 9.
9. Turn the ignition switch OFF.
10. Replace CMP sensor B.
11. Turn the ignition switch ON (II).
12. Reset the PCM with the HDS.
13. Do the PCM idle learn procedure.
14. Start the engine, and let it idle for 10 seconds.
15. Check for Temporary DTCs or DTCs with the HDS.
Is DTC P0369 indicated? YES-Check for poor connections or loose terminals at CMP sensor B and the PCM, then go to step 1.
NO-Troubleshooting is complete. If any other Temporary DTCs or DTCs are indicated, go to the indicated DTC's troubleshooting.
READ NEXT:
 DTC P050A: Cold Start Idle Air Control
System Performance Problem
DTC P050A: Cold Start Idle Air Control
System Performance Problem
NOTE: Before you troubleshoot, record all freeze data
and any on-board snapshot, and review the general
troubleshooting information.
1. Turn the ignition switch ON (II).
2. Check for Temporary DTCs o
DTC P1116: ECT Sensor 1 Performance
Problem
NOTE:
Before you troubleshoot, record all freeze data and any on-board
snapshot, and review the general troubleshooting information.
If DTC P0111 is stored at the same time as DTC P1116,
trouble
DTC P1157: A/F Sensor (Sensor 1) AFS Circuit
High Voltage
NOTE: Before you troubleshoot, record all freeze data
and any on-board snapshot, and review the general
troubleshooting information.
1. Turn the ignition switch ON (II).
2. Clear the DTC with the HDS
SEE MORE:
If You Get Stuck
Avoid driving on soft sand, deep mud,
or other surfaces where you could
get stuck. If you do happen to get
stuck because of inclement weather
or other conditions, choose a safe
and appropriate course of action.
You should never use a jack to try
getting unstuck. A jack only works
on f
Fan Controls
Component Location Index
RADIATOR FAN RELAY
A/C CONDENSER FAN RELAY
FAN CONTROL RELAY
A/C CONDENSER FAN ASSEMBLY
RADIATOR FAN ASSEMBLY
ENGINE COOLANT TEMPERATURE
(ECT) SENSOR 1
ENGINE COOLANT TEMPERATURE
(ECT) SENSOR 2
Symptom Troubleshooting Index
Circuit Diagram
Radiato
