Honda CR-V: Audio Unit Removal/Installation
Without navigation
SRS components are located in this area. Review the SRS component location.
Also review the precautions and procedures in the SRS section before doing repairs or service.
NOTE:
- Put on gloves to protect your hands.
- Take care not to scratch the dashboard and related parts.
- Lay a workshop towel under the parts when working on them to protect the face panel from scratches or other damage.
- Do not work in a dusty or dirty place.
- Discharge static electricity from your body before and during the work.
- Do not touch the circuit board(s) with your bare hands.
- Do not work with dirty hands.
- Be careful not to fold the flat plate cable.
1. Make sure you have the anti-theft code for the audio system, then write down the XM radio presets.
2. Remove the center vent and HVAC control unit.
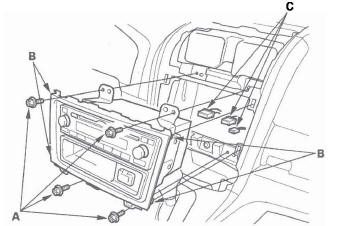
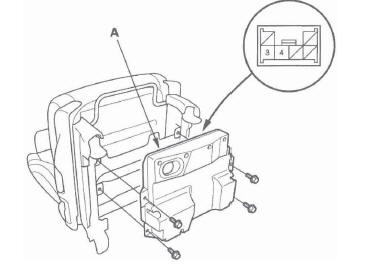
3. Remove the audio unit mounting bolts (A).
LX model
Except LX model
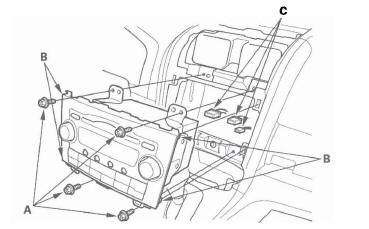
4. Pull the audio unit away from the dashboard to release the locking clips (B), then disconnect the connectors (C).
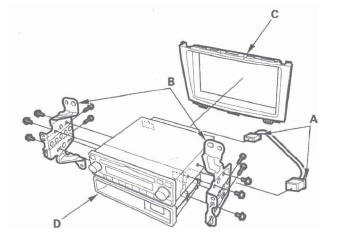
5. Disconnect the connectors (A) (LX model), then remove the bolts, brackets (B), center panel (C) (LX model), and the audio pockets (D) (1 DIN type).
LX model
Except LX model
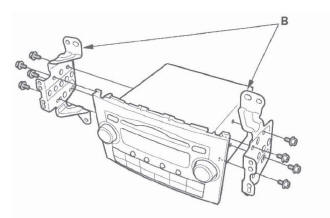
6. Except LX model: Remove the screws and release the clips around the perimeter of the center panel display (A), then remove the audio unit (B) from the center panel display.
7. Install the audio unit in the reverse order of removal. and note these items:
- Make sure all connectors and antenna lead are secure.
- Enter the anti-theft code for the audio system enter the XM radio presets (if equipped), then set the clock.
- When installing a new or remanufactured audio unit, update the anti-theft code information.
Stereo Amplifier Removal/Installation
1. Remove the front console cover.
2. Remove the center lower cover.
3. Disconnect the connectors (A) from the stereo amplifier (B).
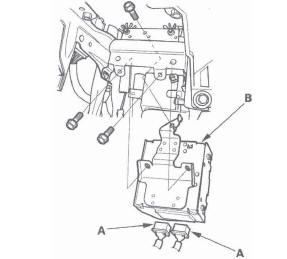
4. Remove the bolts and the stereo amplifier.
5. Install the stereo amplifier in the reverse order of removal.
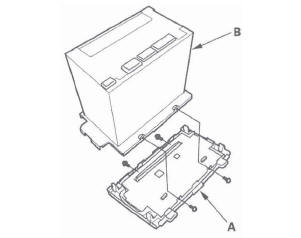
XM Receiver Removal/Installation
1. Remove the right kick panel.
2. Disconnect the connectors (A) from the XM receiver (B).
3. Remove the bolts and the XM receiver.
4. Install the XM receiver in the reverse order of removal.
NOTE: When installing a new XM receiver, call XM lister care to update the customer's account.
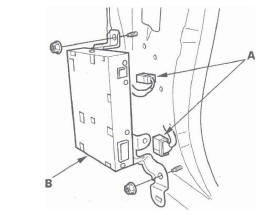
Audio Disc Changer Removal/Installation
1. Remove the center console.
2. Disconnect the connector (A) from the audio disc changer (B).
3. Remove the bolts and the audio disc changer.
4. Install the audio disc changer in the reverse order of removal.
Speaker Test/Replacement
Door Speaker
1. Remove the front door panel.
2. Remove the screw. Then lift the speaker (A) straight up to release the lower clips (B).
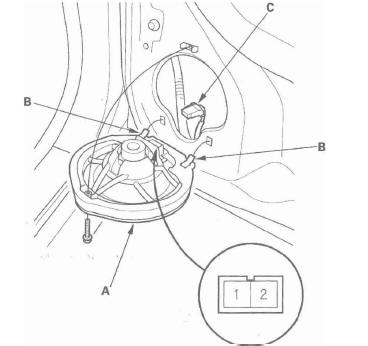
3. Disconnect the 2P connector (C), and remove the speaker.
4. Measure the resistance between the No.1 and No.2 terminals. There should be about 4 Ω.
5. If the resistance is not as specified, replace the door speaker.
Tweeter
1. Carefully pry the tweeter grille (A) out of the dashboard. Be careful not to damage the tweeter grille and the dashboard.
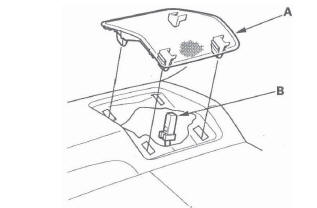
2. Disconnect the 2P connector (B) from the tweeter.
3. Remove the tweeter speaker from the speaker grille.
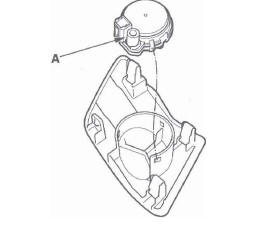
4. Check the capacitor (A) condition. If any malfunction (leakage) is found, replace the tweeter.
5. Measure the resistance between the tweeter (A) terminal No.2 and the outside terminal of the capacitor. There should be about 4 Ω.
6. If the resistance is not as specified, replace the tweeter.
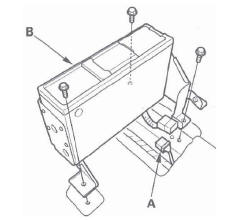
Subwoofer
1. Remove the front passenger's seat.
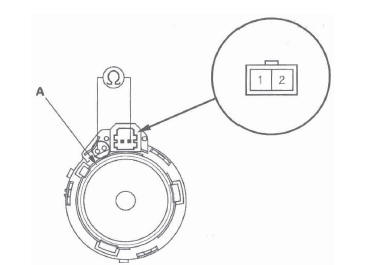
2. Remove the four mounting bolts from the subwoofer (A).
3. Measure the resistance between the No.3 and No.4 terminals. There should be about 2 Ω.
4. If the resistance is not as specified, replace the subwoofer.
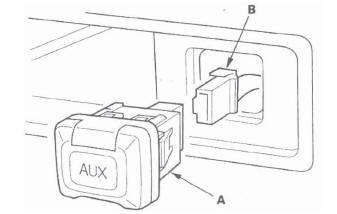
Auxiliary Jack Assembly Replacement
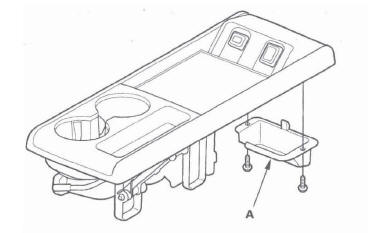
1. EX model: Remove the screws and the center table AUX cover (A).
2. Carefully pull out the auxiliary jack assembly (A), then disconnect the 5P connector (B).
Except EX, LX models
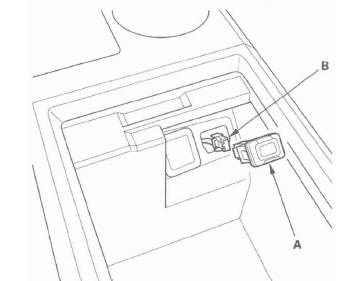
EX model
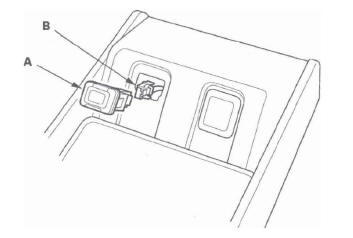
LX model
3. Install the reverse order of removal.
Audio Remote Switch Test
1. Remove the driver's airbag assembly.
2. Remove the 12P connector (A) from the audio remote switch (B).
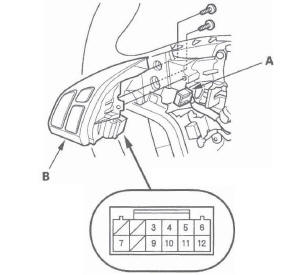
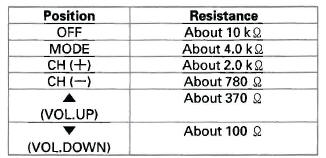
3. Measure the resistance between the No.3 and No.7 terminals in each switch position according to the table.
4. If the resistance is not as specified, replace the audio remote switch.
5. Use a diode tester between the terminals in each switch position according to the table.

6. If the diode test is bad, replace the switch.
Audio Remote Switch Replacement
1. Remove the steering wheel.
2. Remove the audio remote switch.
3. Install the audio remote switch in the reverse order of removal.
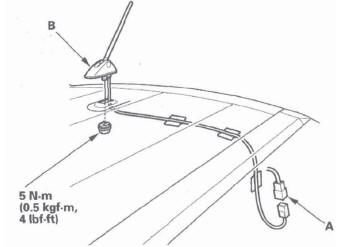
AM/FM/XM Antenna Replacement
NOTE: A loose AM/FM/XM antenna nut will affect radio sound quality.
1. Remove the headliner.
2. Disconnect the lead connectors (A) from the AM/ FM/XM antenna (B).
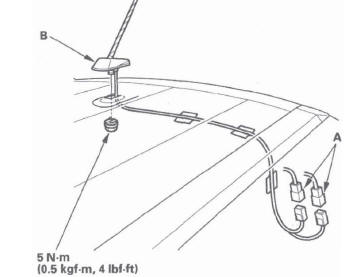
3. Remove the nut from the AM/FM/XM antenna.
4. Install the antenna in the reverse order of removal.
AM/FM Antenna Replacement
NOTE: A loose AM/FM antenna nut will affect radio sound quality.
1. Remove the headliner.
2. Disconnect the lead connector (A) from the AM/FM antenna (B).
3. Remove the nut from the AM/FM antenna.
4. Install the antenna in the reverse order of removal.
READ NEXT:
 Navigation System
Component Location Index
GPS ANTENNA
Removal/Installation
NAVIGATION
MICROPHONE
(Inside the map light)
Replacement
NAVIGATION UNIT
Removal/Installation
REARVIEW CAMERA
Re
General Troubleshooting Information
General Operation
Refer to the navigation system manual, for the
navigation system operating procedures.
Anti-theft Feature
The navigation system has a coded theft protection
circuit. Make sure you ha
System Description
Overview
The navigation system is a highly sophisticated, hybrid locating system.
The navigation unit uses global positioning system (GPS) satellite signals,
internal yaw and vehicle speed inputs, a
SEE MORE:
Cam Chain Removal
NOTE: Keep the cam chain away from magnetic fields.
1. Remove the front wheels.
2. Remove the splash shield (see step 21).
3. Remove the drive belt.
4. Remove the cylinder head cover.
5. Set the No.1 piston at top dead center (TDG). The
punch mark (A) on the variable valve timing control
(VTG) a
Receiver/Dryer Desiccant
Replacement
NOTE: Install the receiver/dryer as quickly as possible
to prevent the system from absorbing moisture from
the air.
1. Remove the A/C condenser.
2. Remove the cap (A) from the bottom of the A/C
condenser. Remove the O-ring (B) and the
desiccant (C).
3. Install the receiver/dryer in the reverse or
