Honda CR-V: No sound is heard from speaker(s) (display is normal) (with navigation)
NOTE:
- Set the fader and balance positions to the center.
- Before doing symptom troubleshooting, do the power switch will not turn ON troubleshooting.
1. Check that the volume button is not set to the MIN level.
Is it at MIN level? YES-Raise the volume level, and recheck the function.
NO-Go to step 2.
2. Check the NAVIGATION VOLUME MUTE COMMAND.
Is the navigation system muting the audio? YES-Cancel the NAVIGATION MUTE MODE by pressing the voice command BACK button, and recheck the function.
NO-Go to step 3.
3. Check to see if there is a specific speaker(s) that has no sound.
Is there a specific speaker( s) with no sound? YES-Go to step 4.
NO-Go to step 7.
4. Turn the ignition switch OFF.
5. Check the speaker(s) with no sound for any damage.
Is there any damage? YES-Substitute a known-good speaker and recheck.
NO-Go to step 6.
6. Remove the speaker(s) with no sound, and disconnect its connector.
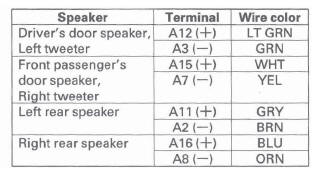
7. Measure the resistance between the No.1 and No.2 terminals of the speaker connector.
Is there about 4 Ω ? YES-Go to step 8.
NO-Faulty speaker(s).
8. Check the speaker 2P connector for a loose or poor connection.
Reconnect the speaker 2P connector and recheck the symptom; is there still no sound? YES-Go to step 9.
NO-Operation is normal at this time.
9. Disconnect stereo amplifier connector A (20P) and connector B (14P).
10. Measure the voltage between stereo amplifier connector A (20P) No. 10 terminal and body ground.
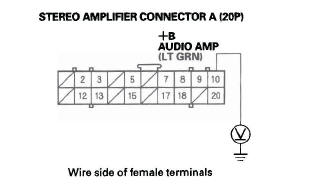
Is there battery voltage? YES-Go to step 11.
NO-Repair open in the wire between fuse No. 17 (15 A) under-hood fuse box and stereo amplifier connector A (20P) No. 10 terminal.
11. Turn the ignition switch ON (II), and push the PWR button on the navigation unit.
12. Measure the voltage between stereo amplifier connector A (20P) No.9 terminal and body ground.
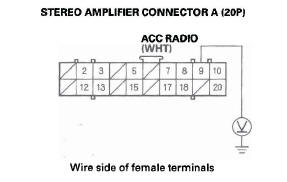
Is there battery voltage? YES-Go to step 13.
NO-Repair open in the wire between fuse No. 34 (7.5 A) under-dash fuse/relay box and stereo amplifier connector A (20P) NO.9 terminal.
13. Measure the voltage between stereo amplifier connector B (14P) No.7 terminal and body ground.
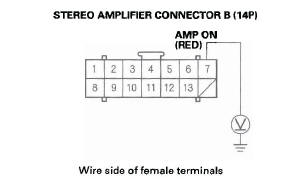
Is there battery voltage? YES-Go to step 14.
NO-Check for and repair open or short in the wire between the stereo amplifier connector B (14P) No.7 terminal and navigation unit connector B (22P) No. 20 terminal. If there is no open or short, substitute a known-good navigation unit, and recheck. If there is now battery voltage, replace the original navigation unit.
14. Turn the ignition switch OFF.
15. Reconnect stereo amplifier connector A (20P).
16. Turn the ignition switch ON (II).
17. Measure the voltage between stereo amplifier connector A (20P) No. 20 terminal and body ground.
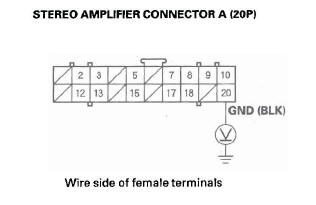
Is there less than 0.1 V? YES-Go to step 18.
NO-Repair open or high resistance in the wire between stereo amplifier connector A (20P) No. 20 terminal and body ground (G505).
18. Turn the ignition switch OFF.
19. Disconnect stereo amplifier connector A (20P).
20. Measure the resistance between the following terminals of stereo amplifier connector A (20P) according to the table.
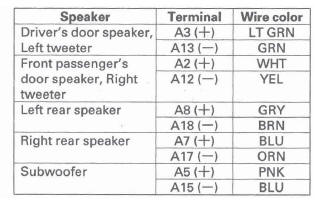
Is there about 4 Ω ? YES-Go to step 21.
NO-If there is 1 M Ω or more, repair open in the wire pairs between the stereo amplifier and speaker.
21. Disconnect the 2P connector(s) to the speaker(s).
22. Check for continuity between stereo amplifier connector A (20P) and body ground according to the table.
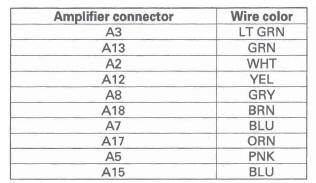
Is there continuity? YES-Repair short to body ground in the wire between the navigation unit and the speaker.
NO-Go to step 23.
23. Disconnect navigation unit connector A (17P) and stereo amplifier connector B (14P).
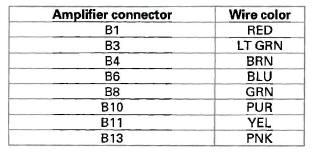
24. Check for continuity between stereo amplifier connector B (14P) and body ground according to the table. Then check for continuity between the same terminals listed in the table and stereo amplifier connector B (14P) No.2, No.5, No.9, No. 12 terminals (the harness shield).
Is there continuity? YES-Replace the appropriate shielded harness.
NO-Go to step 25.
25. Check for continuity between navigation unit connector A and stereo amplifier connector B according to the table.
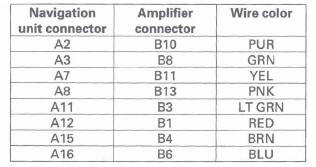
Is there continuity? YES-Substitute a known-good navigation unit and recheck. If the symptom/indication goes away, replace the original navigation unit. If symptom is still present, substitute a known-good stereo amplifier and recheck. If the symptom/indication goes away, replace the original stereo amplifier.
NO-Repair the appropriate shielded harness.
No sound is heard from speaker(s) (display is normal) (without navigation)
NOTE:
- Set the fader and balance positions to the center.
- Before doing symptom troubleshooting, do the power switch will not turn ON troubleshooting.
- Do the self-diagnostic function, speaker check to help isolate the speaker.
1. Check that the volume button is not set to the min level.
Is it at MIN level? YES-Raise the volume level, and recheck the function.
NO-Go to step 2.
2. Check to see if there is a specific speaker(s) that has no sound.
Is there a specific one? YES-Go to step 3.
NO-Go to step 6.
3. Turn the ignition switch OFF.
4. Check the speaker(s) with no sound for any damage.
Is there any damage? YES-Substitute known-good speaker(s) and recheck.
NO-Go to step 5.
5. Remove the speaker(s) with no sound, and disconnect its connector.
6. Measure the resistance between the No.1 and No.2 terminals of the speaker connector.
Is there about 4 Ω ?
YES-Go to step 7.
NO-Faulty speaker(s).
7. Check the speaker 2P connector for a loose or poor connection.
Reconnect the speaker 2P connector and recheck the symptom; is there still no sound? YES-Go to step 8.
NO-Operation is normal at this time.
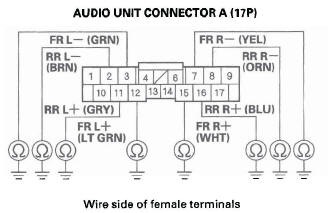
8. Remove the audio unit.
Disconnect audio unit connector A (17P).
9. Measure the resistance between the following terminals of audio unit connector A (17P) according to the table.
Is there about 4 Ω ? YES-Go to step 10.
NO-If there is 1 M Ω or more, repair open in the wire pairs between the audio unit and speaker.
10. Disconnect the speaker 2P connector.
11. Check audio unit connector A (17P) terminals No.2, 3, 7, 8, 11, 12, 15, and 16 individually for continuity to body ground.
Is there continuity? YES-Repair short to body ground in the wire between the audio unit and speaker.
NO-Substitute a known-good audio unit and recheck. If the symptom/indication goes away, replace the original audio unit.
READ NEXT:
 Audio system sound is weak or distorted
(display is normal)
Audio system sound is weak or distorted
(display is normal)
1. Check for sound in each mode (AM, FM, XM, and
disc).
Is there sound from the speakers, and is the sound quality normal in each mode?
YES-Intermittent failure. The system is OK at this time. Check
XM radio display is blank and no station
information is displayed
1. Disconnect audio disc changer 13P connector.
2. Turn the ignition switch to ACC (I).
3. Operate the XM radio, and check the display.
Is XM information displayed? YES-Replace the audio disc chang
Sound Quality Diagnosis
Special Tools Required
Diagnostics CD 07AAZ-SDBA100
Use the following tests to check sound quality.
NOTE: Before beginning the following tests, write down
the customer's bass, treble, fader and balan
SEE MORE:
Radio Theft Protection
Your vehicle’s audio system will
disable itself if it is disconnected
from electrical power for any reason.
To make it work again, you must
enter a specific code using the preset
buttons (icon on vehicle’s with
navigation system). Because there
are hundreds of number
combinations
VSA (Vehicle Stability Assist) System Components
Component Location Index
VSA MODULATOR-CONTROL UNIT
Removal and Installation
UNDER-HOOD FUSE/RELAY BOX
DATA LINK
CONNECTOR (DLC)
STEERING ANGLE SENSOR
Replacement
VSA OFF SWITCH
Test
RIGHT-REAR WHEEL SENSOR
Replacement
HUB BEARING UNIT
(MAGNETIC ENCODER)
Replace
