Honda CR-V: Evaporator Core Replacement
1. Recover the refrigerant with a recovery/recycling/ charging station.
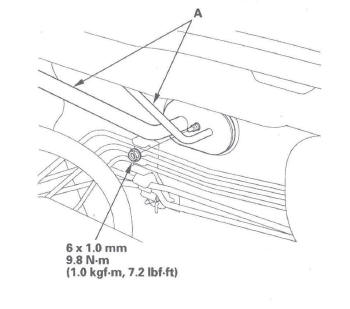
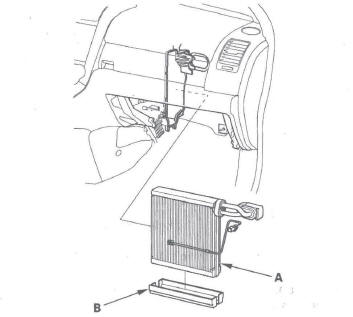
2. Remove the bolt from the A/C line clamp, and remove the receiver line (A) from the clips (B).
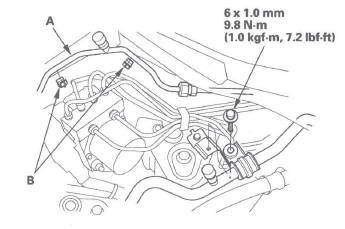
3. Remove the nut, then disconnect the A/C lines (A) from the evaporator core.
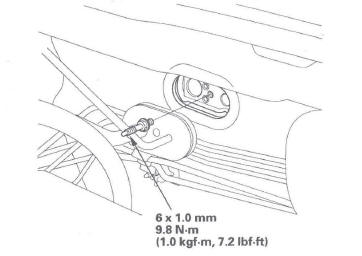
4. Remove the stud bolt.
5. Remove the blower unit.
6. Disconnect the connectors (A) from the evaporator temperature sensor and the power transistor, then remove the connector clip (B). Remove the self-tapping screws, the expansion valve cover (C), and the seal (D).
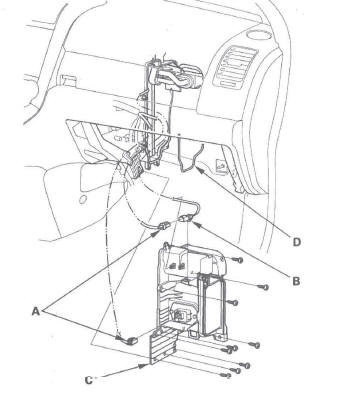
7. Carefully pull out the evaporator core (A) without bending the lines, then remove the plate (B).
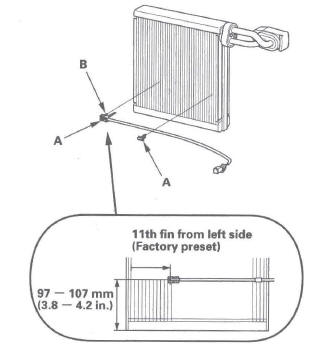
8. Remove the clips (A) and the evaporator temperature sensor (B).
NOTE: At the factory, the evaporator temperature sensor is installed at the 11th fin from the left side.
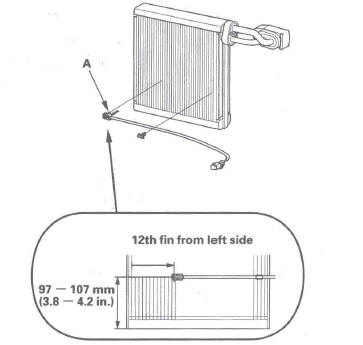
9. When the evaporator temperature sensor (A) is reinstalled, set the evaporator temperature sensor in the 12th fin from the left side.
10. Install the core in the reverse order of removal and note these items:
- If you're installing a new evaporator core, add refrigerant oil (SP-10).
- Replace the O-rings with new ones at each fitting, and apply a thin coat of refrigerant oil before installing them. Be sure to use the correct O-rings for HFC-134a (R-134a) to avoid leakage.
- Immediately after using the oil, reinstall the cap on the container, and seal it to avoid moisture absorption.
- Do not spill the refrigerant oil on the vehicle; it may damage the paint; if the refrigerant oil contacts the paint, wash it off immediately.
- Make sure that there is no air leakage.
- Charge the system.
READ NEXT:
 Heater Unit/Core
Replacement
Heater Unit/Core
Replacement
SRS components are located in this area. Review the
SRS component locations, and the
precautions and procedures before
doing repairs or service.
1. Make sure you have anti-theft codes for the audio
sy
A/C Compressor
Replacement
NOTE: Do not install an A/C compressor into a system
unless you are completely sure that the system is free
of contamination. Installing the A/C compressor into a
contaminated system can result in pre
Receiver/Dryer Desiccant
Replacement
NOTE: Install the receiver/dryer as quickly as possible
to prevent the system from absorbing moisture from
the air.
1. Remove the A/C condenser.
2. Remove the cap (A) from the bottom of the A/C
cond
SEE MORE:
Cylinder Head Installation
1. Install a new coolant separator in the engine block
whenever the engine block is replaced.
2. Clean the cylinder head and block surface.
3. Install the new cylinder head gasket (A) and dowel
pins (B) on the engine block. Always use a new
cylinder head gasket.
Set the crankshaft to top dead cen
Intake Manifold and Exhaust System
Intake Manifold Removal and Installation
Exploded View
Removal
1. Remove the hood support rod, then use it as shown
to prop the hood in the wide-open position.
2. Remove the bulkhead cover.
3. Disconnect the fan motor connectors (A) and hood
switch connector (B), then remove the harness clips
(C)
