Honda CR-V: A/C Compressor Replacement
NOTE: Do not install an A/C compressor into a system unless you are completely sure that the system is free of contamination. Installing the A/C compressor into a contaminated system can result in premature A/C compressor failure.
1. If the A/C compressor is marginally operable, run the engine at idle speed, and let the air conditioning work for a few minutes, then shut the engine off.
2. Recover the refrigerant with a recovery/recycling/ charging station.
3. Remove the drive belt.
4. Remove the front splash shield.
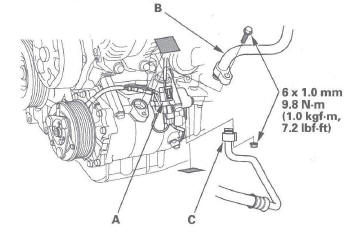
5. Disconnect the A/C compressor clutch connector (A). Remove the bolt and the nut, then disconnect the suction hose (B) and discharge hose (C) from the A/C compressor. Plug or cap the lines immediately after disconnecting them to avoid moisture and dust contamination.
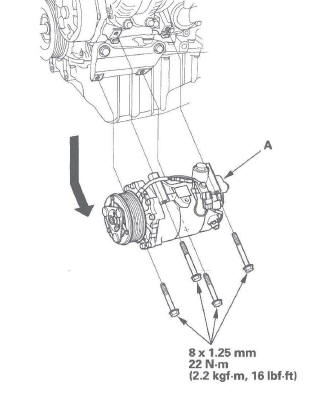
6. Remove the mounting bolts and the A/C compressor (A). Be careful not to damage the radiator fins when removing the A/C compressor.
7. Install the compressor in the reverse order of removal, and note these items:
- Inspect the A/C lines for any signs of contamination.
- Replace the O-rings with new ones at each fitting, and apply a thin coat of refrigerant oil before installing them. Be sure to use the correct O-rings for HFC-134a (R-134a) to avoid leakage.
- Use refrigerant oil (SP-10) for HFC-134a SANDEN spiral type A/C compressor only.
- To avoid contamination, do not return the oil to the container once dispensed, and never mix it with other refrigerant oils.
- Immediately after using the oil, reinstall the cap on the container, and seal it to avoid moisture absorption.
- Do not spill the refrigerant oil on the vehicle; it may damage the paint; if the refrigerant oil contacts the paint, wash it off immediately.
- Charge the system.
A/C Compressor Clutch Check
1. Check the armature plate for discoloration, peeling, or other damage. If there is damage, replace the clutch set.
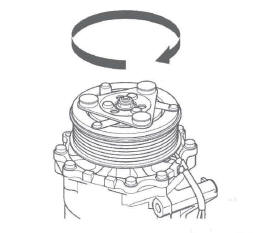
2. Check the rotor pulley bearing play and drag by rotating the rotor pulley by hand. Replace the clutch set with a new one if it is noisy or has excessive play/drag.
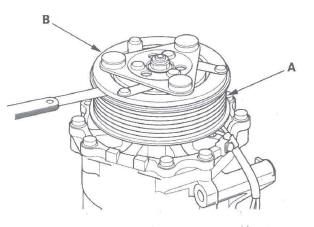
3. Measure the clearance between the rotor pulley (A) and the armature plate (B) all the way around. If the clearance is not within specified limits, remove the armature plate (see page 21-64) and add or remove shims as needed to increase or decrease clearance.
Clearance: 0.35-0.65 mm (0.014-0.026 in.)
NOTE: The shims are available in four thicknesses: 0.1 mm, 0.2 mm, 0.4 mm, and 0.5 mm.
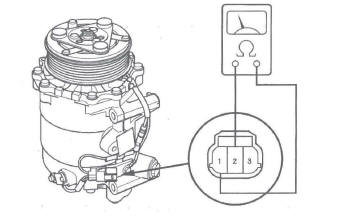
4. Check for continuity between the A/C compressor clutch connector No.1 and No.2. If there is no continuity, replace the thermal protector.
NOTE: The thermal protector will have no continuity above about 252 to 262 ºF (122 to 128 ºC).
When the temperature drops below about 241 to 219 ºF (116 to 104 ºC), the thermal protector will have continuity.
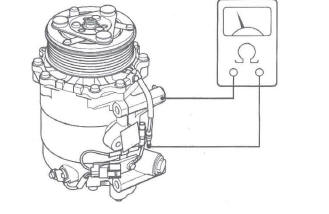
5. Disconnect the field coil connector (A). Check resistance of the field coil. If resistance is not within specifications, replace the field coil.
Field Coil Resistance: 3.15-3.45 Ω 68 ºF (20 C)
A/C Compressor Clutch Overhaul
Special Tools Required
A/C clutch holder, Robinair 10204 or Kent-Moore J37872, or Honda Tool and Equipment KMT-J33939, commercially available
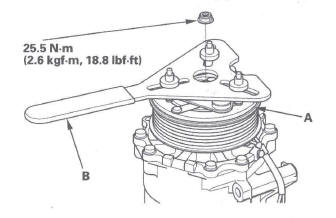
1. Remove the center nut while holding the armature plate (A) with a commercially available A/C clutch holder (B).
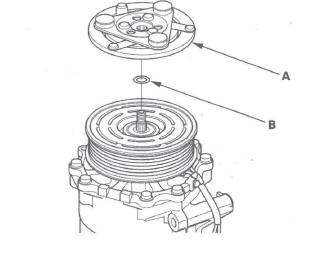
2. Remove the armature plate (A) and shim(s) (B), taking care not to lose the shim(s). If the clutch needs adjustment, increase or decrease the number and thickness of shims as necessary, then reinstall the armature plate, and recheck its clearance.
NOTE: The shims are available in four thicknesses: 0.1 mm, 0.2 mm, 0.4 mm, and 0.5 mm.
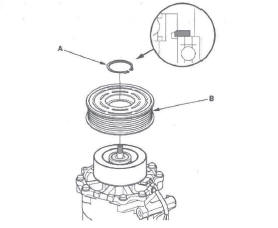
3. If you are replacing the field coil, remove the snap ring (A) with snap ring pliers, then remove the rotor pulley (B). Be careful not to damage the rotor pulley and A/C compressor.
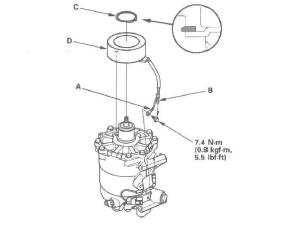
4. Remove the bolt and the field coil ground (A), then disconnect the field coil connector (B). Remove the snap ring (C) with snap ring pliers, then remove the field coil (D). Be careful not to damage the field coil and A/C compressor.
5. Reassemble the clutch in the reverse order of disassembly, and note these items:
- Install the field coil with the wire side facing down, and align the boss on the field coil with the hole in the A/C compressor.
- Clean the rotor pulley and A/C compressor sliding surfaces with contact cleaner or other non-petroleum solvent.
- Install new snap rings, note the installation direction, and make sure they are fully seated in the groove.
- Make sure that the rotor pulley turns smoothly after it's reassembled.
- Route and clamp the wires properly or they can be damaged by the rotor pulley.
A/C Compressor Thermal Protector Replacement
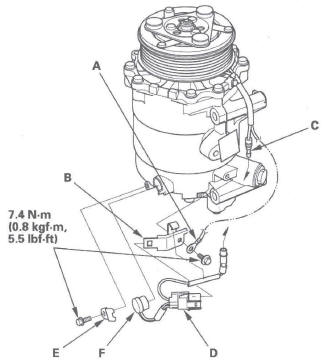
1. Remove the bolt, the field coil ground (A), and the holder (B). Disconnect the field coil connector (C), then remove the connector clip (D). Remove the bolt, the holder (E), and thermal protector (F).
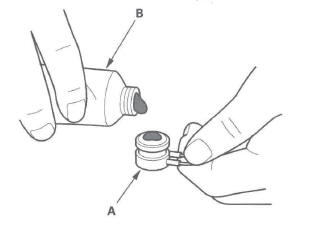
2. Replace the thermal protector (A) with a new one, and apply silicone sealant (B) to the bottom of the thermal protector.
3. Install the thermal protector in the reverse order of removal.
A/C Compressor Relief Valve Replacement
1. Recover the refrigerant with a recovery/recycling/ charging station.
2. Remove the front splash shield.
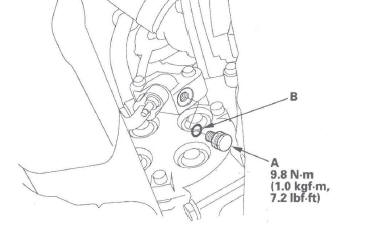
3. Remove the relief valve (A) and the O-ring (B). Plug the opening to keep foreign matter from entering the system and the A/C compressor oil from running out.
4. Clean the mating surfaces.
5. Replace the O-ring with a new one at the relief valve, and apply a thin coat of refrigerant oil before installing it.
6. Remove the plug, and install and tighten the relief valve.
7. Charge the system.
A/C Condenser Replacement
1. Recover the refrigerant with a recovery/recycling/charging station.
2. Remove the front bumper.
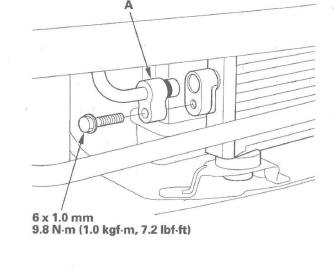
3. Remove the bolts, then disconnect the discharge hose (A) from the A/C condenser.
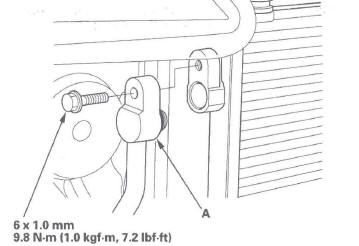
4. Remove the bolt, then disconnect the receiver line (A) from the A/C condenser.
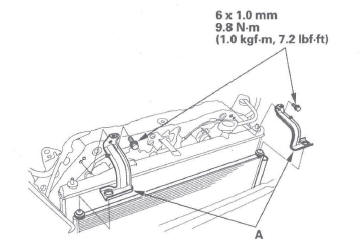
5. Remove the bolts, the harness clip (A), and the radiator upper mount brackets (B).
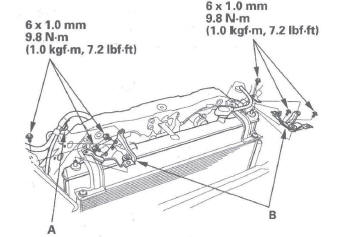
6. Remove the bolts and the A/C condenser upper mount brackets (A).
7. Remove the hood latch.
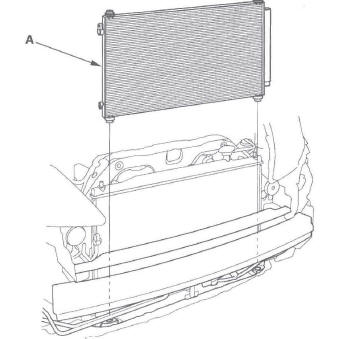
8. Remove the A/C condenser (A) by lifting it up. Be careful not to damage the radiator and A/C condenser fins when removing the A/C condenser.
9. Install the A/C condenser in the reverse order of removal, and note these items:
- If you're installing a new A/C condenser, add refrigerant oil (SP-10).
- Replace the O-rings with new ones at each fitting, and apply a thin coat of refrigerant oil before installing them. Be sure to use the correct O-rings for HFC-134a (R-134a) to avoid leakage.
- Immediately after using the oil, reinstall the cap on the container, and seal it to avoid moisture absorption.
- Do not spill the refrigerant oil on the vehicle; it may damage the paint; if the refrigerant oil contacts the paint, wash it off immediately.
- Charge the system.
- Adjust the hood latch.
READ NEXT:
 Receiver/Dryer Desiccant
Replacement
Receiver/Dryer Desiccant
Replacement
NOTE: Install the receiver/dryer as quickly as possible
to prevent the system from absorbing moisture from
the air.
1. Remove the A/C condenser.
2. Remove the cap (A) from the bottom of the A/C
cond
General Troubleshooting Information
Tips and Precautions
Before Troubleshooting
1. Check applicable fuses in the appropriate fuse/relay
box.
2. Check the battery for damage, state of charge, and
clean and tight connections.
NOTICE
Do
SEE MORE:
Differential Mount Replacement
Exploded View
Differential Installation
1. Install rear differential mount assembly A to the
rear differential assembly (B).
2. Jack up the rear differential.
3. Install the new set rings (A) onto the driveshafts,
then insert the drives hafts into the rear differential.
4. Lift the rear different
Intake Air System
Component Location Index
AIR CLEANER
RESONATOR
THROTTLE BODY
INTAKE AIR BYPASS CONTROL
THERMAL VALVE
Throttle Body Test
Carbon Accumulation Check
NOTE: If the malfunction indicator lamp (MIL) has been
reported on, check for diagnostic trouble codes (DTCs).
1. Connect the H
