Honda CR-V: A/C Condenser Fan High Speed Circuit Troubleshooting
NOTE:
- Do not use this troubleshooting procedure if the
radiator fan and/or A/C compressor is inoperative.
Refer to the symptom troubleshooting index.
- Before doing symptom troubleshooting, check for powertrain DTCs.
1. Check the No.6 (20 A) and No. 15 (7.5 A) fuses in the under-hood fuse/relay box.
Are the fuses OK? YES-Go to step 2.
NO-Replace the fuses, and recheck. If the fuses blow again, check for a short in the No.6 (20 A) and No. 15 (7.5 A) fuses circuit.
2. Remove the A/C condenser fan relay from the under-hood fuse/relay box, and test it.
Is the relay OK? YES-Go to step 3.
NO-Replace the A/C condenser fan relay.
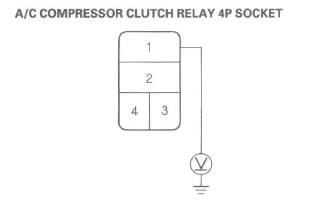
3. Measure the voltage between the A/C condenser fan relay 4P socket terminal No.1 and body ground.
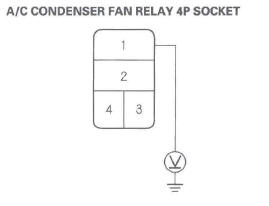
Is there battery voltage? YES-Go to step 4.
NO-Replace the under-hood fuse/relay box.
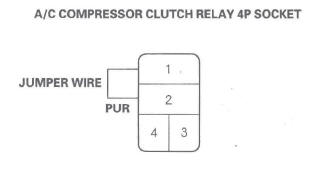
4. Connect the A/C condenser fan relay 4P socket terminals No.1 and No.2 with a jumper wire.
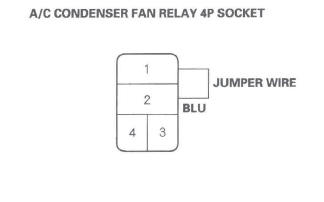
Does the A/C condenser fan run on high? YES-Go to step 5.
NO-Replace the under-hood fuse/relay box.
5. Disconnect the jumper wire.
6. Turn the ignition switch ON (II).
7. Measure the voltage between the A/C condenser fan relay 4P socket terminal No.4 and body ground.

Is there battery voltage? YES-Go to step 8.
NO-Go to step 14.
8. Turn the ignition switch OFF.
9. Reinstall the A/C condenser fan relay.
10. Jump the SCS line with the HDS.
NOTE: This step must be done to protect the powertrain control module (PCM) from damage.
11. Disconnect PCM connector A (44P).
12. Connect the PCM connector A (44P) terminal No.5 to body ground with a jumper wire.
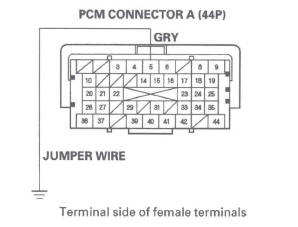
13. Turn the ignition switch ON (II).
Does the A/C condenser fan run on high? YES-Check for loose wires or poor connections at PCM connector A (44P) terminal No.5. If the connections are good, substitute a known-good PCM, and recheck. If the symptom/indication goes away, replace the original PCM.
NO-Repair open in the wire between the A/C condenser fan relay and the PCM.
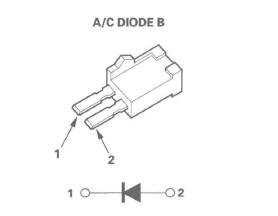
14. Remove A/C diode B from the under-hood fuse/ relay box.
15. Turn the ignition switch ON (II).
16. Measure the voltage between the A/C diode B 2P socket terminal No.2 and body ground.
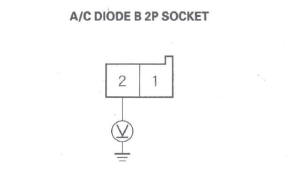
Is there battery voltage? YES-Go to step 17.
NO-Replace the under-hood fuse/relay box.
17. Using the diode setting ( ) on
a DVOM, check
for current flow in both directions between the A/C
diode B terminals No.1 and No.2.
) on
a DVOM, check
for current flow in both directions between the A/C
diode B terminals No.1 and No.2.
Is there current flow in only one direction? YES-Replace the under-hood fuse/relay box.
NO-Replace A/C diode B.
A/C Compressor Clutch Circuit Troubleshooting
NOTE:
- It is normal for the A/C compressor to turn off under certain conditions, such as low idle, high engine coolant temperature, hard acceleration, or high/low pressure.
- Do not use this troubleshooting procedure if the fans are also inoperative with the A/C on. Refer to the symptom troubleshooting index.
- Before doing any symptom troubleshooting, check for powertrain DTCs.
1. Check the No. 20 (7.5 A) fuse in the under-hood fuse/relay box, and the No. 36 (10 A) fuse in the under-dash fuse/relay box.
Are the fuses OK? YES-Go to step 2.
NO-Replace the fuses and recheck. If the fuses blow again, check for a short in the No. 20 (7.5 A) and No. 36 (10 A) fuses circuit.
2. Connect the HDS to the DLC.
3. Start the engine.
4. Turn on the A/C.
5. Check the A/C CLUTCH in the PGM-FI Data List with the HDS.
Is the A/C CLUTCH on? YES-Go to step 7.
NO-Go to step 6.
6. Using the HDS, confirm the following values in the PGM-FI Data List at idle.
Are all the values within specifications? YES-Go to step 7.
NO-Troubleshoot the value that is not within the specifications.
7. Remove the A/C compressor clutch relay from the under-hood fuse/relay box, and test it.
Is the relay OK? YES-Go to step 8.
NO-Replace the A/C compressor clutch relay.
8. Measure the voltage between the A/C compressor clutch relay 4P socket terminal No. 1 and body ground.
Is there battery voltage? YES-Go to step 9.
NO-Replace the under-hood fuse/relay box.
9. Connect the A/C compressor clutch relay 4P socket terminals No.1 and No.2 with a jumper wire.
Does the A/C compressor clutch click? YES-Go to step 10.
NO-Go to step 19.
10. Disconnect the jumper wire.
11. Turn the ignition switch ON (II).
12. Measure the voltage between the A/C compressor clutch relay 4P socket terminal No.3 and body ground.
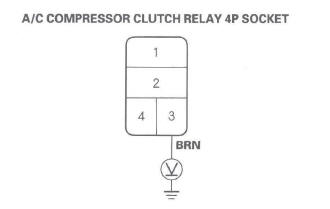
Is there battery voltage? YES-Go to step 13.
NO-Repair open in the wire between the No. 36 (10 A) fuse in the under-dash fuse/relay box and the A/C compressor clutch relay.
13. Turn the ignition switch OFF.
14. Reinstall the A/C compressor clutch relay.
15. Jump the SCS line with the HDS.
NOTE: This step must be done to protect the powertrain control module (PCM) from damage.
16. Disconnect PCM connector A (44P).
17. Connect the PCM connector A (44P) terminal No. 14 to body ground with a jumper wire. '
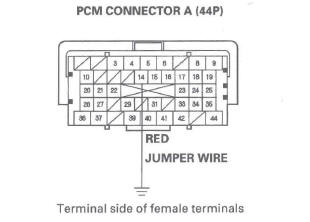
18. Turn the ignition switch ON (II).
Does the A/C compressor click? YES-Check for loose wires or poor connections at PCM connector A (44P). If the connections are good, check the PCM grounds. If the grounds are good, substitute a known-good PCM, and recheck. If the symptom/indication goes away, replace the original PCM.
NO-Repair open in the wire between the A/C compressor clutch relay and the PCM.
19. Disconnect the jumper wire.
20. Disconnect the A/C compressor clutch 3P connector.
21. Check for continuity between the A/C compressor clutch relay 4P socket terminal No.2 and the A/C compressor clutch 3P connector terminal No.3.
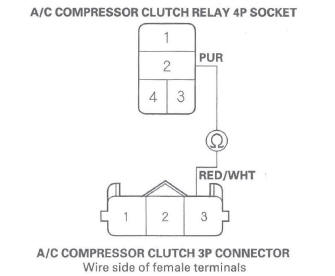
Is there continuity? YES-Check the A/C compressor clutch clearance, and the compressor clutch field coil. Repair as needed.
NO-Repair open in the wire between the A/C compressor clutch relay and the A/C compressor clutch.
READ NEXT:
 A/C Signal Circuit Troubleshooting
NOTE:
Use this troubleshooting procedure if the A/C
compressor, the A/C condenser fan, and radiator fan are inoperative.
Before doing symptom troubleshooting, check for and resolve any
powertrai
Blower Unit
Removal/Installation
1. Remove the glove box.
2. Disconnect the connector (A), then remove the
connector clip (B), the wire harness clips (C), the
bolts, and the glove box frame (D).
3. Cut the plastic cross brace (A) i
Evaporator Core
Replacement
1. Recover the refrigerant with a recovery/recycling/ charging station.
2. Remove the bolt from the A/C line clamp, and
remove the receiver line (A) from the clips (B).
3. Remove the nut, then disco
SEE MORE:
Maintenance
This section explains why it is
important to keep your vehicle well
maintained and how to follow basic
maintenance safety precautions.
This section also includes
instructions on how to read the
maintenance minder messages on
the information display, and
instructions for simple mainten
DTC P1009: VTC Advance Malfunction
NOTE:
Before you troubleshoot, record all freeze data and any on-board
snapshot, and review the general troubleshooting information.
If DTC P0341 is stored at the same time as DTC P1009,
troubleshoot DTC P1009 first, then recheck for DTC
P0341.
1. Turn the ignition switch ON (II).
2. Clear
